1. Información importante de seguridad
Lea atentamente todas las instrucciones antes de instalar y usar el producto. Conserve este manual para futuras consultas.
- Do not use corrosive cleaners or chemicals on the lock finish.
- Ensure all components are installed correctly and securely to prevent malfunction.
- Keep physical keys in a safe location away from the lock.
- Regularly check battery levels and replace batteries as needed to avoid lock-out situations.
- Avoid exposing the lock to extreme temperatures or direct water spray beyond its IP54 rating.
2. Contenido del paquete
Verify that all parts are present before beginning installation. If any parts are missing or damaged, contact customer support.
- Conjunto de teclado exterior
- Montaje interior
- Pestillo de cerrojo
- Placa de impacto
- Placa de montaje
- Door Handle Set (Interior and Exterior)
- Tornillos de montaje
- Llaves físicas (2)
- Manual de usuario
3. Guía de instalación
The Ulecoce U18 lock is designed for easy installation on standard U.S. doors with a screwdriver. No drilling is typically required for compatible doors.
3.1 Preparación de la puerta
Asegúrese de que su puerta cumpla con las siguientes especificaciones:
- Contracorriente: 2-3/8 pulgadas o 2-3/4 pulgadas (60 mm o 70 mm).
- Espesor de la puerta: 1.31 inches to 2.16 inches (35-50mm).
- Diámetro del orificio transversal: 2-1/8 pulgadas (54 mm).

Imagen 3.1: Door measurement guide for backset, door thickness, and cross bore diameter, indicating compatibility for easy installation without drilling.

Imagen 3.2: Compatibility guide illustrating different existing door lock types and their compatibility with the Ulecoce U18 lock. The lock is compatible with standard deadbolt and handle sets, but not with certain integrated or multi-point locking systems.
3.2 Instalación paso a paso
- Instale el pestillo: Insert the deadbolt latch into the door edge. Ensure the "UP" arrow on the latch is pointing upwards. Secure with screws.
- Instalar el conjunto exterior: Feed the cable from the exterior keypad assembly through the cross bore hole. Align the spindle with the latch mechanism.
- Instalar la placa de montaje interior: Secure the interior mounting plate to the exterior assembly using the provided screws. Ensure the cable passes through the plate.
- Conecte el cable: Conecte el cable del conjunto exterior al conjunto interior.
- Instale el conjunto interior: Mount the interior assembly onto the mounting plate, ensuring the thumb turn aligns with the deadbolt mechanism. Secure with screws.
- Instale las baterías: Abra la tapa de la batería en el conjunto interior e inserte 4 baterías alcalinas AA (no incluidas).
- Install the Door Handle Set: Install the interior and exterior door handle components according to the separate instructions for the handle set.
- Pruebe la cerradura: Close the door and test the deadbolt operation using the thumb turn and a physical key.
4. Instrucciones de funcionamiento
The Ulecoce U18 offers multiple convenient unlocking and locking methods.
4.1 Métodos de desbloqueo

Imagen 4.1: Visual representation of the various unlocking methods available for the Ulecoce U18 lock, including keypad entry, one-time codes, anti-peeping function, and traditional physical key access.
- Código del teclado: Enter your 6-digit user code followed by the '#' key. The lock will unlock.
- Contraseña anti-mirones: To enhance security, you can enter random digits before or after your actual code. For example, si tu código es 123456, puedes ingresar 789123456012#. The lock will still recognize the correct sequence within the longer input.
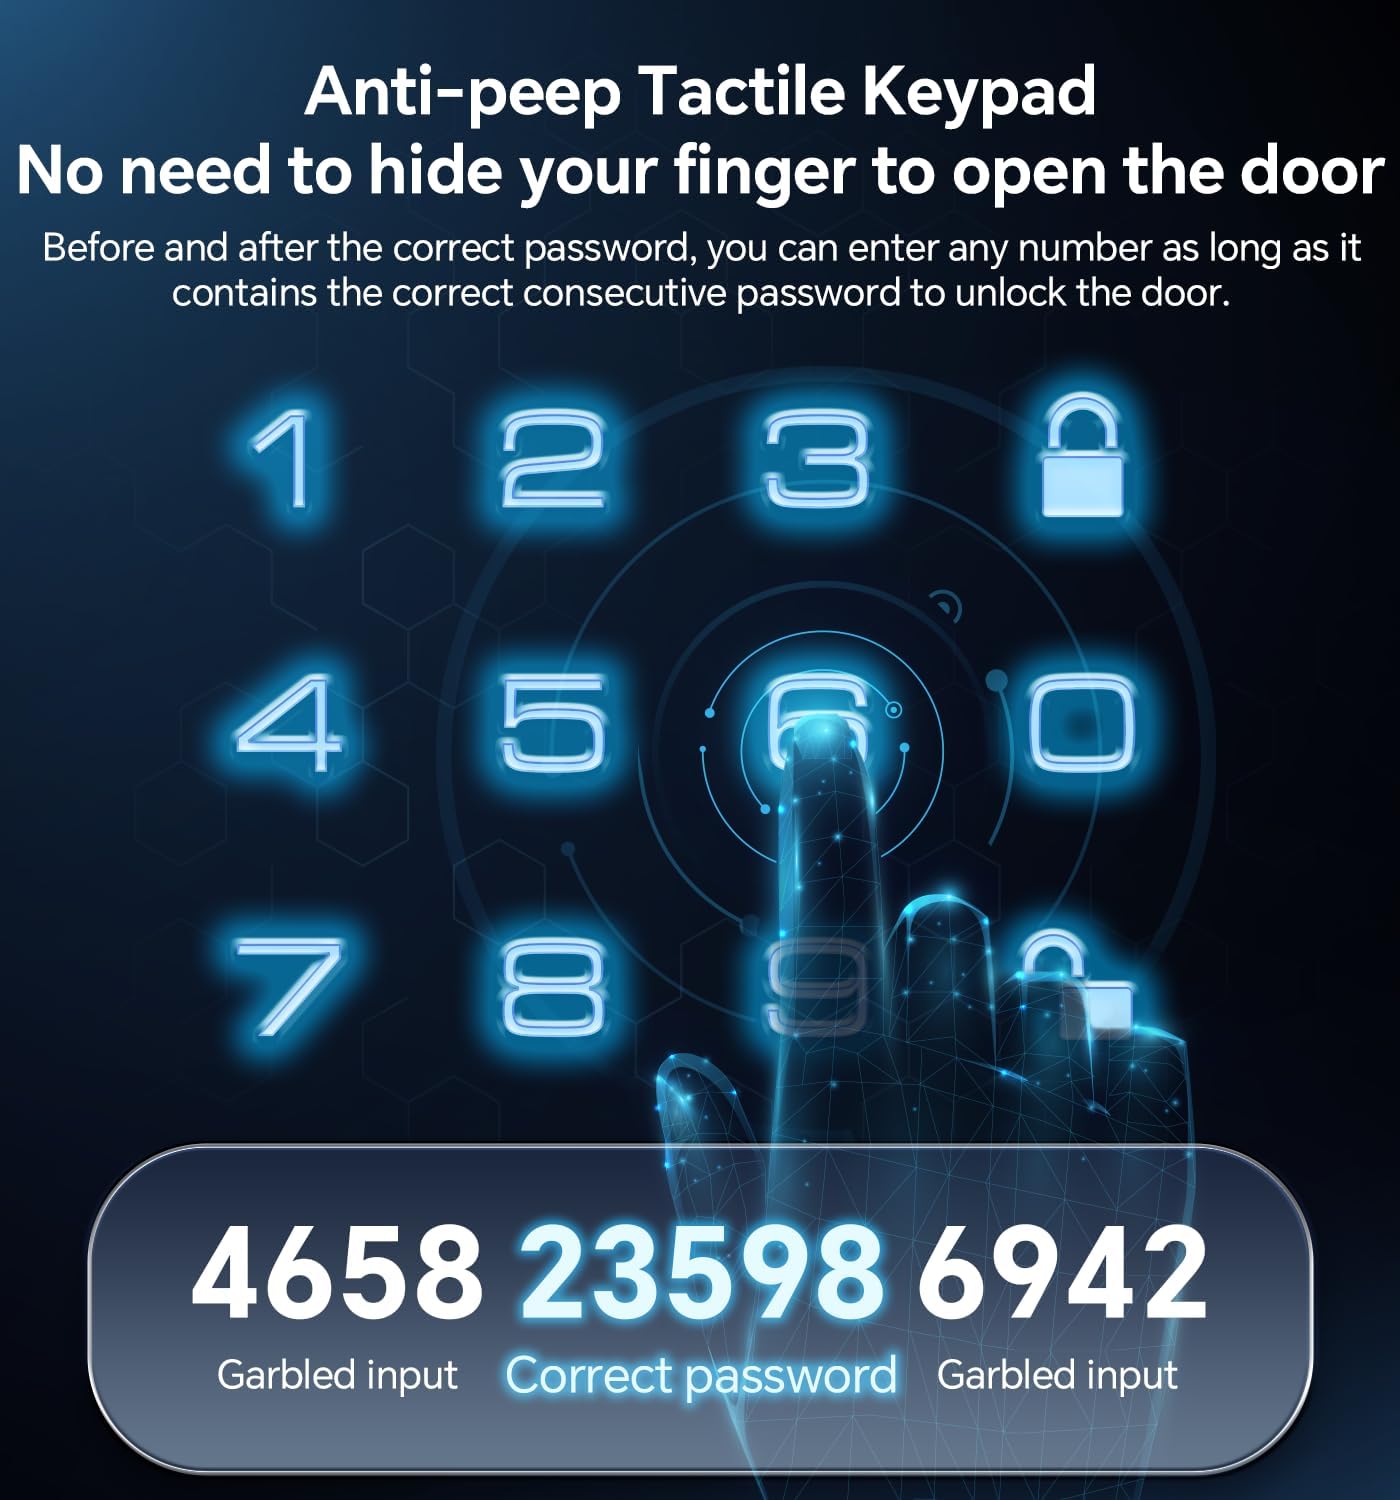
Imagen 4.2: Explanation of the anti-peep function, demonstrating how to obscure your actual PIN by adding random digits before and after it on the keypad.
- Código PIN de un solo uso: Generate temporary codes for guests or service providers. These codes are valid for a single use.

Imagen 4.3: A user receiving a one-time PIN code on their mobile device, illustrating the convenience of temporary access for visitors.
- Clave física: In case of battery failure or forgotten codes, use the provided physical keys to unlock the deadbolt.
4.2 Métodos de bloqueo

Imagen 4.4: The auto-lock feature, which automatically secures the door after a customizable delay of 10-30 seconds, providing peace of mind.
- Bloqueo automático: The lock can be configured to automatically lock after a set period (10-30 seconds) once the door is closed. Refer to programming instructions for setting this feature.
- Bloqueo de un toque: Press and hold the '#' key on the keypad for 2 seconds to manually lock the door from the outside. From the inside, use the thumb turn.
4.3 User Management and Programming
The lock supports 3 administrator codes and up to 97 user codes. Refer to the detailed programming guide (often provided separately or via email after purchase) for instructions on:
- Adding/Deleting Administrator Codes
- Adding/Deleting User Codes (Permanent, One-Time, Scheduled)
- Setting Auto-Lock Delay
- Habilitar/deshabilitar el sonido
- Restablecimiento de fábrica
5. Mantenimiento
- Limpieza: Limpie el exterior de la cerradura con un paño suave.amp cloth. Do not use abrasive cleaners, solvents, or harsh chemicals, as these can damage the finish and electronic components.
- Reemplazo de batería: The lock will provide a low battery alert. Replace all 4 AA batteries promptly. Use high-quality alkaline batteries for optimal performance.
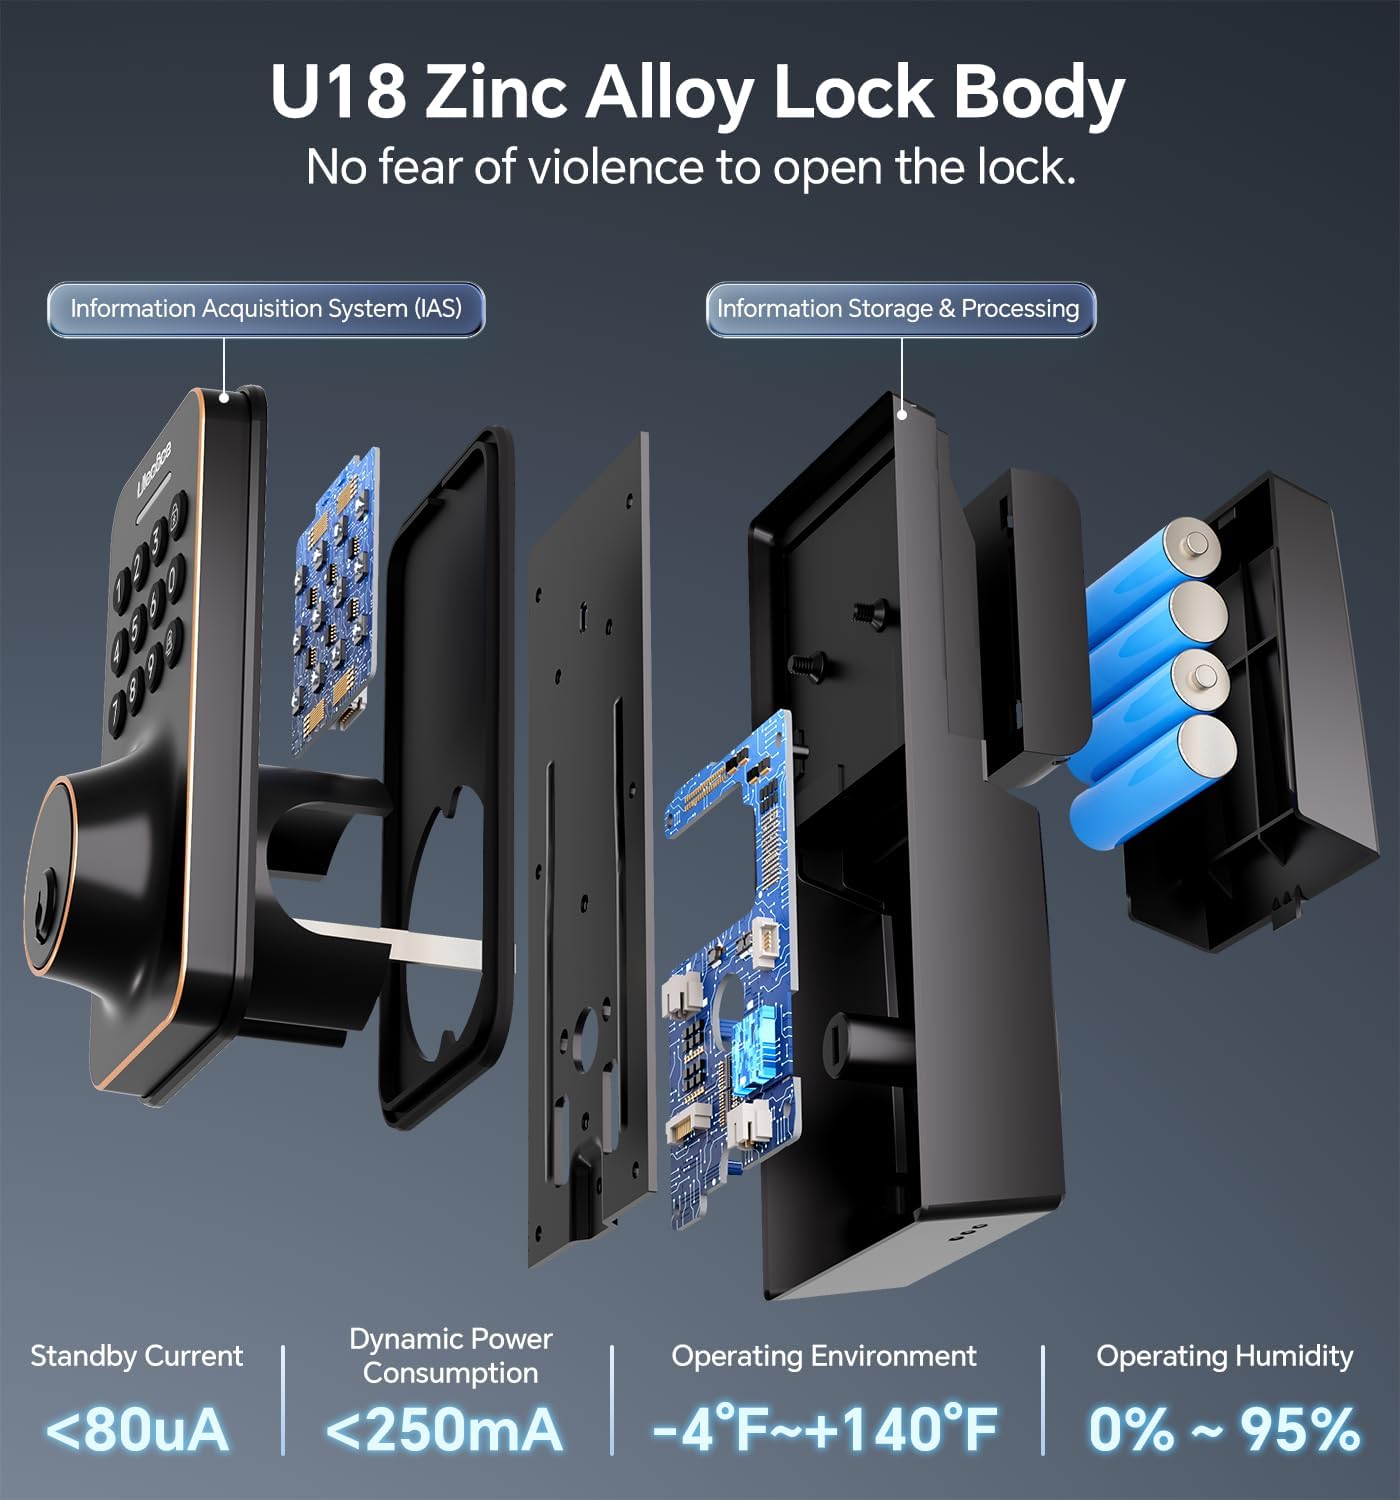
Imagen 5.1: Internal structure of the Ulecoce U18 lock, highlighting the battery compartment and electronic components, which are designed for durability and efficient power consumption.
- Comprobación mecánica: Periodically check that all screws are tight and that the deadbolt operates smoothly. If the deadbolt sticks, ensure the strike plate is properly aligned with the latch.
6. Solución de problemas
| Problema | Posible causa | Solución |
|---|---|---|
| La cerradura no responde al teclado. | Pilas agotadas; código incorrecto; mal funcionamiento del teclado. | Replace batteries. Re-enter code carefully. Use physical key. Contact support if issue persists. |
| El cerrojo no se extiende/retrae completamente. | Misalignment of lock components; strike plate misalignment; obstruction. | Check installation for proper alignment. Adjust strike plate. Clear any obstructions. |
| Low battery alert persists after replacement. | Poor quality batteries; incorrect battery insertion. | Ensure fresh, high-quality alkaline batteries are used and inserted correctly. |
| No se pueden programar nuevos códigos. | Incorrect programming steps; lock in an error state. | Review programming instructions carefully. Perform a factory reset if necessary (this will erase all existing codes). |
7. Especificaciones

Imagen 7.1: Detailed dimensions of the Ulecoce U18 Smart Door Lock Set, illustrating the size of both the exterior keypad and the interior handle components.
- Modelo: Ulecoce U18
- Material: Aleación de zinc
- Color: Bronce frotado con aceite
- Dimensions (Exterior Keypad): Approximately 6.5in (H) x 2.83in (W)
- Dimensions (Interior Assembly): Approximately 4.8in (H) x 2.6in (W)
- Fuerza: 4 pilas AA (no incluidas)
- Códigos de usuario: Hasta 100
- Grado de seguridad: ANSI Grado 3
- Resistencia a la intemperie: IP54
- Temperatura de funcionamiento: -4 °F a +140 °F (-20 °C a +60 °C)
- Humedad de funcionamiento: 0% a 95% (sin condensación)
- Características especiales: Anti-spy password, Portable, Weather-resistant, Automatic locking, One-touch locking.
8. Garantía y atención al cliente
Ulecoce door locks come with a 30-day return policy and a 1-year replacement warranty. Lifetime troubleshooting and customer service are also provided.
For assistance, please contact Ulecoce customer support. Upon receipt of your entry door lock kit, you may receive a follow-up email with additional instructions to ensure proper operation.