1. Introducción
This user manual provides comprehensive instructions for the proper installation, operation, and maintenance of the SmallRig ZV-E10 II Cage Kit. Please read this manual thoroughly before using the product to ensure optimal performance and safety.
The SmallRig ZV-E10 II Cage Kit 4867 is specifically designed to enhance the functionality and protection of the Sony ZV-E10 II camera. It features a hollow design to maintain access to camera functions, an ergonomic grip, and multiple mounting points for accessories.
2. ¿Qué hay en la caja?
Verifique que todos los componentes estén presentes antes de continuar con la instalación.
- Jaula x 1
- Clase de cable HDMIamp x1

3. Especificaciones
| Característica | Detalle |
|---|---|
| Dimensiones del producto | 150 x 85.7 x 57.3 mm (6.0 x 85.7 x 57.3 pulgadas) |
| Peso del artículo | 124 ± 5.0 g (4.4 ± 0.2 oz) |
| Compatibilidad | For Sony ZV-E10 II |
| Material (es) | Aleación de aluminio, acero inoxidable |
| Número de modelo | 4867-CF |
4. Configuración e instalación
4.1 Attaching the Cage to the Camera
- Ensure your Sony ZV-E10 II camera is powered off and the battery is removed.
- Align the camera with the cage. The cage secures the camera via a 1/4"-20 screw on the bottom and M2.5 screws on both sides.
- Carefully slide the camera into the cage. Ensure the built-in all-round protective gasket is properly positioned to prevent scratching the camera body.
- Tighten the 1/4"-20 screw on the bottom of the cage into the camera's tripod socket.
- Secure the camera further by tightening the M2.5 screws on both sides of the cage. This three-point locking mechanism prevents camera deflection and lens shake.

4.2 Instalación del cable HDMI Clamp
El cable HDMI clamp helps protect the camera's HDMI interface and ensures stable signal transmission.
- Locate the dedicated hand-twisted cable clamp for HDMI.
- Adjuntar el clamp to the designated mounting point on the cage, typically near the HDMI port.
- Insert your HDMI cable into the camera's port, then secure it within the clamp by tightening the hand-twisted screws. No additional tools are required for this step.

5. Operating the Cage Kit
5.1 Acceso a las funciones de la cámara
The cage is designed with a hollow structure to ensure full access to all camera buttons, ports, and the battery compartment. The battery compartment features an opening and closing wrench for quick battery changes without removing the cage.

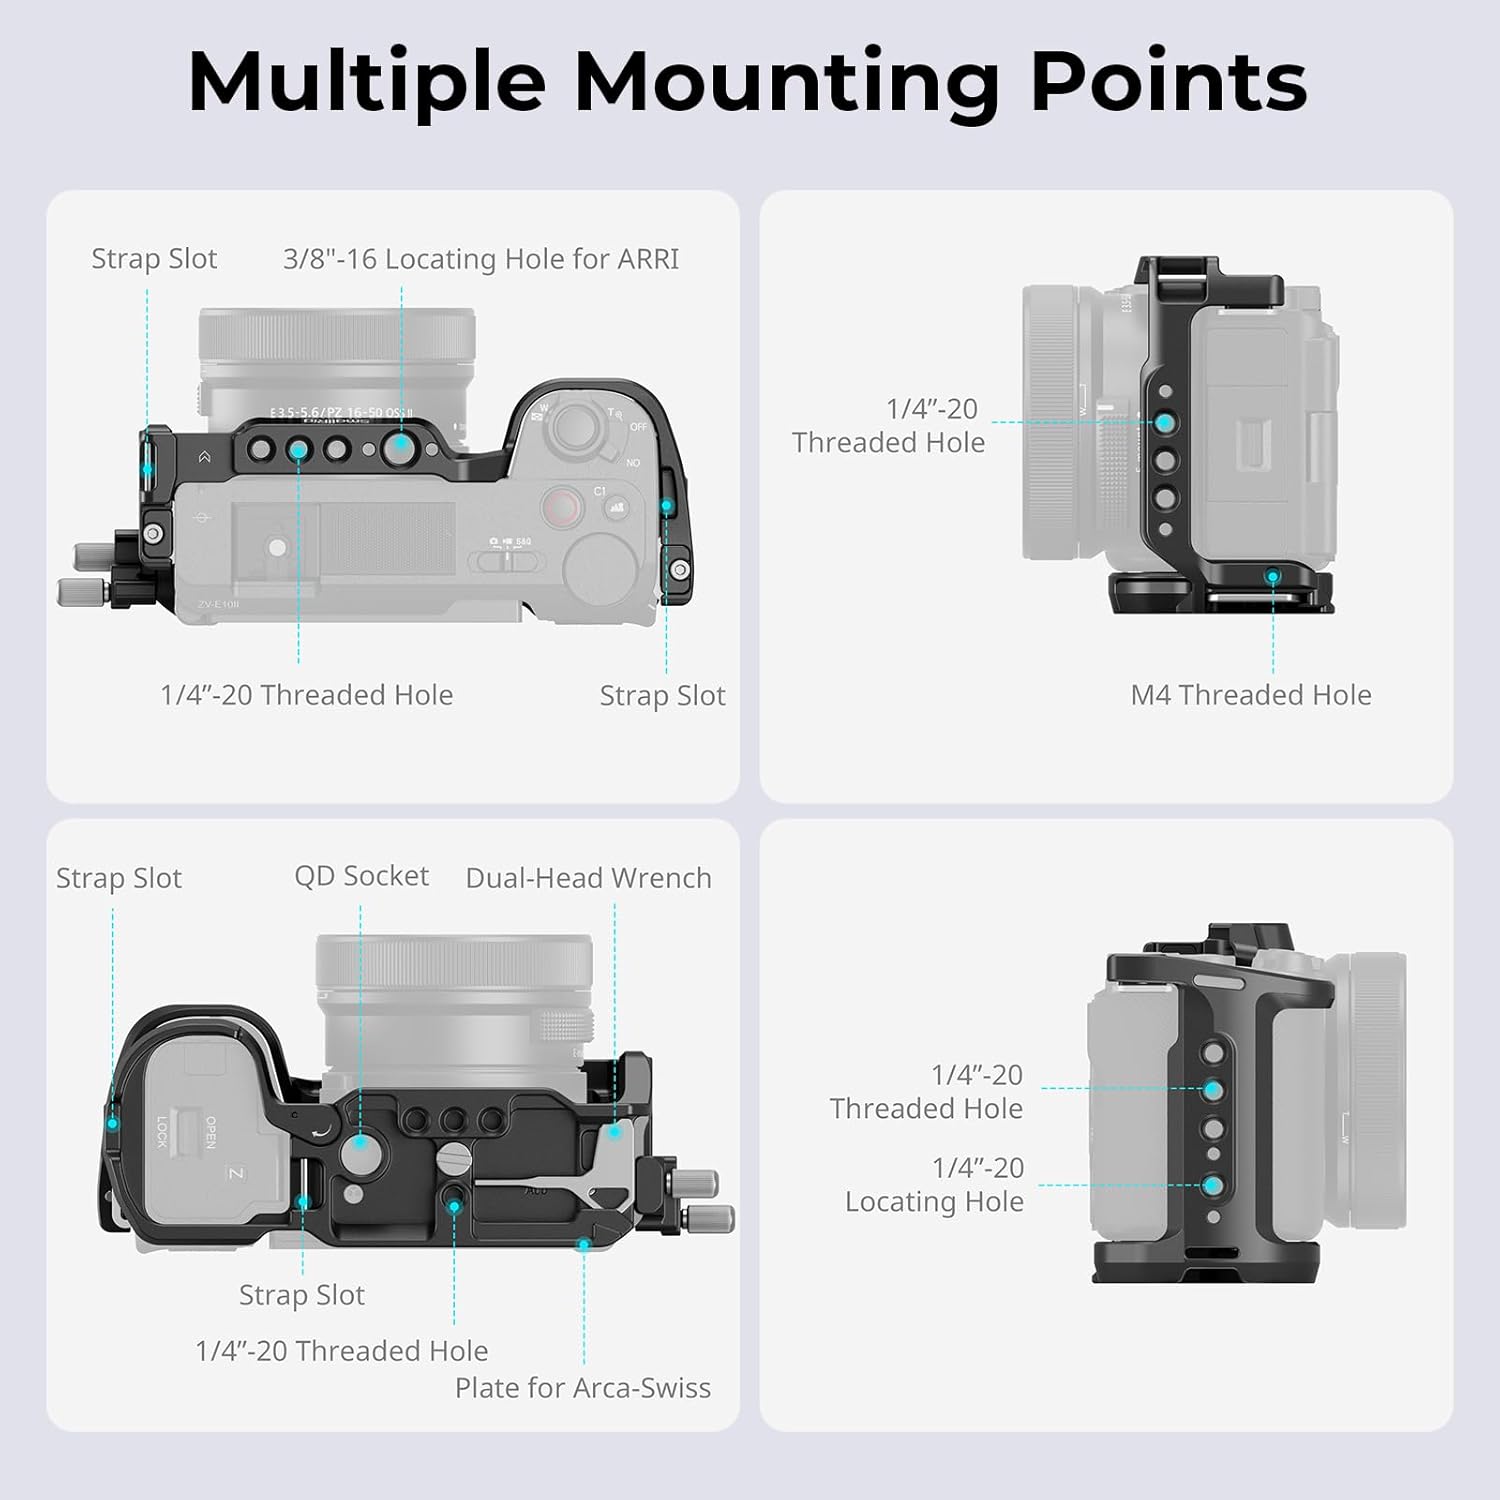
5.2 Utilizing Multiple Mounting Points
The cage provides various mounting points for expanding your camera setup:
- Orificios roscados de 1/4"-20: For attaching various accessories like magic arms, small lights, or monitors.
- ARRI Locating Hole: Provides a secure, anti-twist mounting point for ARRI-compatible accessories.
- Zapato frío: Ideal for mounting microphones, LED lights, or other cold shoe compatible accessories.
- Shoulder/Wrist Strap Slot: For attaching camera straps for added security and portability.
- Zócalo QD: For quick attachment and detachment of QD (Quick Detach) sling swivels.

5.3 Integrated Arca-Type Quick Release Plate
The bottom of the cage features a built-in Arca-Swiss quick release plate, allowing for rapid transitions between different shooting setups.
- Compatibilidad: Directly compatible with DJI RS 2 / RSC 2 / RS 3 / RS 3 Pro / RS 4 / RS 4 Pro stabilizers and Arca-type tripods.
- Nota: When using with the DJI RS 3 Mini stabilizer, ensure to first attach the quick release plate for DJI RS Mini to the base of the cage.

5.4 Enhanced Grip Experience
The cage's design improves the camera's ergonomics, providing a more comfortable and secure grip, especially for users with larger hands. This enhances stability during handheld shooting.
5.5 Accesorios recomendados
To further expand the functionality of your SmallRig ZV-E10 II Cage Kit, consider the following compatible accessories:
- SmallRig Top Handheld 4757
- SmallRig Side Handle 4755
- SmallRig Monitor Mount 2903B
- SmallRig Wrist Strap 3848
- SmallRig Cooling System (ID: 4348)
- NP-F Battery (ID: 4469)
- Dummy Battery Cable (ID: 2922)

6. Mantenimiento
- Limpieza: Wipe the cage with a soft, dry cloth to remove dust and fingerprints. Avoid using abrasive cleaners or solvents.
- Almacenamiento: Store the cage in a dry, cool place away from direct sunlight and extreme temperatures when not in use.
- Inspección: Periodically check all screws and mounting points for tightness. Re-tighten if necessary to ensure the camera remains secure.
- Llave magnética incorporada: The cage includes a built-in magnetic wrench for convenient adjustments. Ensure it is securely stored in its designated slot when not in use.
7. Solución de problemas
| Problema | Posible causa | Solución |
|---|---|---|
| Camera not secure in cage | Los tornillos están sueltos. | Ensure the 1/4"-20 bottom screw and both M2.5 side screws are fully tightened. |
| HDMI cable is loose or signal unstable | Clase de cableamp No está debidamente asegurado. | Re-adjust and tighten the hand-twisted screws on the HDMI cable clamp. |
| Difficulty accessing camera ports/buttons | Camera not correctly seated in cage. | Remove camera and re-install, ensuring proper alignment with the cage's cutouts. |
8. Garantía y soporte
Para obtener información sobre la garantía y soporte técnico, consulte el sitio web oficial de SmallRig. webSitio web o contacte directamente con el servicio de atención al cliente. Conserve su recibo de compra como comprobante para cualquier reclamación de garantía.
Guía oficial del usuario (PDF): Descargar PDF
Visit the SMALLRIG Store: SMALLRIG Amazon Store


