1. Introducción
This manual provides essential information for the safe and efficient operation of your Pretul DESI-36P2 3.6V Cordless Screwdriver. Please read it thoroughly before first use and keep it for future reference. This compact cordless screwdriver is designed for light-duty fastening tasks, featuring a two-position handle and an integrated LED work light.

Figura 1: Pretul DESI-36P2 Cordless Screwdriver. This image shows the screwdriver in its straight configuration, highlighting its compact design and yellow and black color scheme.
2. Información de seguridad
Observe siempre las precauciones básicas de seguridad al utilizar herramientas eléctricas para reducir el riesgo de incendio, descarga eléctrica y lesiones personales.
- Seguridad en el área de trabajo: Mantenga su área de trabajo limpia y bien iluminada. Las áreas desordenadas u oscuras invitan a los accidentes.
- Seguridad eléctrica: No exponga las herramientas eléctricas a la lluvia ni a condiciones húmedas. Si entra agua en una herramienta eléctrica, aumentará el riesgo de descarga eléctrica.
- Seguridad personal: Manténgase alerta, preste atención a lo que hace y utilice el sentido común al utilizar una herramienta eléctrica. No utilice una herramienta eléctrica si está cansado o bajo los efectos de drogas, alcohol o medicamentos.
- Uso y cuidado de herramientas: No fuerce la herramienta eléctrica. Utilice la herramienta eléctrica adecuada para su aplicación. Hará el trabajo mejor y más seguro al ritmo para el que fue diseñado.
- Cuidado de la batería: Recargue únicamente con el cargador especificado por el fabricante. Un cargador adecuado para un tipo de batería puede generar riesgo de incendio si se utiliza con otro tipo de batería.
3. Componentes y características del producto
Familiarize yourself with the parts of your Pretul DESI-36P2 cordless screwdriver.
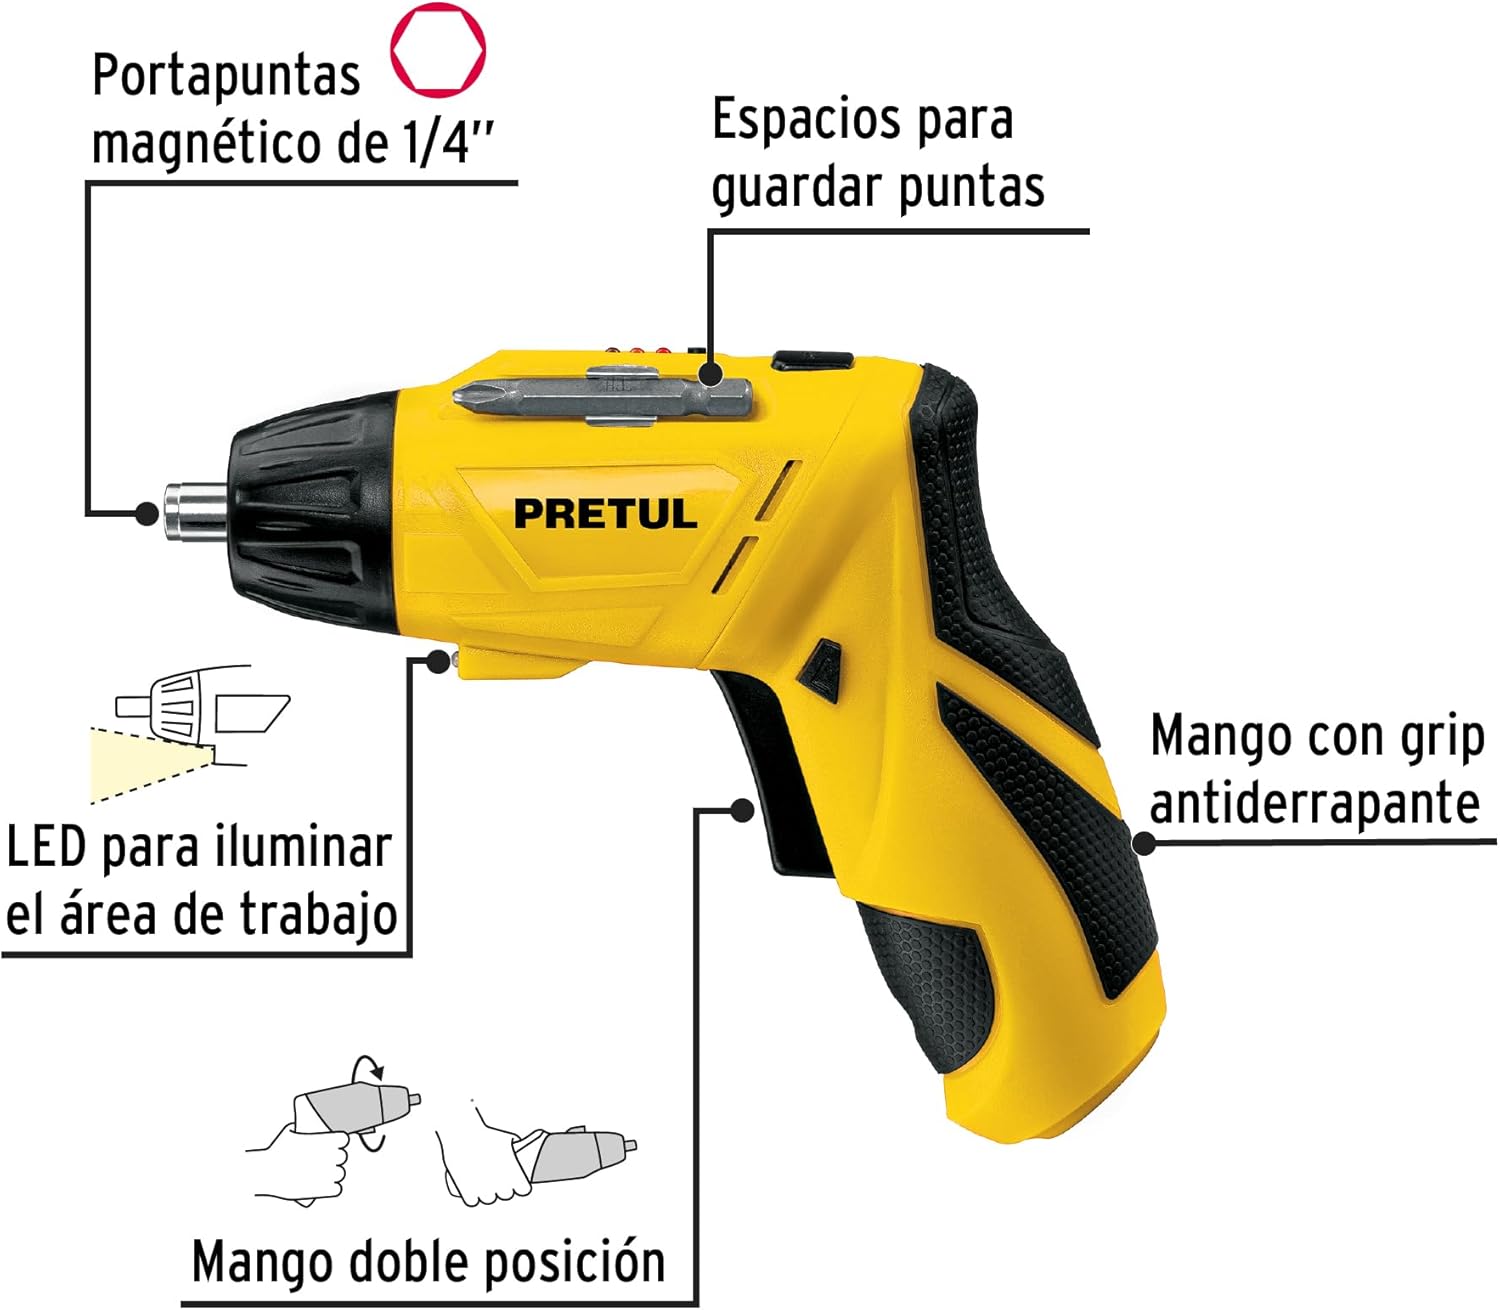
Figura 2: Key features of the Pretul DESI-36P2. This diagram illustrates the magnetic 1/4" bit holder, bit storage slots, anti-slip grip handle, LED work light, and the two-position handle mechanism.
- Portapuntas hexagonal magnético de 1/4": Securely holds screwdriver bits for quick changes.
- Bit Storage Slots: Conveniently located on the tool for storing extra bits.
- Anti-slip Grip Handle: Provides comfortable and secure handling during operation.
- Luz de trabajo LED: Ilumina el área de trabajo para mejorar la visibilidad en espacios poco iluminados.
- Mango de dos posiciones: Allows the screwdriver to be used in a straight or pistol-grip configuration for versatility and access in tight spaces.
- Interruptor de avance/retroceso: Controls the direction of rotation for tightening and loosening screws.
- Botón de encendido: Activa el destornillador.
4. Configuración
4.1 Carga inicial
Before first use, fully charge the screwdriver's internal battery. Connect the charger to a standard electrical outlet and then to the charging port on the screwdriver. The charging indicator (if present) will show the charging status. Disconnect the charger once the battery is fully charged.
4.2 Colocación de las puntas del destornillador
- Select the appropriate 1/4" hex screwdriver bit for your task.
- Insert the bit firmly into the magnetic bit holder at the front of the screwdriver until it is securely seated.
- To remove a bit, simply pull it out from the holder.
4.3 Ajuste de la posición del mango
The screwdriver features a two-position handle for enhanced versatility:
- Empuñadura de pistola: Standard configuration for most tasks.
- Agarre recto: For reaching into confined spaces. To change the handle position, firmly grasp the handle and the body of the screwdriver, then pivot the handle until it locks into the desired position.
5. Instrucciones de funcionamiento
5.1 Encendido / Apagado
Press and hold the power button to activate the screwdriver. Release the button to stop operation. The LED work light will activate when the power button is pressed.
5.2 Selección de la dirección de rotación
Use the forward/reverse switch, typically located near the trigger, to select the desired rotation direction:
- Empuje el interruptor hacia la izquierda para girar hacia adelante (apretando los tornillos).
- Empuje el interruptor hacia la derecha para girar en sentido inverso (aflojando los tornillos).
- Ensure the switch is in the center position to lock the tool and prevent accidental activation.
5.3 tornillos de fijación
- Ensure the correct bit is installed and the rotation direction is set to forward.
- Place the bit onto the screw head, applying gentle pressure.
- Press the power button to start driving the screw. Release the button once the screw is fully seated or the desired torque is reached.
5.4 Aflojamiento de tornillos
- Ensure the correct bit is installed and the rotation direction is set to reverse.
- Place the bit onto the screw head, applying gentle pressure.
- Press the power button to start loosening the screw. Release the button once the screw is free.
6. Mantenimiento
El mantenimiento regular garantiza un rendimiento óptimo y prolonga la vida útil de su herramienta.
- Limpieza: Mantenga las aberturas de ventilación de la herramienta limpias y libres de residuos. Utilice un paño suave y seco.amp Paño para limpiar el exterior. No utilice productos químicos agresivos ni limpiadores abrasivos.
- Portapuntas: Periodically inspect the bit holder for wear or damage. Clean any accumulated dust or metal shavings.
- Almacenamiento de la batería: Store the screwdriver in a cool, dry place away from direct sunlight and extreme temperatures. For long-term storage, ensure the battery is partially charged (around 50%).
- Inspección: Regularly check for loose screws, damaged cords (if applicable), or any other conditions that may affect safe operation.
7. Solución de problemas
Si tiene problemas con su destornillador, consulte los siguientes problemas y soluciones comunes:
| Problema | Posible causa | Solución |
|---|---|---|
| El destornillador no se enciende. | La batería está descargada. | Cargue la batería completamente. |
| El destornillador carece de potencia. | La batería está baja. | Recargar la batería. |
| La broca se resbala de la cabeza del tornillo. | Tamaño de broca incorrecto o broca desgastada. | Utilice el tamaño de broca correcto; reemplace las brocas desgastadas. |
| El mango no se bloquea en su posición. | Not fully pivoted. | Ensure the handle is fully pivoted until it clicks into place. |
Si el problema persiste después de intentar estas soluciones, comuníquese con el servicio de atención al cliente.
8. Especificaciones
Technical specifications for the Pretul DESI-36P2 Cordless Screwdriver.

Figura 3: Dimensions of the Pretul DESI-36P2. This image shows the screwdriver with measurements indicating a length of 17.5 cm and a height of 13 cm.
| Característica | Especificación |
|---|---|
| Número de modelo | DESI-36P2 (26402) |
| Marca | Precio |
| Fuente de poder | Batería |
| Volumen de la bateríatage | 3.6 voltios |
| Velocidad | 230 RPM |
| Esfuerzo de torsión | 3E+1 Pound-inches (approximately 30 in-lbs) |
| Portabits | 1/4" Hex Magnetic |
| Material | Plástico, metal |
| Dimensiones (L x H) | 17.5 cm x 13 cm (approximate, based on image) |
| Peso | 530 gramos (0.53 kilogramos) |
| Componentes incluidos | 5 Phillips bits 1" (PH1, PH2, PH3), Charger, 2 Phillips bits 2" (PH1, PH2), 1/4" Magnetic extension |
9. Garantía y soporte
The Pretul DESI-36P2 Cordless Screwdriver comes with a 1 año de garantía A partir de la fecha de compra. Conserve el comprobante de compra para reclamaciones de garantía.

Figura 4: Product packaging showing the included components and a "1 year warranty" seal.
For technical support, service, or warranty inquiries, please contact Pretul customer service through their official channels or the retailer where the product was purchased.


