1. Introducción
Gracias por la compraasing the Homary Modern Narrow White Nightstand. This manual provides detailed instructions for assembly, operation, maintenance, and troubleshooting to ensure safe and efficient use of your new nightstand. Please read this manual thoroughly before assembly and use, and retain it for future reference.

Image 1: Homary Modern Narrow White Nightstand, showcasing its design and features like the USB port and sensor light.
2. Información de seguridad
Caution: This product requires assembly. Follow the instructions carefully to avoid injury.
- Monte siempre el producto sobre una superficie suave y limpia para evitar rayones.
- Asegúrese de que todos los tornillos y sujetadores estén bien apretados antes de usar.
- No sobrecargue los cajones ni los estantes.
- Mantenga las piezas pequeñas fuera del alcance de los niños durante el montaje.
- No se pare ni se suba a la mesita de noche.
- Disconnect from power outlet before cleaning or moving the unit.
3. Contenido del paquete
Antes de comenzar el montaje, verifique que todas las piezas que se indican a continuación estén presentes y sin daños. Si alguna pieza falta o está dañada, póngase en contacto con atención al cliente.
- Nightstand panels (top, bottom, sides, back)
- Componentes del cajón (frontal, posterior, laterales, inferior)
- Correderas para cajones
- módulo de carga USB
- Sensor light module
- Nightlight module
- Paquete de hardware (tornillos, tacos, cerraduras de leva, etc.)
- Wheels (pre-installed or separate)
- Manual de instrucciones
4. Instrucciones de montaje
Assembly typically requires two people. Please follow the step-by-step diagrams provided in the separate assembly guide included in your package. The following tools are recommended for assembly:
- Allen Key (often included)
- Martillo
- Destornillador (cabeza Phillips)
- Llave inglesa
Pasos de la Asamblea General:
- Desembale todos los componentes y compruébelos con la lista de piezas.
- Attach drawer slides to the side panels of the nightstand.
- Assemble the main frame of the nightstand (side panels, top, bottom, back).
- Assemble the drawers and install them onto the drawer slides.
- Install the USB charging module into the designated slot on the top panel.
- Install the sensor light module within the drawer area.
- Install the nightlight module on the top surface.
- Connect all electrical components as per the wiring diagram in the assembly guide.
- Ensure all connections are secure and all fasteners are tightened.
5. Instrucciones de funcionamiento
5.1. Puerto de carga USB
The nightstand is equipped with a built-in USB charging station. To use:
- Conecte el cable de alimentación principal de la mesita de noche a un tomacorriente de pared estándar.
- Connect your electronic devices (e.g., smartphone, tablet) to the USB ports using their respective charging cables.
- Asegúrese de que los dispositivos se estén cargando correctamente.

Image 2: Close-up of the nightstand's top surface showing a smartphone charging via the integrated USB port.
5.2. Sensor Light for Drawers
The drawers feature an automatic sensor light that illuminates when the drawer is opened, providing visibility for stored items.
- The sensor light activates automatically when the drawer is pulled open.
- The light will turn off automatically when the drawer is closed.
- No manual operation is required for the drawer sensor light.

Image 3: An open drawer of the nightstand, showing the sensor light illuminating the interior.
5.3. Top Nightlight with Switch
A nightlight is integrated into the top surface of the nightstand, providing a gentle ambient glow. It is operated by a manual switch.
- Locate the switch on the nightlight module on the top surface.
- Press the switch to turn the nightlight ON or OFF.

Image 4: Illustration of both the top nightlight with its switch and the sensor light within the drawer.
6. Mantenimiento
- Limpieza: Limpie las superficies con un paño suave yamp paño. Evite productos químicos agresivos o limpiadores abrasivos.
- Limpiar el polvo: Quite el polvo periódicamente con un paño seco y suave.
- Derrames: Immediately wipe up any spills to prevent staining, especially on the wood surfaces. The product is not stain resistant.
- Sujetadores: Revise periódicamente todos los tornillos y fijaciones para asegurarse de que estén bien apretados. Vuelva a apretarlos si es necesario.
- Componentes eléctricos: Ensure the power cord and USB ports are free from damage. Do not attempt to repair electrical components yourself.
7. Solución de problemas
| Problema | Posible causa | Solución |
|---|---|---|
| Los puertos USB no cargan. |
|
|
| Drawer sensor light not working. |
|
|
| Top nightlight not turning on. |
|
|
| Los cajones son rígidos o difíciles de abrir/cerrar. |
|
|
8. Especificaciones
| Característica | Detalle |
|---|---|
| Marca | langostas |
| Número de modelo | JJ763B905B |
| Dimensiones (An x Pr x Al) | 17W x 17D x 23H inches (Approx. 43.2W x 43.2D x 58.4H cm) |
| Material del marco | Madera |
| Tipo de material superior | Madera |
| Color | White (Off-White) |
| Numero de cajones | 2 |
| Funciones de carga | Puerto USB incorporado |
| Características de iluminación | Sensor Light for Drawers, Top Nightlight with Switch |
| Movilidad | Hidden Wheels for Smooth Movement |
| Sostenibilidad | Madera certificada FSC |
| Resistente a las manchas | No |
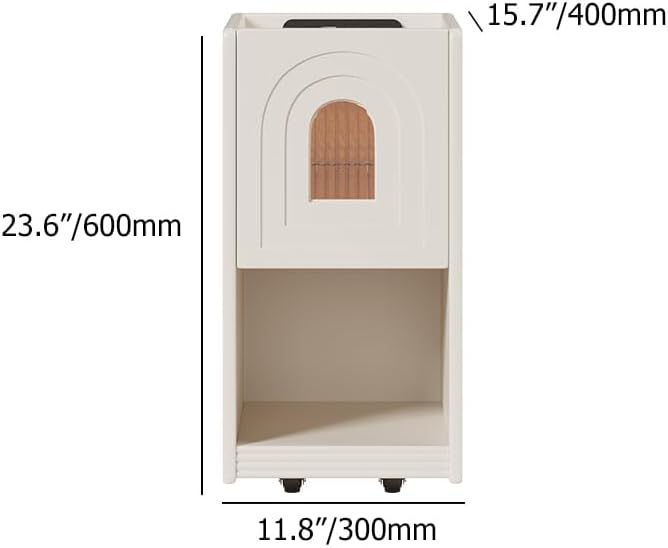
Image 5: Diagram illustrating the dimensions of the nightstand (23.6" H x 11.8" W x 15.7" D).

Imagen 6: Primer plano view of the hidden wheels at the base of the nightstand, indicating easy mobility.
9. Garantía y soporte
Homary products are designed for quality and durability. For warranty information, please refer to the warranty card included with your product or visit the official Homary website. For any questions, missing parts, or technical support, please contact Homary customer service:
- Correo electrónico: service@homary.com
- Tiempo de servicio: Reply within 24 hours (excluding public holidays).
- Please provide your order number when contacting customer service.


