1. Introducción
Thank you for choosing the Greenvelly 72" H Metal Storage Cabinet. This manual provides essential information for the safe assembly, operation, and maintenance of your new storage cabinet. Please read these instructions thoroughly before beginning assembly and retain them for future reference.
Información de seguridad
- Monte siempre el armario sobre una superficie limpia, plana y estable.
- Ensure all parts are present before assembly. Do not proceed if parts are missing or damaged.
- Utilice las herramientas adecuadas según se especifica en las instrucciones de montaje.
- It is recommended that two people assemble this cabinet for safety and ease.
- Secure the cabinet to a wall using the provided anti-tip hardware to prevent accidental tipping, especially in households with children or pets.
- Do not overload shelves. Refer to the specifications for maximum weight capacity per shelf.
- Keep fingers clear of moving parts during assembly and operation.
2. Contenido del paquete
Before assembly, verify that all components listed below are present and undamaged. If any parts are missing or damaged, please contact Greenvelly customer support.
- Paneles del gabinete (superior, inferior, laterales, posterior)
- Puertas (2)
- Estantes ajustables (4)
- Locking Mechanism and Handle
- Llaves (2)
- Herrajes antivuelco
- Herrajes de montaje (tornillos, pernos, tuercas, etc.)
- Manual de instrucciones
3. Configuración y montaje
Preparación
- Despeje un área espaciosa para la reunión.
- Lay out all components and hardware, organizing them for easy access.
- Ensure you have a Phillips head screwdriver and possibly a wrench (not always included).
Pasos de montaje
Follow the detailed assembly instructions provided in the separate assembly guide included with your product. The general steps are outlined below:
- Montar el marco: Connect the side panels to the back panel, then attach the top and bottom panels. Ensure all connections are secure.
- Instalar estantes: Insert the shelf clips into the desired slots on the side panels. Place the adjustable shelves onto the clips. The shelves can be repositioned later as needed.
- Fijar puertas: Mount the doors to the cabinet frame using the provided hinges. Adjust hinges if necessary for proper door alignment.
- Instalar el mecanismo de bloqueo: Attach the handle and locking mechanism to one of the doors as per the instructions. Test the lock with the provided keys.
- Fijar a la pared (antivuelco): Position the cabinet in its final location. Use the anti-tip hardware to secure the cabinet to a wall stud. This is a critical safety step.


4. Instrucciones de funcionamiento
Mecanismo de bloqueo
The Greenvelly storage cabinet is equipped with a 3-point locking system for enhanced security. To lock the cabinet, ensure both doors are fully closed. Insert one of the provided keys into the lock cylinder on the handle and turn it to engage the locking bolts. To unlock, insert the key and turn it in the opposite direction.

Ajuste de estantes
The cabinet includes four adjustable shelves, allowing you to customize the internal storage space. To adjust a shelf:
- Vacíe el estante por completo.
- Carefully lift the shelf to disengage it from the shelf clips.
- Remove the shelf clips from their current slots.
- Reinsert the shelf clips into the desired new slots, ensuring they are level and securely seated.
- Coloque nuevamente el estante sobre los clips.

5. Mantenimiento
Proper maintenance will ensure the longevity and appearance of your Greenvelly metal storage cabinet.
- Limpieza: Limpie las superficies del gabinete con un paño suave y seco.amp cloth. For stubborn dirt, a mild soap solution can be used. Avoid abrasive cleaners or harsh chemicals, as they may damage the finish.
- Inspección: Revise periódicamente todos los tornillos y pernos para asegurarse de que estén bien apretados. Vuelva a apretarlos si es necesario.
- Cuidado de la cerradura: Si el mecanismo de bloqueo se vuelve rígido, se puede aplicar una pequeña cantidad de lubricante de grafito en el ojo de la cerradura.
- Prevención de óxido: Although the cabinet has a rust-resistant coating, avoid prolonged exposure to excessive moisture or corrosive substances. Promptly clean any spills.
6. Solución de problemas
A continuación se presentan problemas comunes y sus posibles soluciones:
| Problema | Posible causa | Solución |
|---|---|---|
| Las puertas no cierran correctamente o están desalineadas. | Las bisagras están flojas o mal ajustadas. | Tighten hinge screws. Adjust hinges as per assembly instructions to align doors. Ensure the cabinet is on a level surface. |
| El mecanismo de bloqueo es rígido o difícil de girar. | Falta de lubricación u obstrucción menor. | Apply a small amount of graphite lubricant into the keyhole. Ensure the key is fully inserted. |
| El gabinete se siente inestable o tambaleante. | Not all fasteners are tightened; cabinet not level; anti-tip hardware not installed. | Check and tighten all assembly fasteners. Ensure the cabinet is on a level surface. Install the anti-tip hardware securely to a wall stud. |
| Los estantes se hunden o no pueden sostener el peso. | Estante sobrecargado; los clips del estante no están colocados correctamente. | Reduce the weight on the shelf. Ensure shelf clips are fully inserted and seated correctly in the slots. Refer to specifications for maximum weight capacity. |
7. Especificaciones
| Característica | Detalle |
|---|---|
| Marca | Greenvelly |
| Modelo | B0DHX7X7MP |
| Material | Cold-rolled Steel (0.88mm thickness) |
| Color | Negro |
| Dimensiones generales (profundidad x anchura x altura) | 18" x 36" x 72" (45.6 cm x 91 cm x 182.8 cm) |
| Número de estantes | 4 (ajustable) |
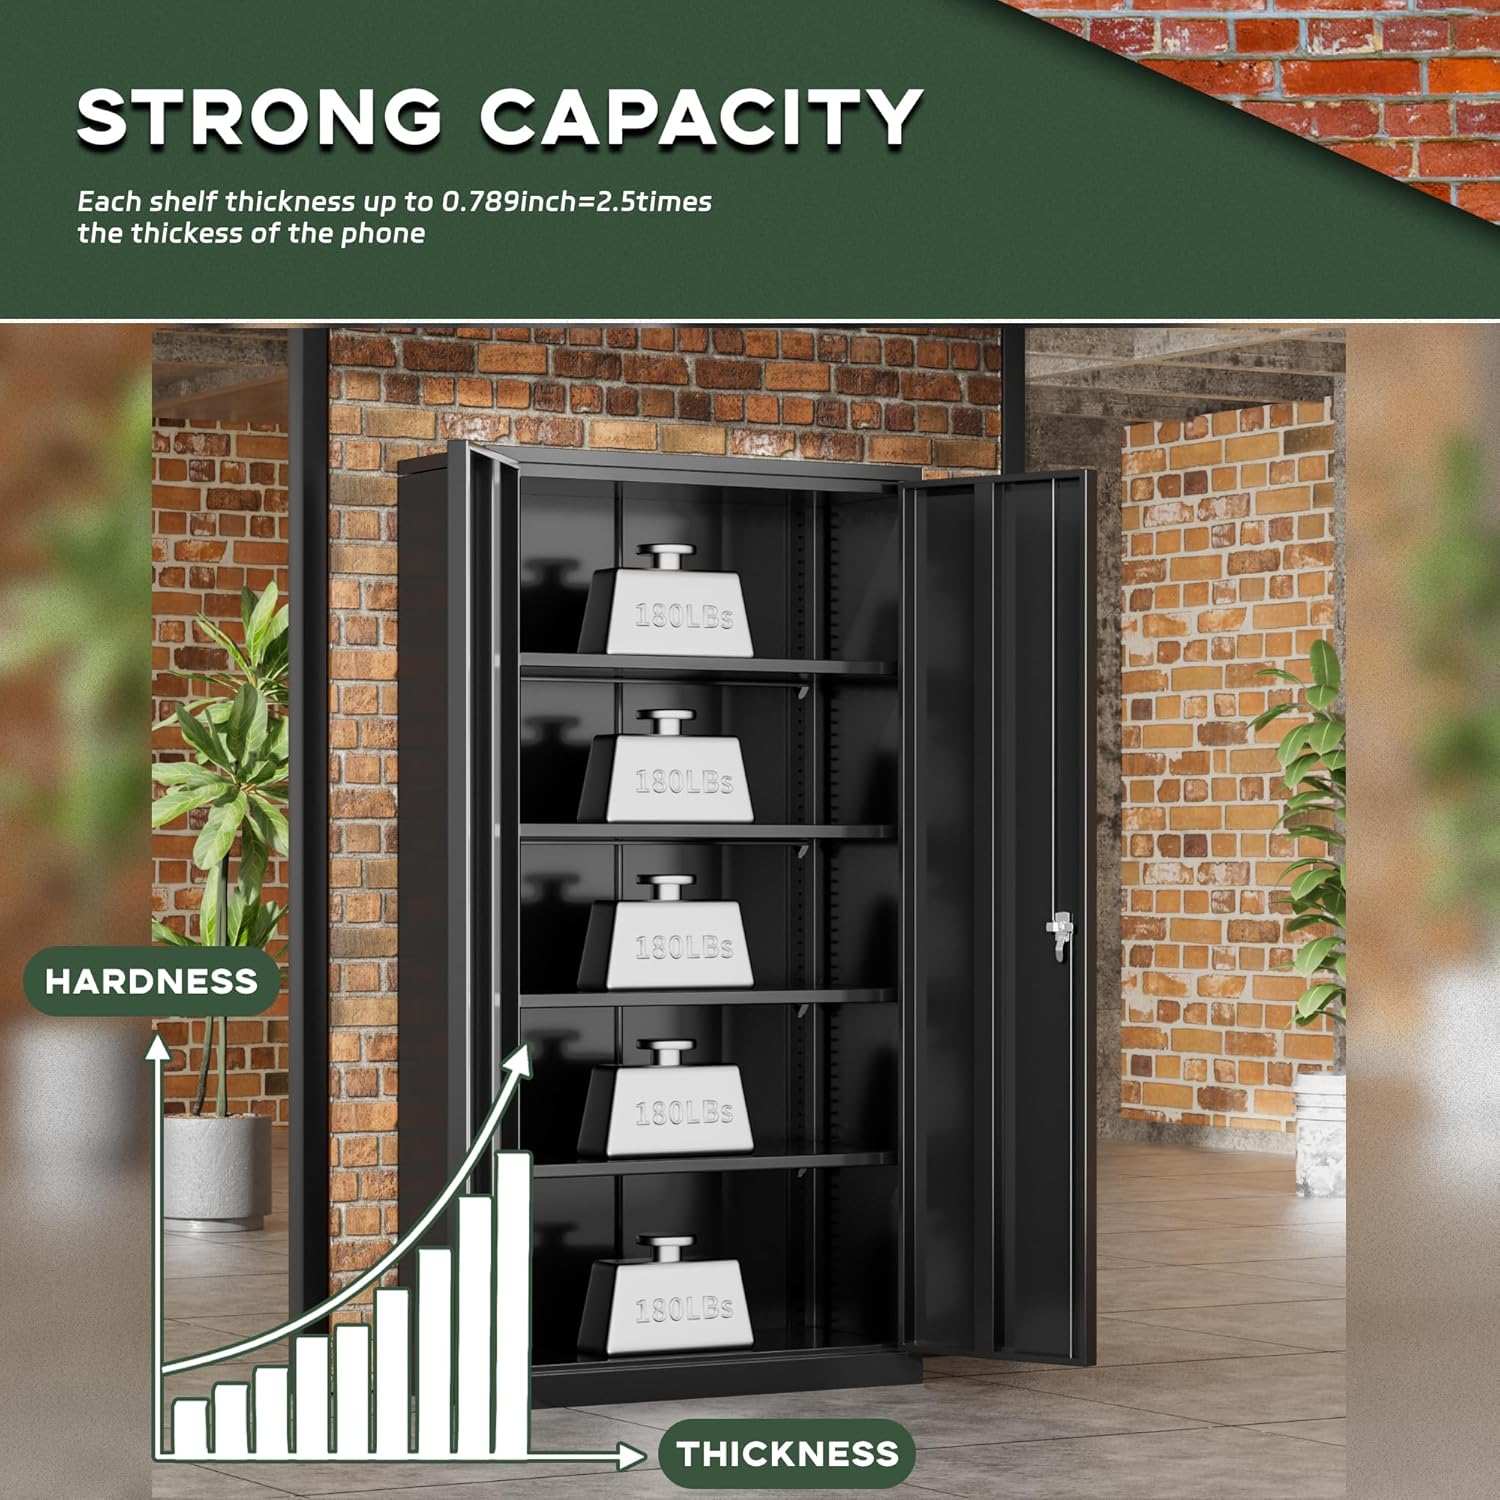
| Capacidad de peso del estante | Hasta 180 libras por estante |
| Sistema de bloqueo | 3-point locking with 2 keys |
| Características especiales | Lockable, Anti-tipping mechanism, Waterproof and rust-resistant coating |
| Usos recomendados | Art & Crafts, Clothes, Files & Folders, Tools, Home Office, Garage, Shop, School |
8. Garantía y soporte
Greenvelly products are manufactured to high-quality standards. For specific warranty details, please refer to the warranty card included with your purchase or visit the official Greenvelly website. If you encounter any issues or require assistance with your Greenvelly 72" H Metal Storage Cabinet, please contact our professional after-sales support team. Contact information can typically be found on our websitio o en el embalaje del producto.


