1. Introducción
Thank you for choosing the IRONZON Fingerprint Door Lock with Mini G2 Gateway. This smart lock system provides advanced security and convenient access for various environments, including homes, hotels, offices, and apartments. It integrates multiple unlocking methods, including fingerprint recognition, passcodes, traditional keys, and smart app control via the included Mini G2 Gateway.
This manual will guide you through the installation, setup, operation, and maintenance of your new smart door lock, ensuring optimal performance and security.

Image 1.1: The IRONZON Fingerprint Door Lock, Mini G2 Gateway, and a smartphone displaying the control app.
2. Contenido del paquete
Verifique que todos los componentes estén presentes en su paquete antes de continuar con la instalación:
- Conjunto de manija frontal (con sensor de huellas dactilares y teclado)
- Montaje de la manija trasera
- Pestillo ajustable
- Placa de impacto y caja de impacto
- Tornillos y husillos de montaje
- 2 x Llaves mecánicas
- Mini G2 Gateway
- USB-C Power Cable for Gateway
- Manual de usuario (este documento)

Imagen 2.1: Másview of the IRONZON Fingerprint Door Lock and its included accessories.
3. Características principales
- Múltiples métodos de desbloqueo: Access your door using fingerprint, passcode, mechanical key, or the smart app.
- Fast Biometric Recognition: Unlock the door in under 1 second with advanced fingerprint technology.
- Control y monitoreo remoto: The included Mini G2 Gateway enables remote control and real-time status monitoring via the Tuya Smart App (2.4G Wi-Fi required).
- Códigos de acceso temporales: Generate and manage temporary passcodes for guests or service personnel.
- Registro de actividad: View a detailed history of who accessed the door and when through the app.
- Construcción duradera: All-metal design ensures longevity and blends with modern decor.
- Pestillo ajustable: Compatible with most standard door preparations.
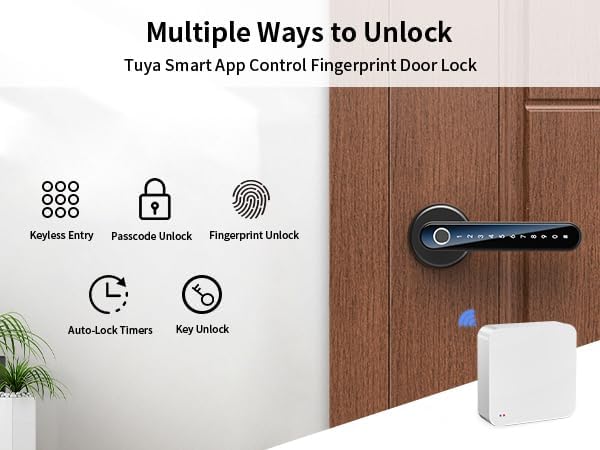
Image 3.1: Visual representation of the various unlocking methods available with the smart door lock.

Image 3.2: The Mini G2 Gateway enables remote control of the door lock from anywhere via the app.
4. Guía de configuración
4.1. Instalación
Before installation, ensure your door thickness is between 1⅜ inches (35mm) and 1¾ inches (45mm) and the backset distance is between 2⅜ inches (60mm) and 2¾ inches (70mm).
- Prepara la puerta: Si va a reemplazar una cerradura existente, retírela. Asegúrese de que los orificios de la puerta estén limpios y del tamaño correcto.
- Instale el pestillo: Insert the adjustable latch into the door edge. Ensure the latch bolt faces the correct direction (slanted side towards the door frame). Secure with screws.
- Instalar el mango delantero: Insert the spindle through the latch. Position the front handle assembly on the exterior side of the door, ensuring the cable passes through the borehole.
- Instalar el mango trasero: Connect the cable from the front handle to the rear handle assembly. Align the rear handle with the spindle and mounting posts. Secure with mounting screws from the interior side.
- Inserte las baterías: Open the battery cover on the rear handle. Insert 4 AAA batteries (not included), ensuring correct polarity. Close the battery cover.
- Operación de prueba: Manually test the handle and latch to ensure smooth operation.

Image 4.1: Detailed installation guide and applicable door dimensions for the smart lock.
4.2. Descarga y configuración de la aplicación
The IRONZON Fingerprint Door Lock uses the Tuya Smart App for smart features.
- Descargar aplicación: Buscar "Tuya Smart" in your smartphone's app store (iOS or Android) and download it.
- Registrarse/Iniciar sesión: Abra la aplicación y registre una nueva cuenta o inicie sesión si ya tiene una.
- Agregar dispositivo: Tap the "+" icon in the top right corner or select "Add Device." Choose "Security & Video Surveillance" > "Smart Lock" or use the auto-scan feature.
- Bloqueo de par: Follow the on-screen instructions to put the lock into pairing mode (usually by pressing a button on the interior handle or entering a specific code on the keypad). The app will detect and connect to the lock via Bluetooth.
- Administrador del conjunto: Once connected, you will be prompted to set up the administrator fingerprint and passcode. This is crucial for initial access and managing other users.
4.3. Mini G2 Gateway Pairing
The Mini G2 Gateway enables remote control and monitoring of your lock via Wi-Fi.
- Puerta de enlace de encendido: Connect the Mini G2 Gateway to a power source using the provided USB-C cable. The indicator light will flash.
- Agregar puerta de enlace a la aplicación: In the Tuya Smart App, tap "+" to add a new device. Select "Gateway" > "Wireless Gateway (Wi-Fi)" or use auto-scan.
- Conectarse a Wi-Fi: Follow the app instructions to connect the gateway to your 2.4GHz Wi-Fi network.
- Link Lock to Gateway: Once the gateway is online, navigate to your lock's settings within the Tuya Smart App. Select the option to link it to the newly added gateway. Ensure the gateway is within Bluetooth range of the lock for initial linking.

Image 4.2: Specifications and physical dimensions of the Mini G2 Gateway.
5. Instrucciones de funcionamiento
5.1. Métodos de desbloqueo
- Desbloqueo mediante huella dactilar: Coloque firmemente el dedo registrado sobre el sensor de huellas dactilares. La cerradura se desbloqueará si se reconoce la huella.
- Passcode Unlocking: Enter your registered passcode on the keypad, followed by the '#' key. The lock will unlock if the passcode is correct.
- Mechanical Key Unlocking: Insert the mechanical key into the keyhole located on the front handle and turn to unlock. This is a backup method for emergencies or battery depletion.
- App Unlocking: Open the Tuya Smart App, select your lock, and tap the unlock icon. This can be done via Bluetooth (close range) or remotely via the Mini G2 Gateway (Wi-Fi).

Image 5.1: The Tuya Smart App provides multiple options for unlocking and managing the door lock.
5.2. User Management (via Tuya Smart App)
The app allows you to manage users, add/delete fingerprints and passcodes, and set access schedules.
- Agregar usuario: In the app, navigate to your lock's settings and select "Member Management" or "Users." Follow the prompts to add new users, assigning them fingerprints or passcodes.
- Generate Temporary Codes: Select "Temporary Code" to create time-limited or one-time access codes for guests.
- View Registro de actividad: Access the "Log" section to review a chronological record of all lock and unlock events, including the method used and the user.
- Mando a distancia: With the gateway connected, you can lock/unlock the door remotely, modify user access, and receive notifications.

Image 5.2: The app allows for remote monitoring of door status, viewing activity logs, and managing access.
6. Mantenimiento
6.1. Reemplazo de la batería
The lock requires 4 AAA batteries. When the battery level is low, the lock will provide an audible warning. Replace batteries promptly to avoid loss of function.
- Locate the battery cover on the interior handle.
- Retire el tornillo que fija la tapa de la batería.
- Remove the old batteries and insert 4 new AAA batteries, ensuring correct polarity.
- Vuelva a colocar la tapa de la batería y asegúrela con el tornillo.
Nota: If batteries completely deplete, you can use the mechanical key or connect a USB-C power bank to the emergency power port on the exterior handle to temporarily power the lock for entry.
6.2. Limpieza
Para mantener la apariencia y funcionalidad de su cerradura:
- Limpie la superficie de la cerradura con un paño suave y seco.
- Evite utilizar limpiadores abrasivos, solventes o productos químicos agresivos, ya que pueden dañar el acabado y los componentes electrónicos.
- Mantenga el sensor de huellas dactilares y el teclado limpios y libres de residuos para un rendimiento óptimo.
7. Solución de problemas
| Problema | Posible causa | Solución |
|---|---|---|
| La cerradura no responde. | Baterías agotadas. | Replace batteries. Use mechanical key or emergency USB-C power. |
| Huella dactilar no reconocida. | Finger is wet/dirty, sensor is dirty, or fingerprint not properly registered. | Ensure finger and sensor are clean and dry. Re-register fingerprint, trying different angles. |
| El código de acceso no funciona. | Incorrect passcode entered, or passcode not registered. | Verify passcode. Ensure '#' is pressed after the code. Register passcode via app. |
| No se puede conectar a la aplicación. | Bluetooth/Wi-Fi off, lock/gateway out of range, or pairing issue. | Ensure Bluetooth is on. Move closer to the lock/gateway. Check Wi-Fi connection (2.4GHz only). Re-pair device in app. |
| La puerta de enlace no se conecta al Wi-Fi. | Contraseña de Wi-Fi incorrecta, red de 5 GHz o señal débil. | Verify Wi-Fi password. Ensure you are connecting to a 2.4GHz network. Move gateway closer to router. |
| Lock makes unexpected sounds or locks automatically. | Auto-lock feature enabled, or internal error. | Check auto-lock settings in the app. If persistent, perform a factory reset (refer to app instructions for reset procedure). |
8. Especificaciones
| Característica | Detalle |
|---|---|
| Marca | IRONZON |
| Nombre del modelo | LOC191GWBUSIR |
| Tipo de bloqueo | Biométrico (huella dactilar) |
| Métodos de desbloqueo | Fingerprint, Passcode, Key, App (Bluetooth/Wi-Fi via Gateway) |
| Método de control | Aplicación, remoto |
| Fuente de alimentación | Pilas 4 x AAA (no incluidas) |
| Energía de emergencia | Puerto USB-C |
| Espesor de la puerta | 1.38 - 1.77 pulgadas (35 mm - 45 mm) |
| Backset Distance | 2.36 - 2.75 pulgadas (60 mm - 70 mm) |
| Dimensiones del artículo (largo x ancho x alto) | 6.3 x 2.3 x 2.3 pulgadas |
| Peso del artículo | 1.94 libras (0.88 kilogramos) |
| Red de puerta de enlace | Wifi 2.4G |
| Gateway Power Interface | USB tipo C (CC 5 V/1 A) |
| Gateway Bluetooth | Bluetooth 4.2 de bajo consumo |
9. Garantía y soporte
IRONZON products are designed for reliability and performance. This product comes with a standard manufacturer's warranty against defects in materials and workmanship. Please refer to the warranty card included in your package for specific terms and conditions, including the warranty period and coverage details.
For technical support, troubleshooting assistance, or warranty claims, please contact IRONZON customer service through the following channels:
- Correo electrónico: Refer to your product packaging or the IRONZON official webSitio para obtener el correo electrónico de contacto más actualizado.
- Soporte en línea: Visit the IRONZON official webSitio para preguntas frecuentes, artículos de soporte y formularios de contacto.
When contacting support, please have your product model number (LOC191GWBUSIR) and purchase information readily available.


