1. Introducción
The Saker Cordless Tile Vibration Tool (Model SK-7019A) is a portable, handheld device designed for efficient and precise tile installation. This tool combines powerful suction with adjustable vibration to ensure optimal adhesion and leveling of various tile types on different surfaces. Its cordless design, digital display, and multiple speed settings enhance user convenience and work efficiency. This manual provides essential information for safe operation, setup, maintenance, and troubleshooting.

Figure 1: Saker Cordless Tile Vibration Tool with included accessories.
2. Información de seguridad
Lea y comprenda siempre todas las advertencias e instrucciones de seguridad antes de utilizar esta herramienta. El incumplimiento de estas instrucciones podría provocar descargas eléctricas, incendios o lesiones graves.
2.1 Advertencias generales de seguridad
- Seguridad en el área de trabajo: Mantenga su área de trabajo limpia y bien iluminada. Las áreas desordenadas u oscuras invitan a los accidentes.
- Seguridad eléctrica: No exponga las herramientas eléctricas a la lluvia ni a condiciones húmedas. Si entra agua en una herramienta eléctrica, aumentará el riesgo de descarga eléctrica.
- Seguridad personal: Always wear appropriate personal protective equipment, including eye protection, gloves, and sturdy footwear. Avoid loose clothing or jewelry.
- Uso y cuidado de herramientas: No fuerce la herramienta. Utilice la herramienta correcta para su aplicación. Desconecte la batería de la herramienta antes de realizar ajustes, cambiar accesorios o guardar herramientas eléctricas.
2.2 Seguridad de la batería
- Utilice únicamente el cargador especificado por el fabricante para recargar. Un cargador compatible con un tipo de batería puede suponer un riesgo de incendio al utilizarse con otro tipo.
- Do not use battery packs that are damaged or modified. Damaged or modified batteries may exhibit unpredictable behavior resulting in fire, explosion, or risk of injury.
- No exponga la batería ni la herramienta al fuego ni a temperaturas excesivas. La exposición al fuego o a temperaturas superiores a 130 °C (265 °F) puede provocar una explosión.
- Follow all charging instructions and do not charge the battery pack or tool outside the temperature range specified in the instructions. Improperly charging or at temperatures outside the specified range may damage the battery and increase the risk of fire.
3. Contenido del paquete
Verify that all items listed below are included in your package. If any items are missing or damaged, please contact Saker customer support.
- 1 x Cordless Tile Vibration Tool
- 2 baterías de iones de litio de 1.5 Ah y 22 V
- Cargador de batería 1 x
- 1 x Manual de usuario (este documento)
- 1 x bolsa de almacenamiento

Figure 2: Included components in the Saker Cordless Tile Vibration Tool package.
4. Producto terminadoview
Familiarize yourself with the components of your Saker Cordless Tile Vibration Tool.

Figure 3: Key components of the Saker Cordless Tile Vibration Tool.
- Interruptor de alimentación: Activates or deactivates the tool.
- Lifting Rod: Engages and disengages the suction cup mechanism.
- Lock Bolt: Secures the lifting rod in position.
- Ventosa: Creates a vacuum seal on the tile surface for lifting and vibration.
- Power Button (Start-up): Initiates the vibration function.
- Vibration Adjust (+/-): Buttons to increase or decrease the vibration speed.
- Burbuja de nivel: Integrated bubble level for checking tile alignment.
- Pantalla digital: Shows the current vibration speed level.
5. Configuración
5.1 Carga de las baterías
- Conecte el cargador a una toma de corriente estándar.
- Insert a 22V battery into the charger. Ensure it is seated correctly.
- Allow the battery to charge fully. The charger's indicator light will typically change color or turn off when charging is complete. A full charge takes approximately 2 hours.
- Retire la batería del cargador una vez que esté completamente cargada.
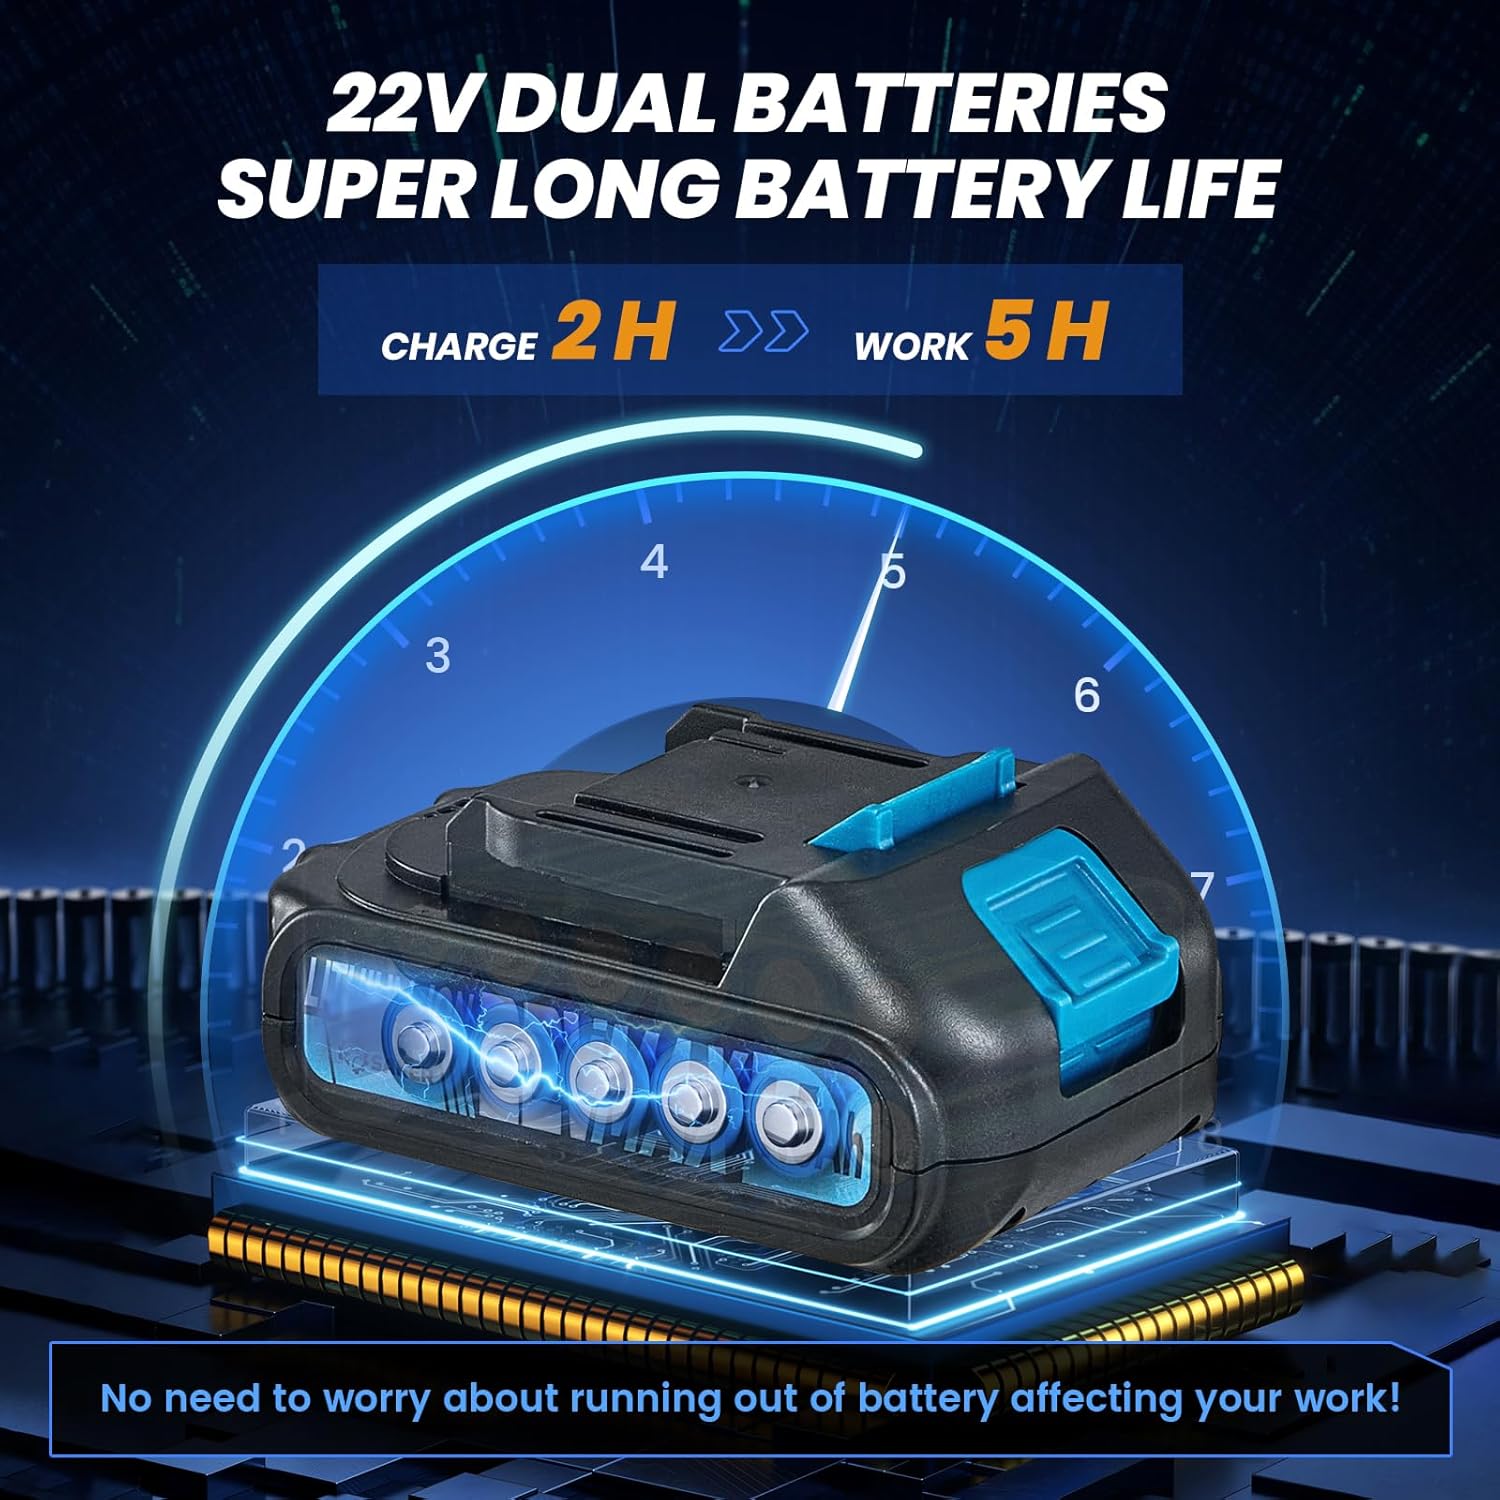
Figure 4: Charging the 22V Lithium-Ion battery.
5.2 Instalación de la batería
- Asegúrese de que el interruptor de encendido de la herramienta esté en la posición APAGADO.
- Align the charged battery with the battery slot at the base of the tool handle.
- Deslice la batería en la ranura hasta que encaje firmemente en su lugar.
- Para quitar la batería, presione el botón de liberación (si está presente) y deslice la batería hacia afuera.

Figure 5: Installing the battery into the tool.
6. Instrucciones de funcionamiento
6.1 Encendido / Apagado
Locate the main power switch on the tool's handle. Flip the switch to the 'ON' position to power on the tool. Flip it to 'OFF' when not in use or when changing batteries.

Figure 6: Engaging the main power switch.
6.2 Attaching to Tile (Suction Function)
- Ensure the tile surface is clean and dry for optimal suction.
- Place the suction cup flat onto the tile surface.
- Press down firmly on the tool and engage the Lifting Rod (refer to Figure 3) to create a vacuum seal. The Lock Bolt can be used to maintain suction.
- Verify that the tile is securely held by the suction cup before lifting or moving. The tool can absorb tiles with a load-bearing capacity of over 130 pounds.

Figure 7: Engaging the lifting rod for suction.
6.3 Adjusting Vibration Speed
- With the tool powered on, press the 'Start-up' Power Button (refer to Figure 3) to begin vibration.
- Use the '+' and '-' buttons on the control panel to adjust the vibration speed. There are 5 levels of adjustment, up to 18000r/min.
- The Digital Display will show the current vibration level. Adjust the speed based on the tile size, type, and adhesive thickness.

Figure 8: Control panel for vibration adjustment.
6.4 Vibrating the Tile for Adhesion
- After applying adhesive to the surface and placing the tile, attach the tool's suction cup to the tile.
- Activate the vibration function and gently move the tool across the tile surface. This helps to spread the adhesive evenly, remove air pockets, and ensure a strong bond.
- Use the integrated Level Bubble to check for proper alignment and flatness during the process.
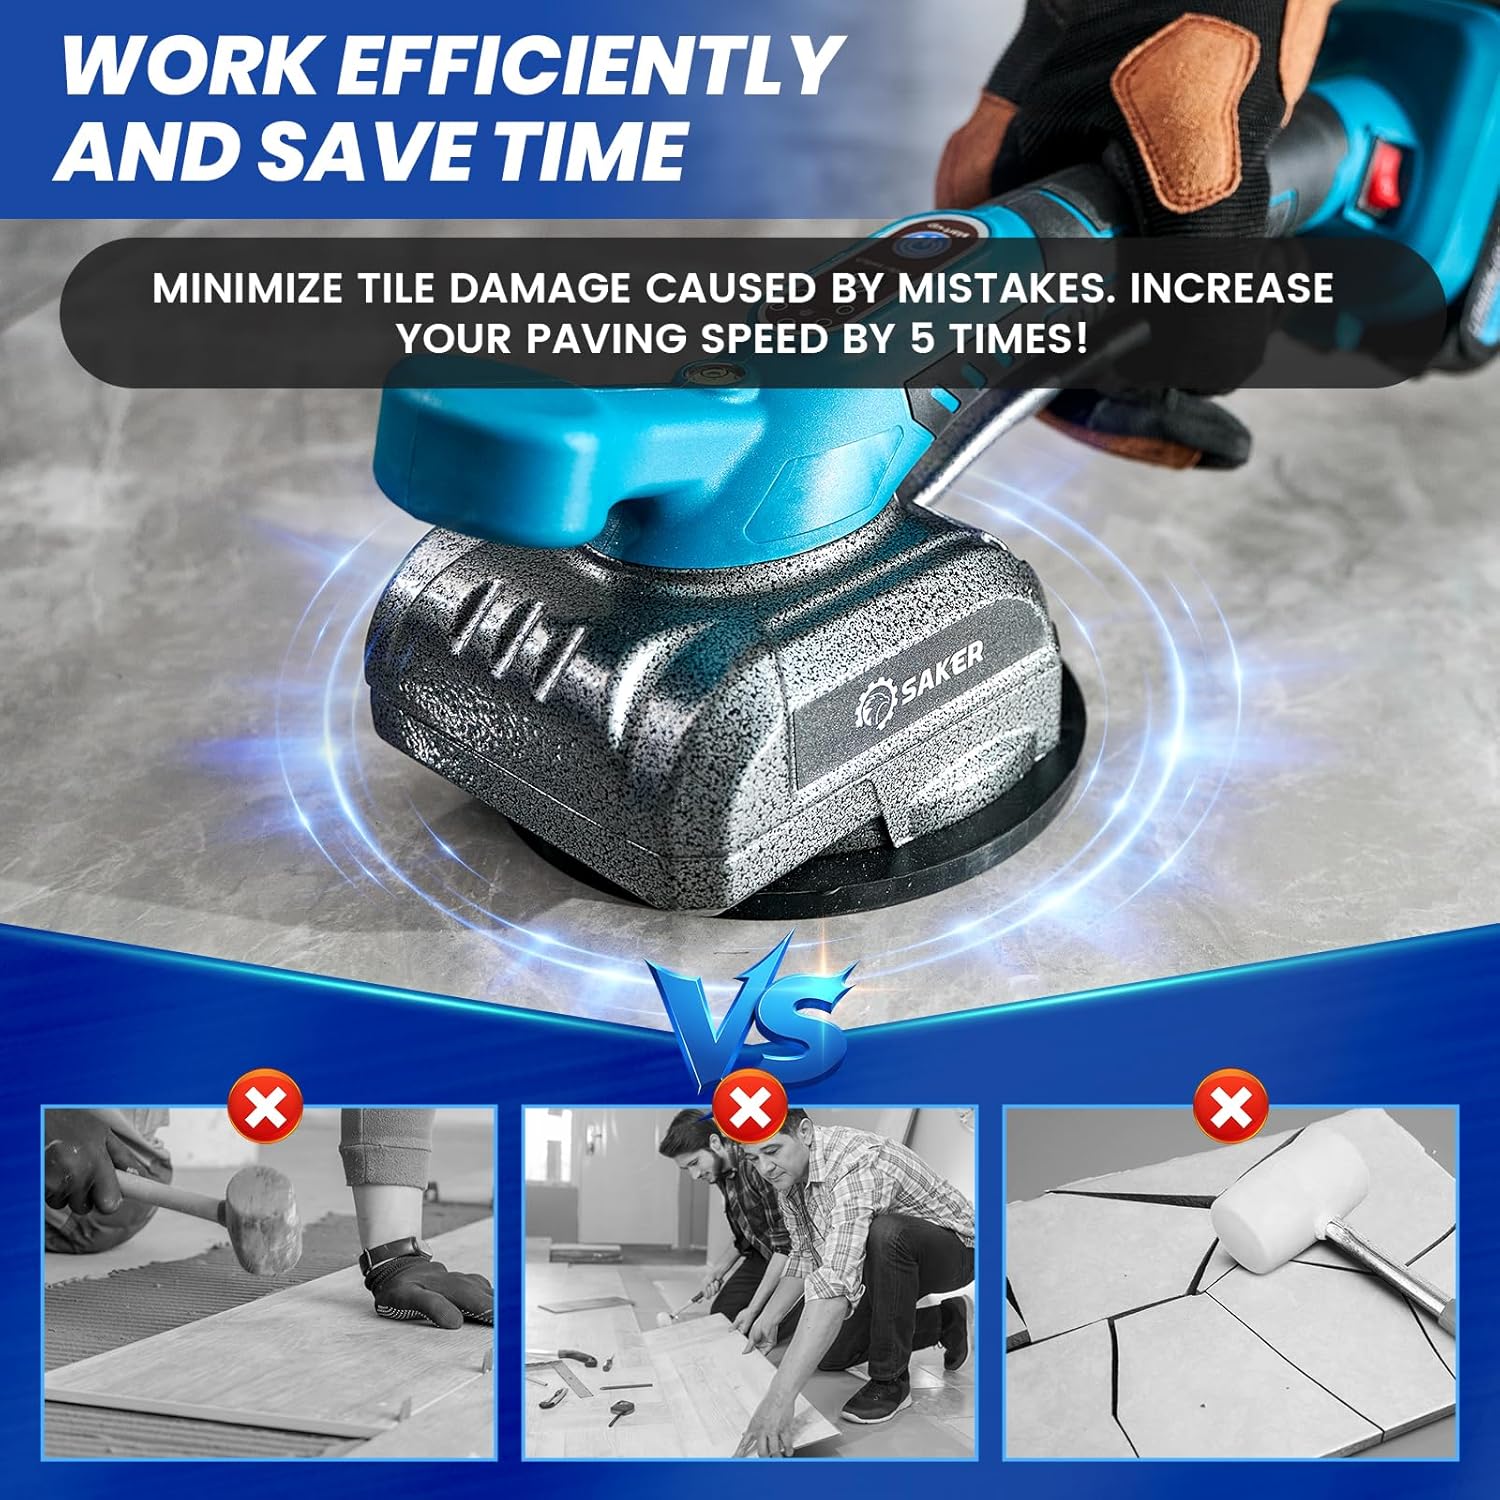
Figure 9: Using the tool to vibrate and level tiles.
6.5 Extracción de la herramienta
To release the suction, disengage the Lifting Rod. Carefully lift the tool from the tile surface.
7. Mantenimiento
7.1 Limpieza
- Always ensure the tool is powered off and the battery is removed before cleaning.
- Wipe the tool body with a clean, damp paño. No utilice productos químicos agresivos ni limpiadores abrasivos.
- Clean the suction cup thoroughly after each use to remove any adhesive residue or debris. A clean suction cup ensures optimal performance.
7.2 Cuidado y almacenamiento de la batería
- Guarde las baterías en un lugar fresco y seco, lejos de la luz solar directa y de temperaturas extremas.
- Para el almacenamiento a largo plazo, cargue las baterías aproximadamente al 50 % de su capacidad.
- Avoid fully discharging batteries, as this can reduce their lifespan.
7.3 Inspección General
- Regularly inspect the tool for any signs of damage, wear, or loose components.
- Asegúrese de que todas las piezas móviles funcionen sin problemas.
- If any damage is found, discontinue use and contact customer support for repair or replacement.
8. Solución de problemas
This section addresses common issues you might encounter with your Saker Cordless Tile Vibration Tool.
| Problema | Posible causa | Solución |
|---|---|---|
| La herramienta no se enciende. | Battery not charged or improperly installed. Main power switch is off. | Ensure battery is fully charged and correctly inserted. Flip the main power switch to 'ON'. |
| Poor or no suction. | Suction cup is dirty or damaged. Tile surface is wet or uneven. Lifting rod not fully engaged. | Clean the suction cup. Ensure tile surface is clean and dry. Fully engage the lifting rod and lock bolt. |
| La vibración es débil o inconsistente. | Carga de batería baja. Ajuste de velocidad incorrecto. | Charge the battery. Adjust the vibration speed using the '+' button. |
| La batería no se carga. | Cargador no conectado. Batería o cargador defectuoso. | Ensure charger is properly plugged in. Try a different outlet. Contact customer support if issue persists. |
9. Especificaciones
| Característica | Especificación |
|---|---|
| Marca | Saker |
| Modelo | SK-7019A |
| Volumentage | 22 voltios |
| Tipo de batería | Iones de litio |
| Número de baterías | 2 (1.5 Ah) |
| Peso del artículo | 5.17 libras |
| Dimensiones del producto (LxAnxAl) | 14.29" x 7.17" x 5.67" |
| Capacidad de carga máxima | Más de 130 libras |
| Max Tile Size | 59" x 59" |
| Velocidad de vibración | 5 levels, up to 18000 r/min |
| Material | Acero aleado |
10. Garantía y soporte
The Saker Cordless Tile Vibration Tool comes with a limited warranty. Please refer to the warranty card included in your package for specific terms and conditions. For any quality problems, questions about the product, or technical support, please contact Saker customer service. Keep your purchase receipt as proof of purchase for warranty claims.


