Introducción
Thank you for choosing the Diivoo 4 Zone Sprinkler Timer. This programmable automatic irrigation timer is designed to simplify your garden watering, offering independent control over four separate zones. With features like rain delay and manual watering modes, it provides flexibility and efficiency for your lawn, yard, and pool watering needs. Please read this manual thoroughly before operation to ensure proper setup and optimal performance.
Información de seguridad
- Do not immerse the timer in water. The unit is IP54 rated for water resistance, but not submersion.
- Use only 2 AA 1.5V alkaline batteries. Do not mix old and new batteries, or different types of batteries.
- Asegúrese de que todas las conexiones estén bien ajustadas para evitar fugas.
- Operate within recommended water pressure limits to avoid damage.
- Mantener fuera del alcance de los niños.
- Protect from freezing temperatures. Remove batteries and store indoors during winter.
Producto terminadoview
Componentes

Figura 1: Frente view of the Diivoo 4 Zone Sprinkler Timer, showing the large LCD display, control buttons, and four hose outlets.
- Unidad principal: Houses the control panel, LCD display, and battery compartment.
- Conector de entrada: Connects to your outdoor faucet (standard 3/4" garden hose thread). Features reinforced nylon fiber for durability.
- Four Outlet Connectors: Each outlet can be connected to a separate hose or irrigation line.
- Botones de control: For navigation and setting adjustments (OK, ESC/OFF, +, -, DELAY).
- Pantalla LCD: Large screen showing current time, program settings for each zone (A, B, C, D), and status indicators.
Características principales
- 4 zonas de riego independientes: Allows separate scheduling for different areas.
- Horarios programables: Set start time, watering duration (1s-360min), and frequency (every 1 min to 24 hrs, or every day to every 15 days).
- Función de retraso por lluvia: Skip watering cycles to conserve water during rainy periods.
- Modo de riego manual: Initiate immediate watering without affecting programmed schedules.
- Gran pantalla LCD: 3.2 x 2 inch screen for easy readability and quick operation.
- Resistencia al agua IP54: Durable y adecuado para uso en exteriores.
- Bajo consumo de energía: Battery life up to 6-8 months with 2 AA batteries (not included).
- Protección de baja potencia: Valve automatically shuts off when battery is too low to prevent water waste.
Configuración
1. Instalación de la batería
The timer requires 2 AA 1.5V alkaline batteries (not included).
- Localice el compartimento de la batería en la parte posterior del temporizador.
- Deslice la tapa de la batería para abrirla.
- Inserte dos pilas alcalinas AA nuevas, asegurándose de la polaridad correcta (+/-).
- Close the battery cover securely. The battery cover has a seal to isolate moisture.

Figure 2: Image showing the battery compartment and reinforced nylon fiber connection, highlighting the leakproof design.
2. Conexión del temporizador
- Asegúrese de que el grifo exterior esté cerrado.
- Screw the timer's inlet connector onto any standard 3/4" garden outdoor faucet. Hand-tighten only. Do not overtighten.
- Connect your garden hoses to the four independent outlets (A, B, C, D) at the bottom of the timer.
- Turn on your outdoor faucet. The timer is designed to withstand typical household water pressure.
Instrucciones de funcionamiento
Comprensión de la pantalla LCD y los controles

Figure 3: Close-up of the large LCD screen and the 7-button quick setup panel.
The large LCD display shows various information including the current time, battery level, active zone indicators (A, B, C, D), start time, watering duration, watering frequency, and next start time. The control panel features buttons for navigation and setting adjustments:
- Aceptar: Confirmar la selección o ingresar al modo de configuración.
- ESC/OFF: Exit current setting, return to previous screen, or turn off the timer.
- +: Increase value or move forward in menu.
- -: Decrease value or move backward in menu.
- DEMORA: Activate/deactivate rain delay.
- NOW/ABCD: Switch between current time display and zone selection.
1. Configuración de la hora actual
- Presione el OK button to enter setting mode. The time display will flash.
- Utilice el + or - Botones para ajustar la hora. Presione OK Para confirmar.
- Ajuste los minutos utilizando + or -, luego presione OK Para confirmar.
- Prensa ESC para salir del modo de configuración.
2. Programming Automatic Watering Schedules (4 Zones)
The Diivoo timer allows you to set independent watering schedules for each of its four zones (A, B, C, D).

Figure 4: Visual representation of four independent irrigation zones (Zone 1, Zone 2, Zone 3, Zone 4) for customized watering.

Figure 5: Display showing options for setting Start Time, Watering Duration (1s to 360min), and Watering Frequency (Every 1H-23H or Every 1-15 Days).
- Presione el NOW/ABCD button to select the desired zone (A, B, C, or D). The selected zone indicator will flash.
- Prensa OK to enter programming for the selected zone.
- Establecer hora de inicio: Usar + or - to adjust the hour and minutes for the watering start time. Press OK después de cada ajuste.
- Establecer la duración del riego ("Cuánto tiempo"): Usar + or - to set the watering duration from 1 second to 360 minutes. Press OK Para confirmar.
- Establecer la frecuencia de riego ("Con qué frecuencia"):
- Usar + or - to select frequency in hours (e.g., every 1 hour to 23 hours). Press OK.
- Alternatively, select frequency in days (e.g., every 1 day to 15 days). Press OK.
- You can also set specific days of the week for watering. Navigate through the days and press OK to select/deselect.
- After setting all parameters for the zone, press ESC to save and exit. Repeat for other zones as needed.
Nota: Adequate water pressure is required when all 4 zone ports are operating simultaneously. If water pressure is insufficient, it is recommended to rotate the use of the 4 zone ports to avoid reduced water flow through each port.
3. Modo de riego manual
Manual watering allows you to water immediately without interrupting your preset programs.
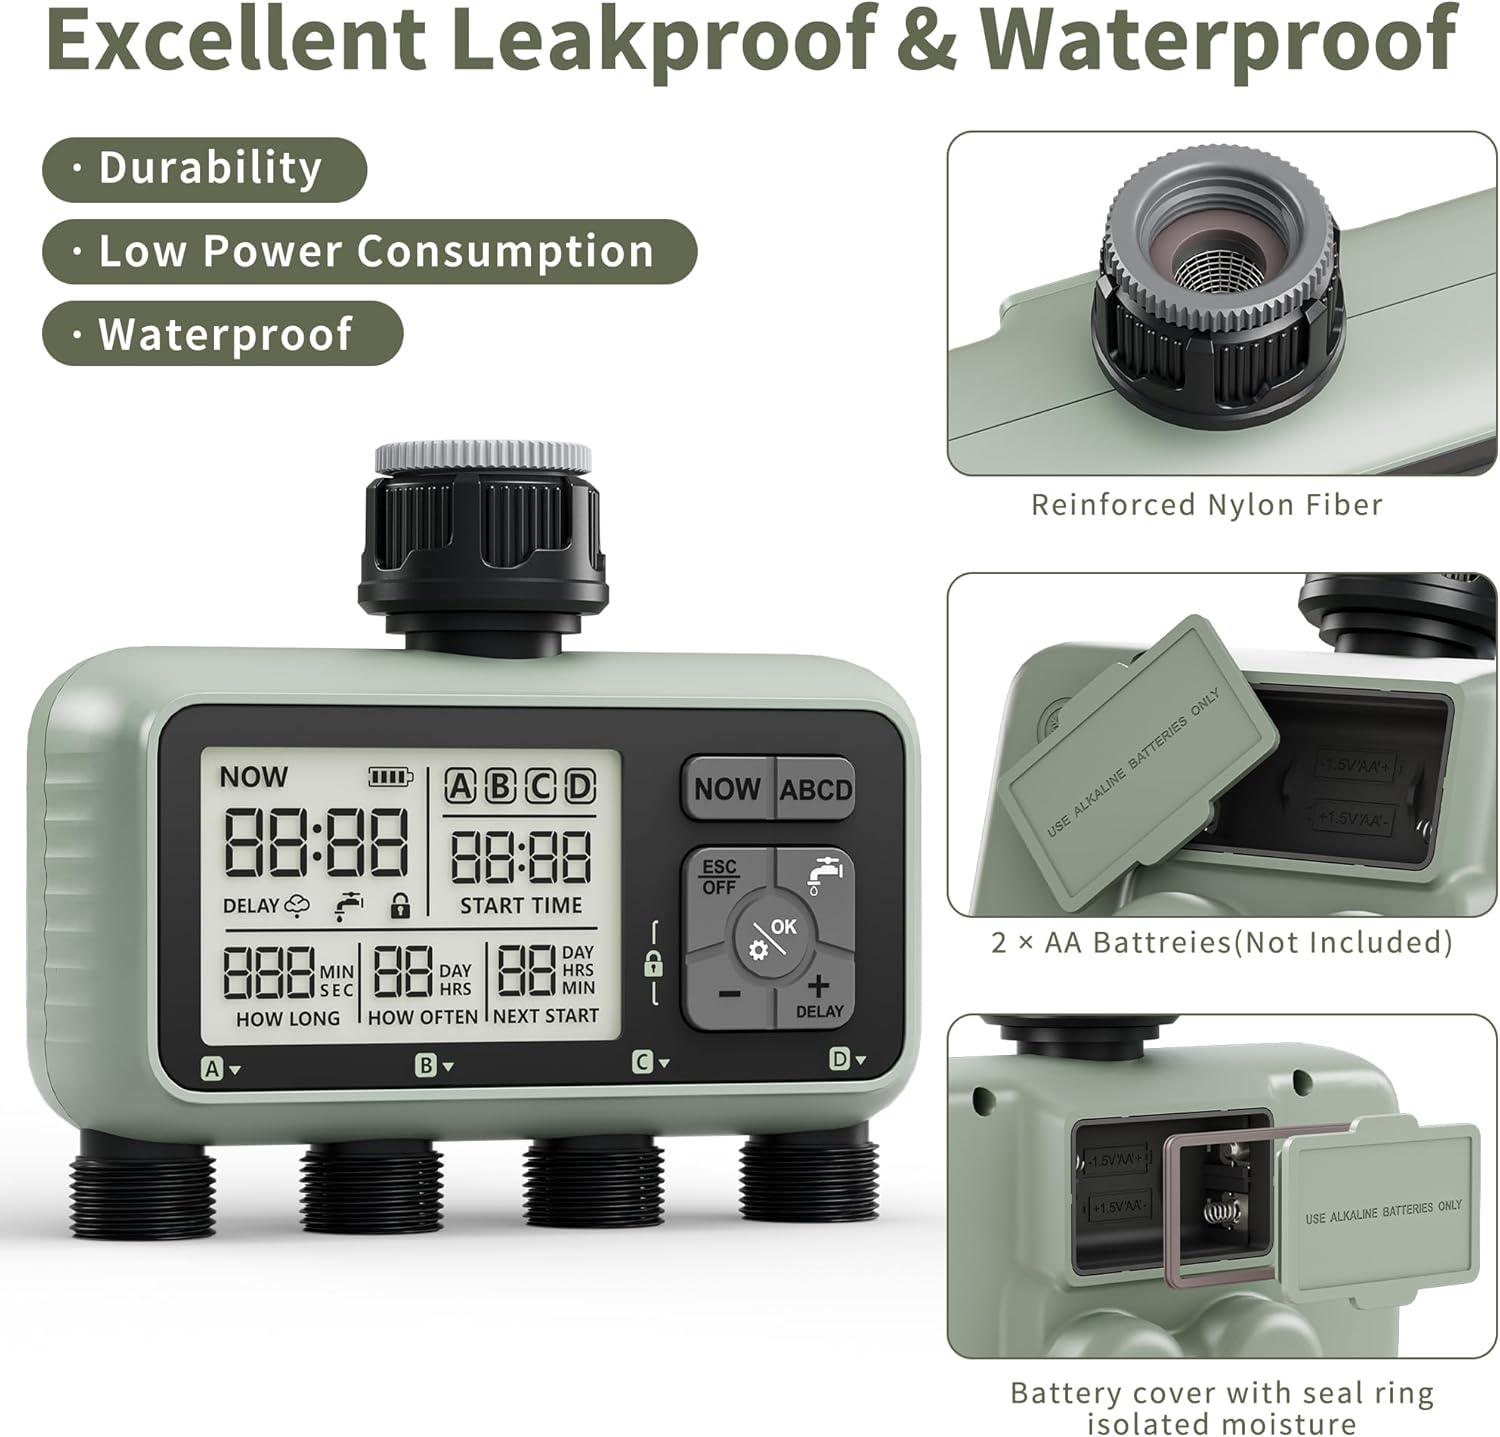
Figure 6: Illustration of manual watering in progress, showing the ability to set individual watering times for each zone from 1 second to 360 minutes.
- Desde la pantalla principal, presione el OK button (water drop icon).
- Usar + or - to select the desired watering duration (from 1 second to 360 minutes).
- Prensa OK to start manual watering. The selected zone(s) will begin watering immediately.
- Para detener el riego manual, presione ESC/APAGADO.
4. Función de retraso por lluvia
The rain delay feature allows you to temporarily pause your watering schedule to avoid overwatering and save water during rainy conditions. The timer does not have a rain sensor, so you will need to activate this manually based on local weather forecasts.

Figure 7: Display showing the Rain Delay feature, indicating that the next watering schedule will be skipped. This feature aids in water conservation and allows for postponed schedules.
- In the "ON" state (main display), press and hold the + Botón durante 5 segundos.
- The "DELAY" icon will appear on the screen, and the "NEXT START" time will update to reflect the postponed schedule.
- To deactivate rain delay, press and hold the + de nuevo durante 5 segundos.
5. Guía de vídeo del producto
Video 1: An official product video demonstrating the features of the Diivoo 4 Zone Sprinkler Timer, including manual watering, automatic watering, and rain delay functionality.
Mantenimiento
- Limpieza: Limpia el temporizador con un anuncioamp Paño. No utilice limpiadores abrasivos ni disolventes.
- Reemplazo de batería: Replace batteries when the low battery indicator appears on the LCD. It is recommended to replace batteries every 6-8 months or at the start of each watering season.
- Winterización: Before the first frost, remove the timer from the faucet. Remove the batteries. Store the timer indoors in a dry, protected area to prevent damage from freezing water.
- Limpieza de filtros: Periodically check the filter washer inside the inlet connector for debris. Clean if necessary to ensure proper water flow.
Solución de problemas
| Problema | Posible causa | Solución |
|---|---|---|
| Timer does not turn on/LCD is blank. | Baterías muertas o instaladas incorrectamente. | Reemplace las baterías con baterías alcalinas AA nuevas, asegurándose de la polaridad correcta. |
| Water does not flow or flow is weak. |
|
|
| Timer leaks from connections. | Loose connections or missing/damaged O-rings. | Ensure all connections are hand-tight. Check and replace O-rings if damaged. |
| Watering schedule not activating. |
|
|
Presupuesto
- Modelo: HCT-379
- Dimensiones del producto: 6.46 x 5.59 x 2.99 pulgadas
- Peso del artículo: 1.85 libras
- Fuente de energía: 2 pilas alcalinas AA de 1.5 V (no incluidas)
- Duración del riego: 1 segundo a 360 minutos
- Frecuencia de riego: Every 1 minute to 24 hours, or Every 1 day to 15 days
- Resistencia al agua: IP54
- Rosca de entrada: Standard 3/4" Garden Hose Thread
- Número de configuraciones: 16
Garantía y soporte
Diivoo products are designed for reliability and performance. For warranty information, technical support, or any questions regarding your Diivoo 4 Zone Sprinkler Timer, please contact Diivoo customer service. Our team of experts is available to assist you.
Please refer to the contact information provided with your product packaging or visit the official Diivoo webSitio para obtener los detalles de soporte más actualizados.
Tienda oficial de Diivoo: Diivoo Store on Amazon


