1. Introducción
The ROCAM CR1027 Vibrating Alarm Clock is a portable and rechargeable device designed to provide a customizable wake-up experience. It features dual alarms, adjustable vibration and sound levels, and a long-lasting battery, making it suitable for heavy sleepers, individuals with hearing impairments, or those who prefer a discreet alarm. This manual provides detailed instructions for setup, operation, and maintenance of your alarm clock.

Image 1.1: The ROCAM CR1027 Vibrating Alarm Clock highlighting its cordless, dual alarm, 12/24H, vibrating, volume setting, and rechargeable features.
2. Contenido del paquete
Por favor revise el paquete para ver los siguientes artículos:
- 1 x ROCAM CR1027 Vibrating Alarm Clock
- 1 x cable de carga USB
- 1 x Manual de usuario
- 1 x Correa de muñeca

Image 2.1: The complete package contents of the ROCAM CR1027 Vibrating Alarm Clock.
3. Producto terminadoview
3.1. Pantalla frontal
The front of the alarm clock features a clear digital display showing the time, AM/PM indicator, day of the week, DST status, alarm icons, and battery level. A speaker grille is located at the bottom of the front face.

Imagen 3.1: Frente view of the ROCAM CR1027 Vibrating Alarm Clock.
3.2. Top Buttons
The top of the device houses the main control buttons:
- (1) Alarm 1 Button: Presione para view/set Alarm 1.
- (2) Alarm 2 Button: Presione para view/set Alarm 2.
- TIME/SNOOZE Button: Presione para view/set current time, or to activate snooze during an alarm.
- (-) Minus Button: Decrease values during setting.
- (+) Plus Button: Increase values during setting.
3.3. Back Switches
The back of the device features several switches for advanced settings:
- Interruptor encendido / apagado: Para encender o apagar el dispositivo.
- LOCK/UNLOCK Switch: To prevent accidental button presses.
- Alarm 1 Day Setting Switch (MON-SUN, MON-FRI, SAT-SUN): Select the days for Alarm 1 to be active.
- Alarm 2 Day Setting Switch (MON-SUN, MON-FRI, SAT-SUN): Select the days for Alarm 2 to be active.
- Vibration Intensity Switch (H, M, L): Adjust the strength of the vibration (High, Medium, Low).
3.4. Side Port
The side of the device includes the USB-C charging port.
4. Configuración
4.1. Carga del dispositivo
Before first use, fully charge the alarm clock. Connect the provided USB charging cable to the USB-C port on the side of the device and plug the other end into a compatible USB power adapter (not included). The battery indicator on the display will show charging status. A full charge provides up to 160 days of standby time.

Image 4.1: The alarm clock connected to its USB-C charging cable.
4.2. Encendido / apagado
Deslice el ENCENDIDO/APAGADO switch on the back of the device to the 'ON' position to power it on. Slide it to 'OFF' to power down.
5. Instrucciones de funcionamiento
5.1. Configuración de la hora actual
- Mantenga pulsado el HORA/POSTEAR Botón hasta que los dígitos de la hora parpadeen.
- Utilice el (+) or (-) Botones para ajustar la hora.
- Presione el HORA/POSTEAR Presione nuevamente el botón para confirmar la hora y pasar al ajuste de minutos.
- Utilice el (+) or (-) Botones para ajustar los minutos.
- Presione el HORA/POSTEAR button again to confirm the minutes and move to day adjustment.
- Utilice el (+) or (-) buttons to adjust the day of the week.
- Presione el HORA/POSTEAR Presione el botón una última vez para guardar todas las configuraciones y salir.
5.2. Configuración de alarmas (Alarma 1 y Alarma 2)
El dispositivo admite dos alarmas independientes.
- Mantenga pulsado el (1) Alarm 1 botón (o (2) Alarm 2 button) until the hour digits flash.
- Utilice el (+) or (-) Botones para ajustar la hora de la alarma.
- Press the corresponding alarm button again to confirm the hour and move to minute adjustment.
- Utilice el (+) or (-) Botones para ajustar los minutos de la alarma.
- Press the corresponding alarm button again to confirm the minutes and move to alarm mode selection (sound/vibration).
- Utilice el (+) or (-) buttons to select the desired alarm mode: Buzzer + Shaker, Single Buzzer, or Single Shaker.
- Press the corresponding alarm button one last time to save settings and exit.
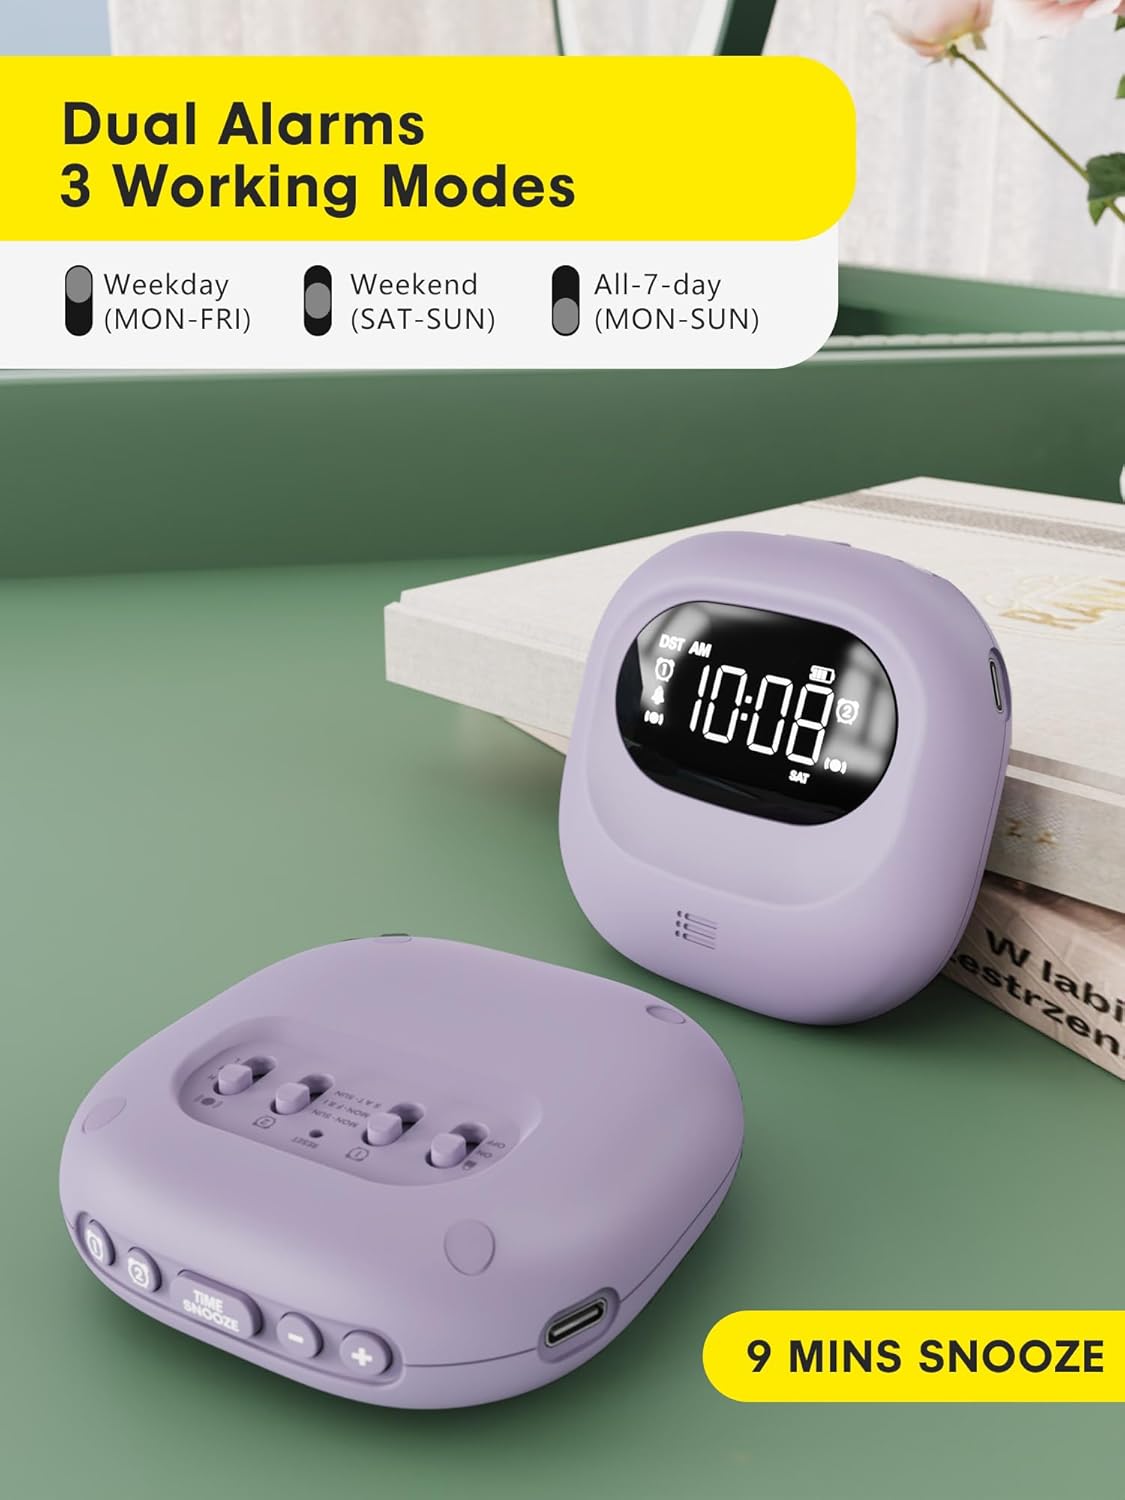
Image 5.1: Dual alarm settings displayed on the ROCAM CR1027.
5.3. Adjusting Alarm Day Settings
On the back of the device, locate the Alarm 1 and Alarm 2 day setting switches. Slide the switch to your preferred setting:
- LUN-DOM: Alarm will activate every day.
- LUN-VIE: Alarm will activate on weekdays only.
- SÁBADO-DOMINGO: Alarm will activate on weekends only.
5.4. Adjusting Vibration Strength
Utilice el Vibration Intensity Switch (H, M, L) on the back of the device to select your desired vibration strength: High, Medium, or Low.

Image 5.2: Illustration of the three wake-up modes available on the alarm clock.
5.5. Ajuste de los niveles de volumen
The device offers 5 volume levels for the audible alarm. Adjust this during the alarm setting process using the (+) or (-) buttons when the volume icon is flashing.
5.6. Función de repetición
Cuando suene una alarma, presione el HORA/POSTEAR button to activate the snooze function. The alarm will pause for 9 minutes and then sound again. This can be repeated up to 9 times.

Image 5.3: The snooze function of the alarm clock.
5.7. Función de bloqueo para niños
Para evitar cambios accidentales en la configuración, deslice el BLOQUEO Y DESBLOQUEO switch on the back of the device to the 'LOCK' position. This will disable all buttons until unlocked.

Image 5.4: The child lock feature of the alarm clock.
5.8. Función de retroiluminación
The digital screen lights up when in use and automatically turns off after 30 seconds of inactivity to conserve energy. Press any button to reactivate the backlight.
5.9. Time Format (12H/24H/DST)
The time display can be customized. During time setting, you can cycle through 12-hour, 24-hour, and Daylight Saving Time (DST) formats using the appropriate buttons.

Image 5.5: Customizable time formats on the alarm clock display.
6. Mantenimiento
- Mantenga el dispositivo limpio frotándolo con un paño suave y seco.
- Evite el uso de limpiadores o disolventes abrasivos.
- Ensure the side sound hole is not covered to maintain normal volume levels.
- Guárdelo en un lugar fresco y seco cuando no lo utilice durante períodos prolongados.

Image 6.1: Important note regarding the side sound hole for optimal performance.
7. Solución de problemas
- Alarma no se activa: Ensure the alarm is set correctly (time, AM/PM, days of the week) and the device is powered on. Check battery level.
- Vibración demasiado débil/fuerte: Adjust the Vibration Intensity Switch (H, M, L) on the back.
- Pantalla no visible: Press any button to activate the backlight. If the display remains off, check the battery level and charge the device.
- Botones que no responden: Check if the Child Lock function is activated. Slide the LOCK/UNLOCK switch to 'UNLOCK'.
8. Especificaciones
| Característica | Detalle |
|---|---|
| Marca | ROCAM |
| Número de modelo | CR1027 |
| Color | Púrpura |
| Tipo de pantalla | Digital |
| Fuente de poder | Funciona con pilas |
| Capacidad de la batería | 3000 mAh (1 batería no estándar incluida) |
| Tiempo de espera | Hasta 160 días |
| Dimensiones del producto | 3.34" de ancho x 1.06" de alto |
| Peso del artículo | 6.7 onzas |
| Material | Plástico |
| Características especiales | 160 Days-Standby, Adjustable Volume, Dual Alarm, Cordless, Rechargeable, Child Lock, Backlight |
9. Garantía y soporte
This ROCAM product comes with an 18-month free replacement warranty. For any questions, technical assistance, or warranty claims, please refer to the contact information provided in your package or visit the official ROCAM support websitio.