1. Producto terminadoview
The Nilight NA916 LED Third Brake Light is a high-mount stop, reverse, and cargo light assembly designed for specific Chevrolet and GMC truck models. This unit features a full LED light source, providing enhanced brightness and a longer lifespan compared to original halogen lights. It is engineered for durability and reliable performance in various weather conditions.
Características principales:
- Premium LED Lighting: Utilizes super bright LED chips for superior illumination, quick activation, and high efficiency.
- Construcción duradera: Made with high-grade ABS housing that is colorfast and built to meet strict OEM requirements.
- Clasificación de impermeabilidad IP67: Features a high-density foam mounted back, ensuring a perfect seal against water, snow, and heavy rain.
- Instalación Plug & Play: Designed for straightforward installation without the need for drilling.
Compatibilidad:
- Chevy Silverado 1500, 2500HD, 3500HD (2007-2013)
- GMC Sierra 1500, 2500HD, 3500HD (2007-2013)
- Note: Fits models equipped with cargo lights only. Replaces OEM Part Number: 25890530.

Figure 1: Product compatibility with Chevy Silverado and GMC Sierra trucks.
2. ¿Qué hay en la caja?
Al abrir el paquete, verifique que todos los componentes estén presentes y sin daños:
- 1x Nilight LED Third Brake Light Assembly
- 1x High-density Foam Pad
3. Especificaciones
| Atributo | Especificación |
|---|---|
| Marca | Crepúsculo |
| Número de modelo | NA916 |
| Color | Lente roja |
| Tipo de fuente de luz | CONDUJO |
| Volumentage | 12 voltios |
| Características especiales | Dustproof, High Beam, Lightweight, Shockproof, Waterproof (IP67) |
| Posición de la pieza automática | Rear Center, Rear Upper |
| Material de la lente | Plástico |
| Peso del artículo | 14.4 onzas |
| Dimensiones del paquete | 16.02 x 3.78 x 2.6 pulgadas |
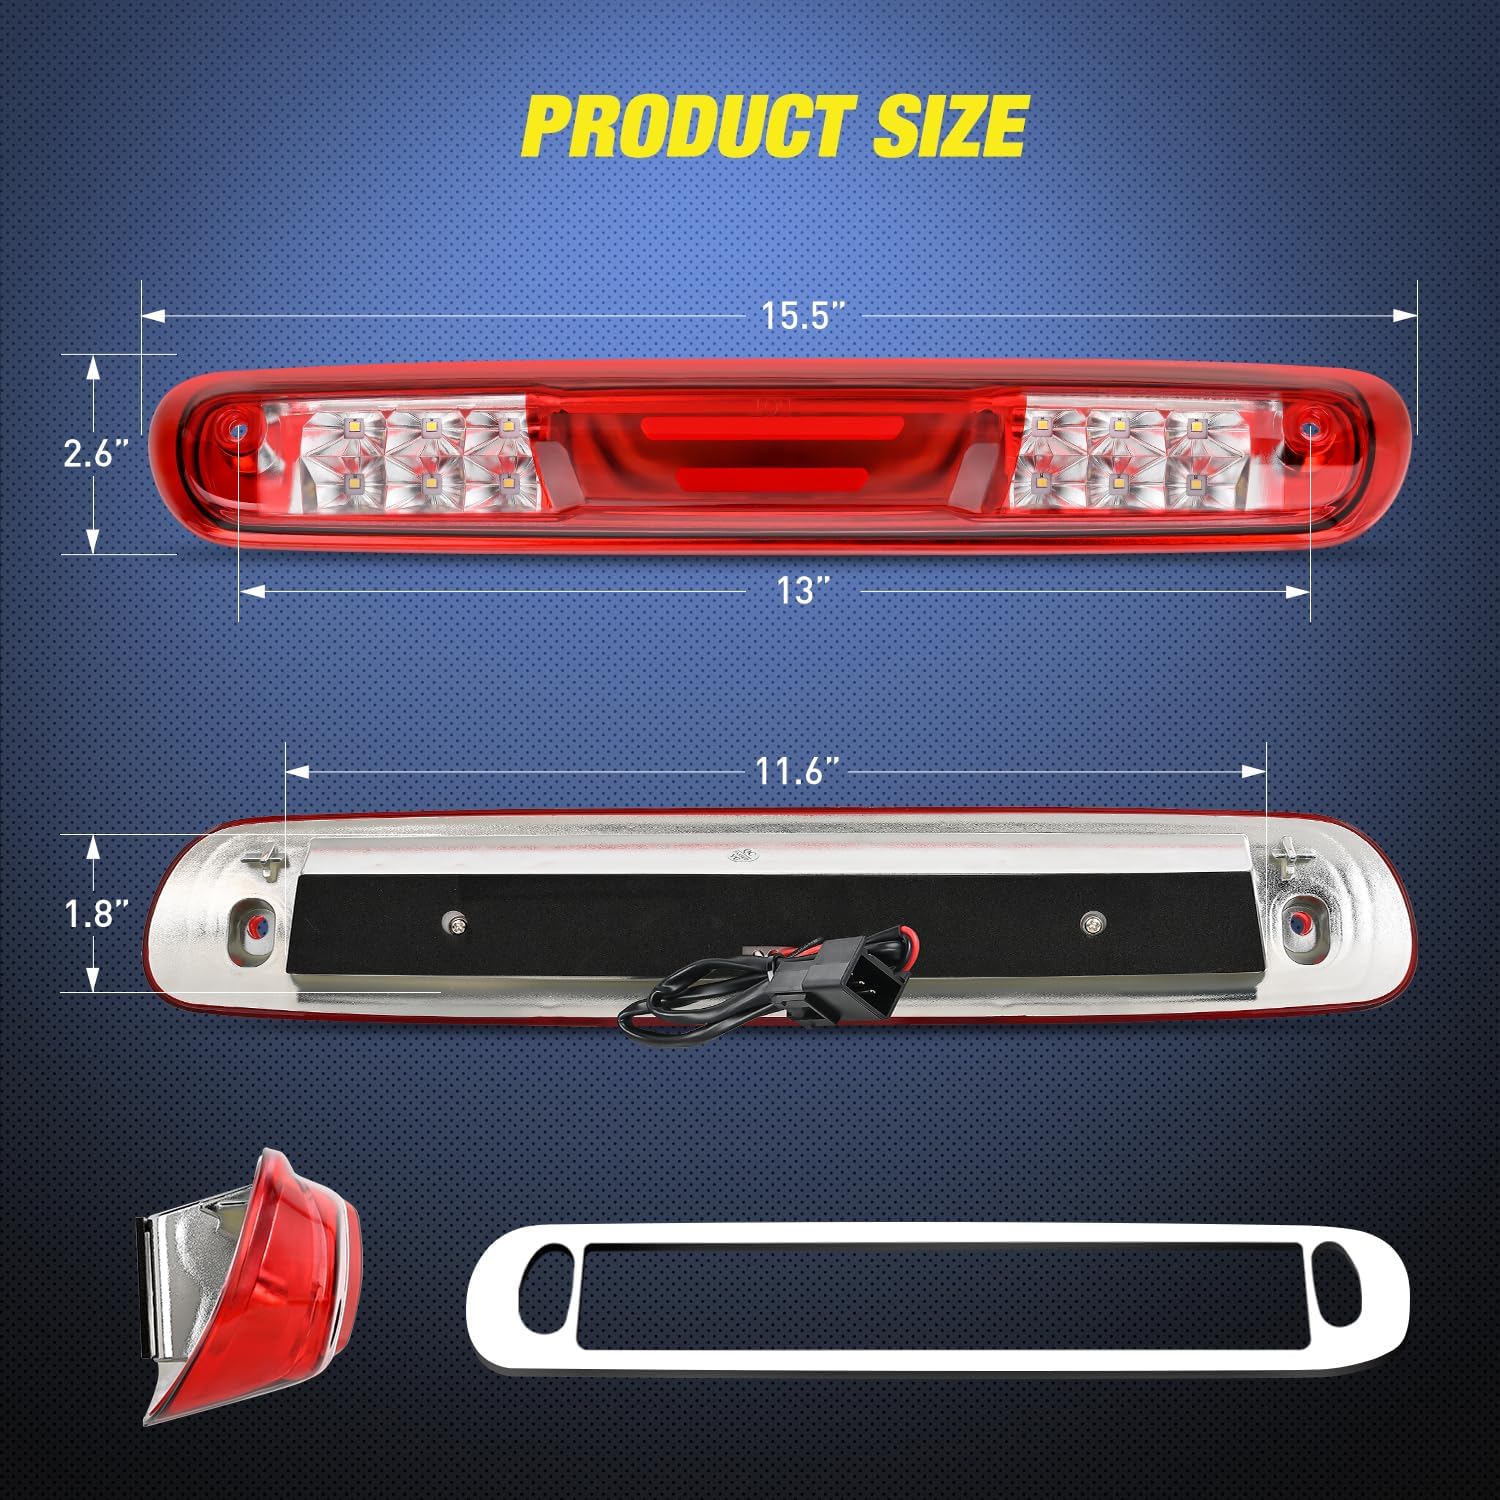
Figure 2: Product dimensions and overall appearance.

Figura 3: detallada view of product features including LED chips and connector.
4. Información de seguridad
Before beginning installation, please read and understand all instructions. Improper installation can lead to electrical issues, damage to the vehicle, or personal injury.
- Always disconnect the vehicle's battery before performing any electrical work to prevent short circuits or electrical shock.
- Use equipo de protección personal adecuado, incluidas gafas de seguridad y guantes.
- Asegúrese de que el vehículo esté estacionado en una superficie nivelada con el freno de estacionamiento aplicado.
- Si no está seguro de algún paso del proceso de instalación, consulte con un técnico automotriz calificado.
- Do not overtighten screws, especially when using power tools, as this can crack the light housing. Hand tools are recommended for final tightening.
5. Configuración e instalación
This third brake light is designed for a direct plug-and-play installation, utilizing existing factory mounting points. No drilling is required.
Pasos de instalación:
- Retire la luz vieja: Carefully remove the existing halogen third brake light assembly. Disconnect the factory electrical plug.
- Preparar la superficie de montaje: Clean any old glue residue or debris from the vehicle's frame where the new light will be mounted.
- Apply Foam Pad: Position the provided high-density foam pad onto the back of the new Nilight LED Third Brake Light assembly, ensuring it aligns correctly for a tight seal.
- Conectar el cableado: Plug the new third brake light's connector into the vehicle's factory electrical harness.
- Mount New Light: Align the new light assembly with the mounting holes on the vehicle. Use the factory screws to secure the light. Hand-tighten the screws to prevent cracking the housing.
- Funcionalidad de prueba: Reconnect the vehicle's battery. Test the brake light, reverse light, and cargo lights to ensure they function correctly before driving.

Figure 4: Easy installation steps for the third brake light.
Video 1: Demonstration of the 2007-2013 Silverado/Sierra 3rd brake light functionality and appearance. (Source: Tresound)
6. Instrucciones de funcionamiento
The Nilight NA916 LED Third Brake Light operates automatically with your vehicle's existing lighting system.
- Función de luz de freno: The red LEDs will illuminate brightly when the brake pedal is pressed, signaling to following vehicles that you are slowing down or stopping.
- Cargo Light Function: The white LEDs provide illumination for the truck bed area. This function is typically controlled by an interior switch in your vehicle.
- Reverse Light Function: The white LEDs also serve as reverse lights, illuminating when the vehicle is shifted into reverse gear, enhancing visibility when backing up.

Figure 5: The third brake light functioning as a brake light on a truck.

Figure 6: The third brake light providing cargo area illumination.
7. Mantenimiento
To ensure optimal performance and longevity of your Nilight LED Third Brake Light, follow these simple maintenance guidelines:
- Limpieza regular: Clean the lens periodically with a soft cloth and mild automotive soap to remove dirt, dust, and road grime. Avoid abrasive cleaners or harsh chemicals that could damage the lens material.
- Inspeccionar si hay daños: Periodically check the light assembly for any signs of physical damage, cracks, or loose connections.
- Integridad del sello: Although designed to be waterproof, regularly inspect the seal around the light for any signs of degradation or water ingress, especially after extreme weather conditions.

Figure 7: The third brake light's waterproof design in action.
8. Solución de problemas
If you encounter any issues with your Nilight LED Third Brake Light, refer to the following common problems and solutions:
| Problema | Posible causa | Solución |
|---|---|---|
| La luz no ilumina | Loose electrical connection, blown fuse, incorrect installation. | Check the electrical plug connection. Inspect vehicle fuses related to brake/cargo lights. Review Pasos de instalación. |
| Las luces son tenues o parpadeantes. | Poor electrical connection, low voltage. | Ensure connections are secure. Check vehicle's electrical system for proper voltage salida. |
| Humedad dentro de la lente | Improper seal during installation, damaged foam pad. | Remove the light, inspect the foam pad for damage or misalignment. Reinstall ensuring a tight, even seal. |
If the issue persists after attempting these solutions, please contact Nilight customer support or a professional automotive technician.


