1. Introducción
This manual provides detailed instructions for the safe and effective operation, setup, and maintenance of your Orion Motor Tech Auto AC Vacuum Pump Kit and 220 lb High Precision Electronic Digital Refrigerant Charging Weight Scale. Please read this manual thoroughly before use to ensure proper function and to prevent damage to the equipment or injury.

Image 1.1: The Orion Motor Tech Auto AC Vacuum Pump and Digital Refrigerant Charging Scale, shown together as a complete bundle.
2. Información de seguridad
Observe siempre las siguientes precauciones de seguridad para reducir el riesgo de lesiones o daños al equipo:
- Wear appropriate personal protective equipment (PPE), including safety glasses and gloves, when handling refrigerants or operating the vacuum pump.
- Asegúrese de que el área de trabajo esté bien ventilada para evitar la acumulación de vapores de refrigerante.
- Do not operate the vacuum pump in wet conditions or expose it to rain.
- Desconecte la alimentación antes de realizar cualquier mantenimiento o limpieza.
- Handle refrigerants according to local and national regulations.
- Mantenga a los niños y al personal no autorizado lejos del equipo durante su funcionamiento.
3. Producto terminadoview
3.1. Auto AC Vacuum Pump
The vacuum pump is designed for efficient evacuation of HVAC systems, compatible with various refrigerants including R12, R22, R134a, R410a, and R1234yf. It features a robust motor and durable construction.

Imagen 3.1: Un detalle view of the Orion Motor Tech Auto AC Vacuum Pump, highlighting its compact design and connection ports.
Componentes clave:
- Motor: 1/3 hp all-copper motor for reliable performance.
- Casing: Reinforced aluminum alloy for heat dissipation and corrosion resistance.
- Intake Filter & Trap: Protects the pump from contaminants.
- Mirilla: Allows monitoring of oil level and condition.
- Tapa de aceite: Multipurpose design with pores and filter to minimize noise and simplify oil charging.
- Mango portátil: Para facilitar el transporte.
3.2. Digital Refrigerant Charging Weight Scale
The electronic digital scale provides high precision for refrigerant charging and recovery, ensuring accurate measurements for HVAC systems. It is designed for durability and portability.

Image 3.2: The Orion Motor Tech Digital Refrigerant Charging Weight Scale, shown within its protective carrying case.
Características principales:
- Alta precisión: Provides precise measurements for refrigerant charging.
- Fast-Response Sensor: Ensures quick and reliable readings.
- Backlit LCD Controller: For clear visibility in various lighting conditions.
- Controles intuitivos: Easy to operate with ON/OFF, Z/T (Zero/Tare), and UNIT buttons.
- Construcción duradera: Built from aluminum alloy, waterproof, and suitable for various temperatures.
- Portabilidad: Compact, lightweight design with an included carrying case.
- Larga espera: Up to 60 hours of standby time, retaining the last reading after power outage.
4. Especificaciones
4.1. Auto AC Vacuum Pump Specifications
| Característica | Especificación |
|---|---|
| Modelo | RS-1.5 |
| Caudal (FAD) | 4 cfm (6.8 m³ / h) |
| Vacío definitivo | 37.5 micrones (5 Pa) |
| Potencia nominal | 1/3 hp (248 W) |
| Volumentage | 110 V/60 Hz |
| Ciclo de trabajo | 30 minutos |
| Capacidad de aceite | 0.24 cuartos de galón (225 ml) |
| Peso | 10.8 libras. |
| Dimensiones (L x An x Al) | 10.8" x 4.3" x 8.5" |
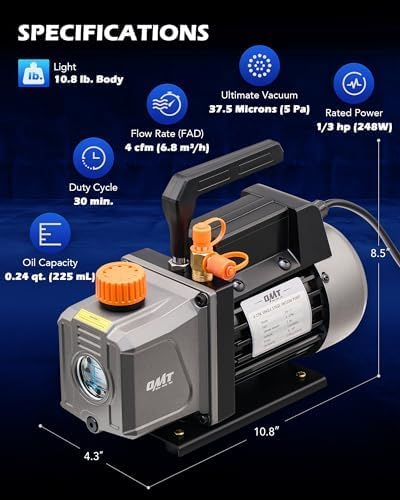
Image 4.1: Visual representation of the vacuum pump's key specifications and dimensions.
4.2. Digital Refrigerant Charging Weight Scale Specifications
| Característica | Especificación |
|---|---|
| Rango | 100 kg/220 libras |
| Exactitud | ±0.05% |
| Resolución | 5 g/0.01 libras |
| Báscula de peso corporal | 4.32 libras |
| Fuente de alimentación | 9V DC Battery (not included) |
| Temperatura de trabajo | 0 °C-50 °C/32 °F-122 °F |
| Tiempo de espera | 60 horas |

Image 4.2: Illustration demonstrating the high accuracy of the digital refrigerant scale during an AC charging process.
5. Configuración
5.1. Vacuum Pump Setup
- Colocación: Place the vacuum pump on a stable, level surface in a well-ventilated area.
- Llenado de aceite: Unscrew the oil cap. Carefully pour vacuum pump oil into the oil inlet until the oil level is between the MIN and MAX marks on the sight glass. Do not overfill.
- Conexión de energía: Connect the power cord to a grounded electrical outlet (110V/60Hz).
- Comprobación inicial: Briefly turn on the pump to ensure it operates smoothly, then turn it off.

Imagen 5.1: Primer plano view of the vacuum pump's multipurpose oil cap and oil inlet, showing the process of refilling oil.
5.2. Digital Refrigerant Charging Weight Scale Setup
- Instalación de la batería: Open the battery compartment on the back of the LCD controller and insert a 9V DC battery (not included), observing polarity.
- Colocación: Place the scale platform on a firm, level surface.
- Conexión del controlador: Ensure the coiled cable from the scale platform is securely connected to the LCD controller.
- Encendido: Press the 'ON/OFF' button on the LCD controller to power on the scale.
- Zero/Tare: Press the 'Z/T' button to zero the scale before placing any refrigerant tanks on it.
- Selección de unidad: Press the 'UNIT' button to cycle through available units (kg, oz, lb).
6. Instrucciones de funcionamiento
6.1. Vacuum Pump Operation (System Evacuation)
- Conecte las mangueras: Connect the appropriate manifold gauge set hoses to the vacuum pump and the HVAC system service ports. Ensure all connections are tight.
- Válvulas abiertas: Open the high and low side valves on the manifold gauge set.
- Arrancar la bomba: Turn on the vacuum pump. Monitor the manifold gauges to observe the vacuum level.
- Tiempo de evacuación: Allow the pump to run until the desired vacuum level (e.g., 500 microns or lower) is achieved and held steady for a specified period (consult HVAC system manufacturer specifications). The pump has a 30-minute duty cycle.
- Cerrar válvulas: Once evacuation is complete, close the manifold gauge set valves before turning off the vacuum pump.
- Desconectar: Turn off the vacuum pump and disconnect the hoses.
6.2. Digital Refrigerant Charging Operation
- Prepare Scale: Power on the scale and ensure it is zeroed ('Z/T' button). Select the desired unit ('UNIT' button).
- Coloque el tanque: Carefully place the refrigerant tank onto the center of the scale platform.
- Peso tara: If the tank is not empty, press the 'Z/T' button to tare the weight of the tank, so the display shows 0.000. This allows you to measure the amount of refrigerant added or removed.
- Conecte las mangueras: Connect the appropriate manifold gauge set hose from the refrigerant tank to the HVAC system.
- Cargar/Recuperar: Open the tank valve and the manifold gauge valve to begin charging or recovering refrigerant. Monitor the weight displayed on the scale.
- Monitor: Stop the process once the desired amount of refrigerant has been transferred, as indicated by the scale reading.
- Close Valves & Disconnect: Close all valves and disconnect hoses.

Image 6.1: The digital refrigerant scale in operation, accurately measuring the weight of a refrigerant tank connected to an AC system.
7. Mantenimiento
7.1. Vacuum Pump Maintenance
- Cambio de aceite: Regularly check the oil level and condition via the sight glass. Change the vacuum pump oil after every 10-20 hours of operation or if it appears cloudy or discolored. To change oil, drain the old oil from the drain plug and refill with new vacuum pump oil to the correct level.
- Limpieza: Mantenga el exterior de la bomba limpio y libre de residuos.
- Almacenamiento: Store the pump in a dry, clean environment when not in use.
7.2. Digital Refrigerant Charging Weight Scale Maintenance
- Limpieza: Wipe the scale platform and controller with a damp Paño. No utilice limpiadores abrasivos.
- Reemplazo de batería: Replace the 9V battery when the low battery indicator appears on the LCD. Remove the battery if the scale will not be used for an extended period.
- Almacenamiento: Store the scale in its protective carrying case in a dry place to prevent damage.
8. Solución de problemas
8.1. Vacuum Pump Troubleshooting
| Problema | Posible causa | Solución |
|---|---|---|
| La bomba no arranca | No power; Motor issue | Check power connection; Consult qualified technician |
| Poor vacuum level | Low/dirty oil; Leaks in system/hoses; Clogged intake filter | Change oil; Check all connections for leaks; Clean/replace filter |
| Ruido excesivo | Low oil level; Worn components | Check and refill oil; Consult qualified technician |
8.2. Digital Refrigerant Charging Weight Scale Troubleshooting
| Problema | Posible causa | Solución |
|---|---|---|
| La báscula no se enciende | Batería agotada; Conexión de batería suelta | Replace 9V battery; Ensure battery is properly seated |
| Lecturas inexactas | Not zeroed; Uneven surface; Overload | Press 'Z/T' button; Place on level surface; Do not exceed 220 lb capacity |
| Error de visualización | Sensor issue; Controller malfunction | Restart scale; Contact customer support |
9. Garantía y soporte
Orion Motor Tech products are designed for reliability and performance. For warranty information, technical support, or service inquiries, please refer to the contact information provided with your product packaging or visit the official Orion Motor Tech websitio.
Conserve su comprobante de compra para reclamos de garantía.


