1. Producto terminadoview
The Thermalright ARGB and Fan HUB X12 IR Black is a versatile controller designed to streamline the management of up to 12 PC fans with both PWM (Pulse Width Modulation) and ARGB (Addressable RGB) lighting. This hub simplifies cable management and provides centralized control over your system's cooling and lighting effects, either through a remote control or by synchronizing with your motherboard's ARGB signal.
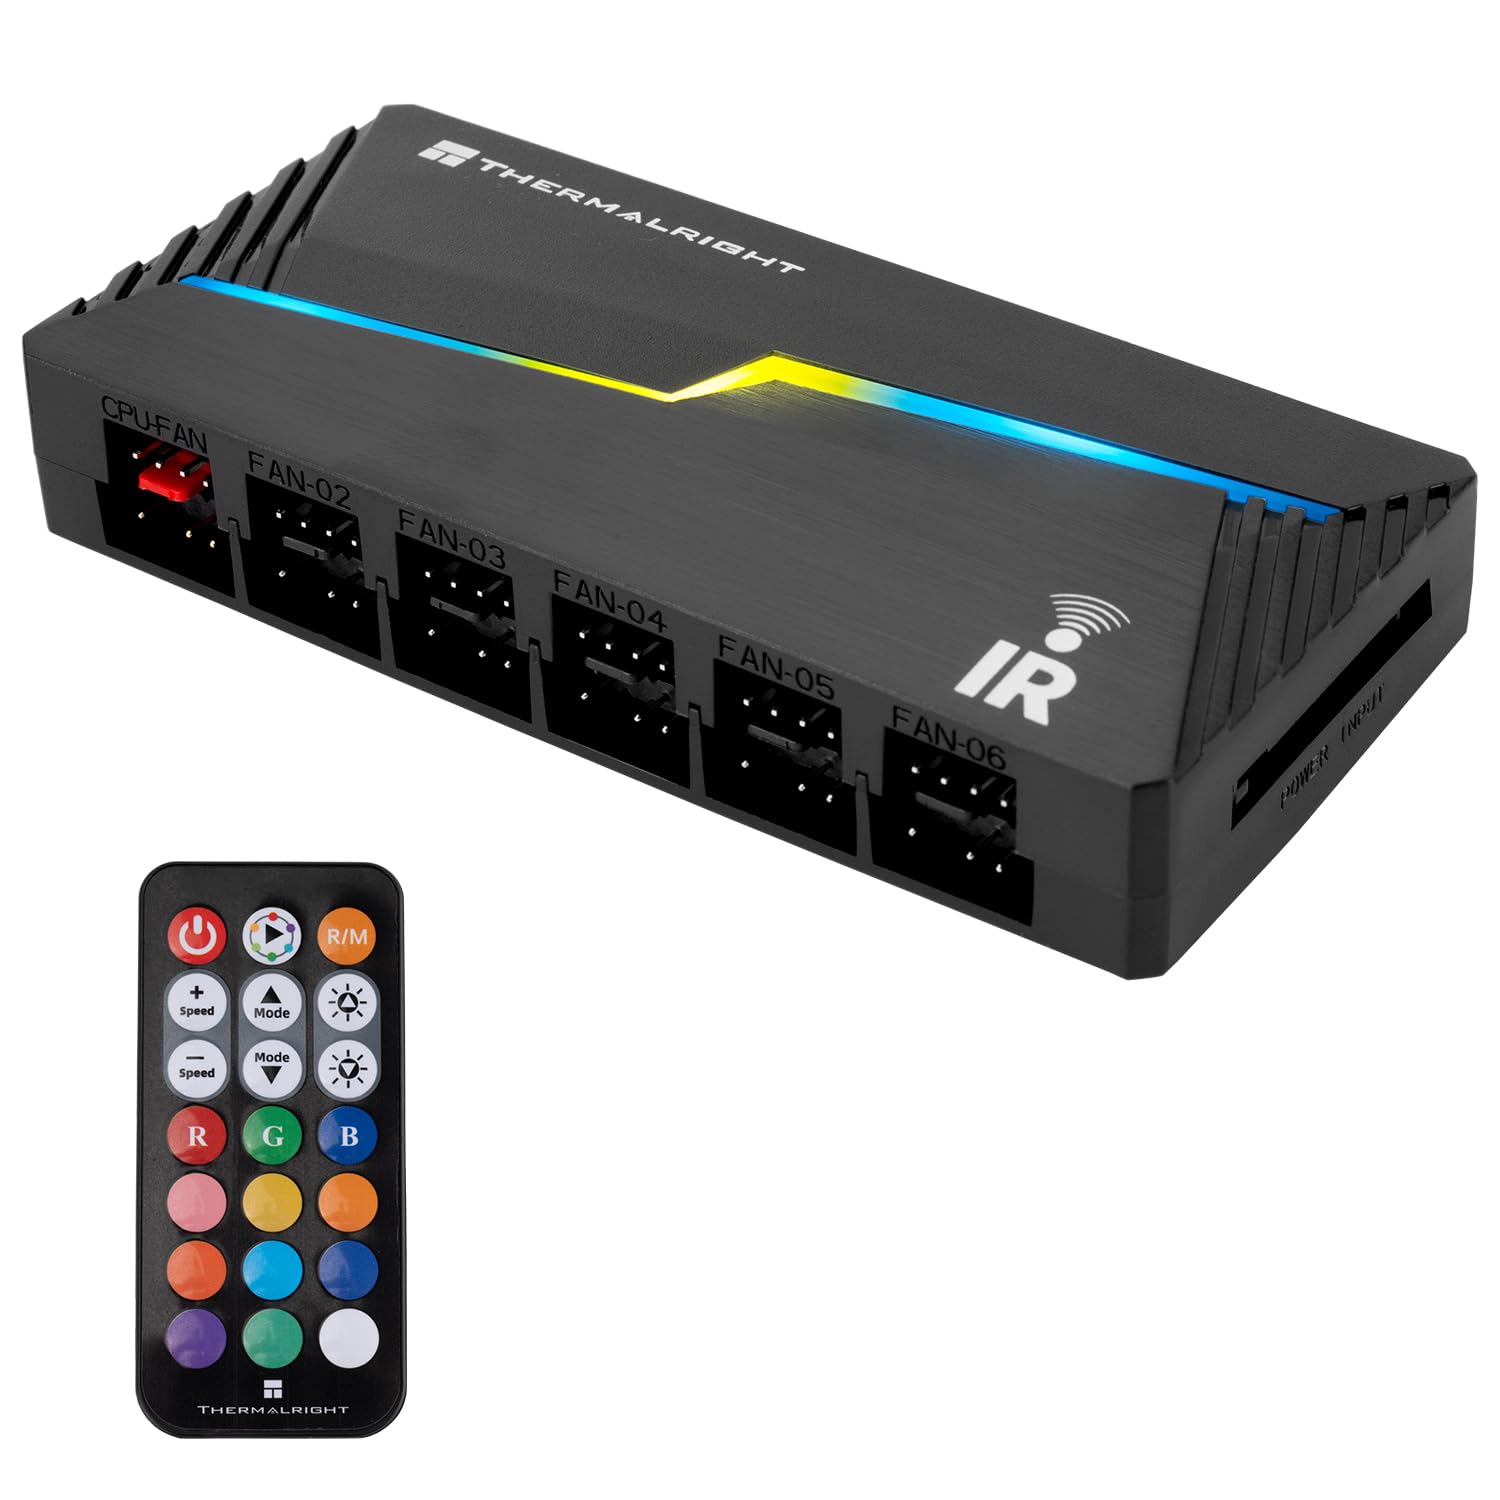
Figure 1: Thermalright ARGB and Fan HUB X12 IR Black.
The hub features dedicated ports for both 4-pin PWM fans and 3-pin 5V ARGB devices, allowing for comprehensive control and synchronization. It is powered directly via a SATA connection to ensure stable output under high loads.

Figura 2: Sobreview of the hub with various connections for fans and ARGB devices.
The compact design of the hub allows for easy installation within your PC chassis, and its dimensions are optimized for space efficiency.

Figure 3: Detailed dimensions of the Thermalright ARGB and Fan HUB X12 IR Black.
2. Contenido del paquete
Verifique que todos los artículos estén presentes en el paquete:
- Thermalright ARGB and Fan HUB X12 IR Black
- Control remoto inalámbrico
- 2-in-1 Signal Cable (for ARGB & PWM input)

Figure 4: Packaging and included components of the ARGB and Fan Hub.
3. Configuración e instalación
Follow these steps to install and connect your Thermalright ARGB and Fan HUB X12 IR Black.
Video 1: A detailed user guide demonstrating the unboxing, connection, and operation of the Thermalright ARGB and Fan HUB X12 IR.
3.1 Conexión del cable de señal
- Connect the provided 2-in-1 signal cable to the ARGB & PWM INPUT header on the hub.
- Connect the 4-pin PWM end of the signal cable to an available 4-pin fan header on your motherboard.
- Connect the 3-pin ARGB end of the signal cable to an available 5V_ARGB 3-pin header on your motherboard. Nota: Do not connect to a 12V 4-pin RGB header, as this may cause damage.
3.2 Conexión de la alimentación
Connect a SATA power cable from your power supply unit (PSU) to the POWER INPUT connector on the hub. This provides stable power to all connected fans and ARGB devices.

Figure 5: Connecting the SATA power cable to the hub for stable power delivery.
3.3 Connecting Fans
Connect your 3-pin ARGB fan cables to the 3-pin ARGB headers and your 4-pin PWM fan cables to the 4-pin PWM headers on the hub. The hub supports up to 12 fan interface connections.

Figure 6: The hub provides 12 ports for both PWM and ARGB connections.
3.4 Montaje del concentrador
The hub includes soft magnetic adhesive on its back. This allows you to easily attach and fix the hub in a suitable location within your PC chassis, promoting tidy cable management.
Figure 7: The hub can be conveniently mounted inside the PC case using its magnetic backing.
4. Operación
4.1 Configuración del control remoto
Before using the wireless remote control, ensure you remove the clear plastic film protecting the battery. This film prevents battery drain during storage.

Figure 8: Remove the plastic film from the remote control before first use.
4.2 Funciones de control remoto
The included remote control allows for easy adjustment of ARGB lighting effects. Refer to the diagram below for button functions:

Figure 9: Wireless remote control button descriptions.
- Botón de encendido: Turns ARGB lighting ON/OFF.
- Auto Lighting Effect Loop: Cycles through various pre-programmed lighting effects.
- R/M Button: Switches between hub signal control and motherboard ARGB signal control.
- Velocidad +/-: Ajusta la velocidad de los efectos de iluminación dinámicos.
- Brillo +/-: Adjusts the brightness of the ARGB lighting.
- R, G, B Buttons: Directly selects Red, Green, or Blue colors.
- Color Shortcut Buttons: Provides quick access to various static colors.
- Previous/Next Light Mode: Navigates through different lighting modes.
Nota importante: This hub addresses the shortage of fan power connectors and RGB headers. It does no support direct fan speed regulation or RGB lighting adjustment independently of the motherboard's PWM+ARGB lighting signal or the remote control. Please check your motherboard's header specifications for compatibility.
5. Gestión de cables
The design of the Thermalright ARGB and Fan HUB X12 IR Black facilitates neat wiring for your ARGB cooling fans within the PC case. By centralizing connections, it helps reduce clutter and improve airflow.

Figure 10: The hub aids in organizing fan and ARGB cables for a cleaner build.
6. Fan Speed Monitoring
The hub is capable of reading the fan speed signal from the designated red fan socket. This signal is then passed to the motherboard, allowing for monitoring of fan RPMs through your system's software.

Figure 11: The red fan socket is used for fan speed signal monitoring.
7. Especificaciones
- Modelo: FAN and ARGB HUB X12 IR Black
- Dimensiones: 108 mm (largo) x 50 mm (ancho) x 21 mm (alto)
- Material: Plástico
- Color: Negro
- Longitud del cable: 500mm (signal cable)
- Vol de entradatage: 12 Volts (via SATA power)
- Fan Interface: 12 x 4 pines PWM
- ARGB Interface: 12 x 3-pin 5V ARGB
- Control: IR Remote Control, Motherboard ARGB Sync
- Peso: Aproximadamente 5 onzas
8. Solución de problemas
- La iluminación ARGB no funciona:
- Ensure the 3-pin ARGB cable is correctly connected to a 5V_ARGB header on your motherboard, not a 12V 4-pin RGB header.
- Verify the SATA power cable is securely connected to both the hub and the PSU.
- Check if the remote control's battery plastic film has been removed.
- Press the R/M button on the remote to switch between hub control and motherboard sync mode.
- Confirm that your motherboard's ARGB software is properly configured if using motherboard sync.
- Fans Not Spinning/Controlling Speed:
- Ensure all 4-pin PWM fan cables are securely connected to the hub.
- Verify the 4-pin PWM signal cable from the hub is connected to a fan header on your motherboard.
- Note that this hub does not directly regulate fan speed; it passes the PWM signal from the motherboard. Fan speed control is managed via motherboard BIOS or software.
- El control remoto no responde:
- Reemplace la batería del control remoto si está vieja o agotada.
- Ensure there are no obstructions between the remote and the hub's IR receiver.
9. Garantía y soporte
Para obtener información sobre la garantía y soporte técnico, consulte el sitio web oficial de Thermalright. webSitio web o contacte a su vendedor. Conserve su comprobante de compra para reclamaciones de garantía.
Fabricante: Derecho térmico


