1. Introducción
Gracias por la compraasing the KODAK 7-inch Digital Photo Frame. This manual provides essential information for the safe and efficient use of your device. Please read it thoroughly before operation and retain it for future reference.
2. Producto terminadoview
2.1 Características
- 7-inch LCD panel with 1024x600 resolution and 16:9 aspect ratio for vivid photo display.
- Supports photo, video, and music playback.
- Compatible with SD/MMC cards and USB memory sticks up to 32GB (FAT32 format recommended).
- Integrated functions: Calendar, clock, and alarm.
- Easy operation via included wireless remote control and on-device buttons.
- Lightweight ABS construction suitable for tabletop or wall mounting.
2.2 Contenido del paquete
Por favor, compruebe que todos los artículos estén presentes en el paquete:
- Marco de fotos digital KODAK de 7 pulgadas
- Control remoto inalámbrico
- Adaptador de corriente
- Soporte de marco
- Manual de usuario

Image: Package contents of the KODAK 7-inch Digital Photo Frame.
3. Configuración
3.1 Desembalaje y colocación
- Retire con cuidado todos los componentes del embalaje.
- Attach the included stand to the back of the frame for tabletop use, or prepare for wall mounting (wall mount hardware is sold separately).
- Place the frame on a stable, flat surface or mount it securely on a wall, ensuring adequate ventilation.

Image: KODAK 7-inch Digital Photo Frame in tabletop and wall-mounted configurations.
3.2 Conexión de alimentación
- Connect the power adapter cable to the DC IN port on the back of the photo frame.
- Plug the power adapter into a standard electrical outlet. The frame will typically power on automatically.

Image: Connecting the power adapter.
3.3 Inserción de medios de almacenamiento
The frame supports SD/MMC cards and USB memory sticks up to 32GB. Ensure your storage media is formatted to FAT32 for optimal compatibility.
- For SD/MMC Card: Insert the SD or MMC card into the designated card slot on the side of the frame until it clicks into place.
- For USB Memory Stick: Insert the USB memory stick into the USB port on the side of the frame.

Image: Inserting an SD card.

Image: Inserting a USB memory stick.
3.4 Preparación del control remoto
Before using the remote control for the first time, remove the clear plastic insulation sheet from the battery compartment.

Image: Removing the battery insulation tab from the remote control.
4. Instrucciones de funcionamiento
4.1 Diseño y controles del dispositivo
Familiarize yourself with the ports and buttons on your digital photo frame.

Image: Back and side view of the frame with labeled ports and buttons.
4.2 Funciones de control remoto
The remote control allows for convenient operation of all frame functions from a short distance.
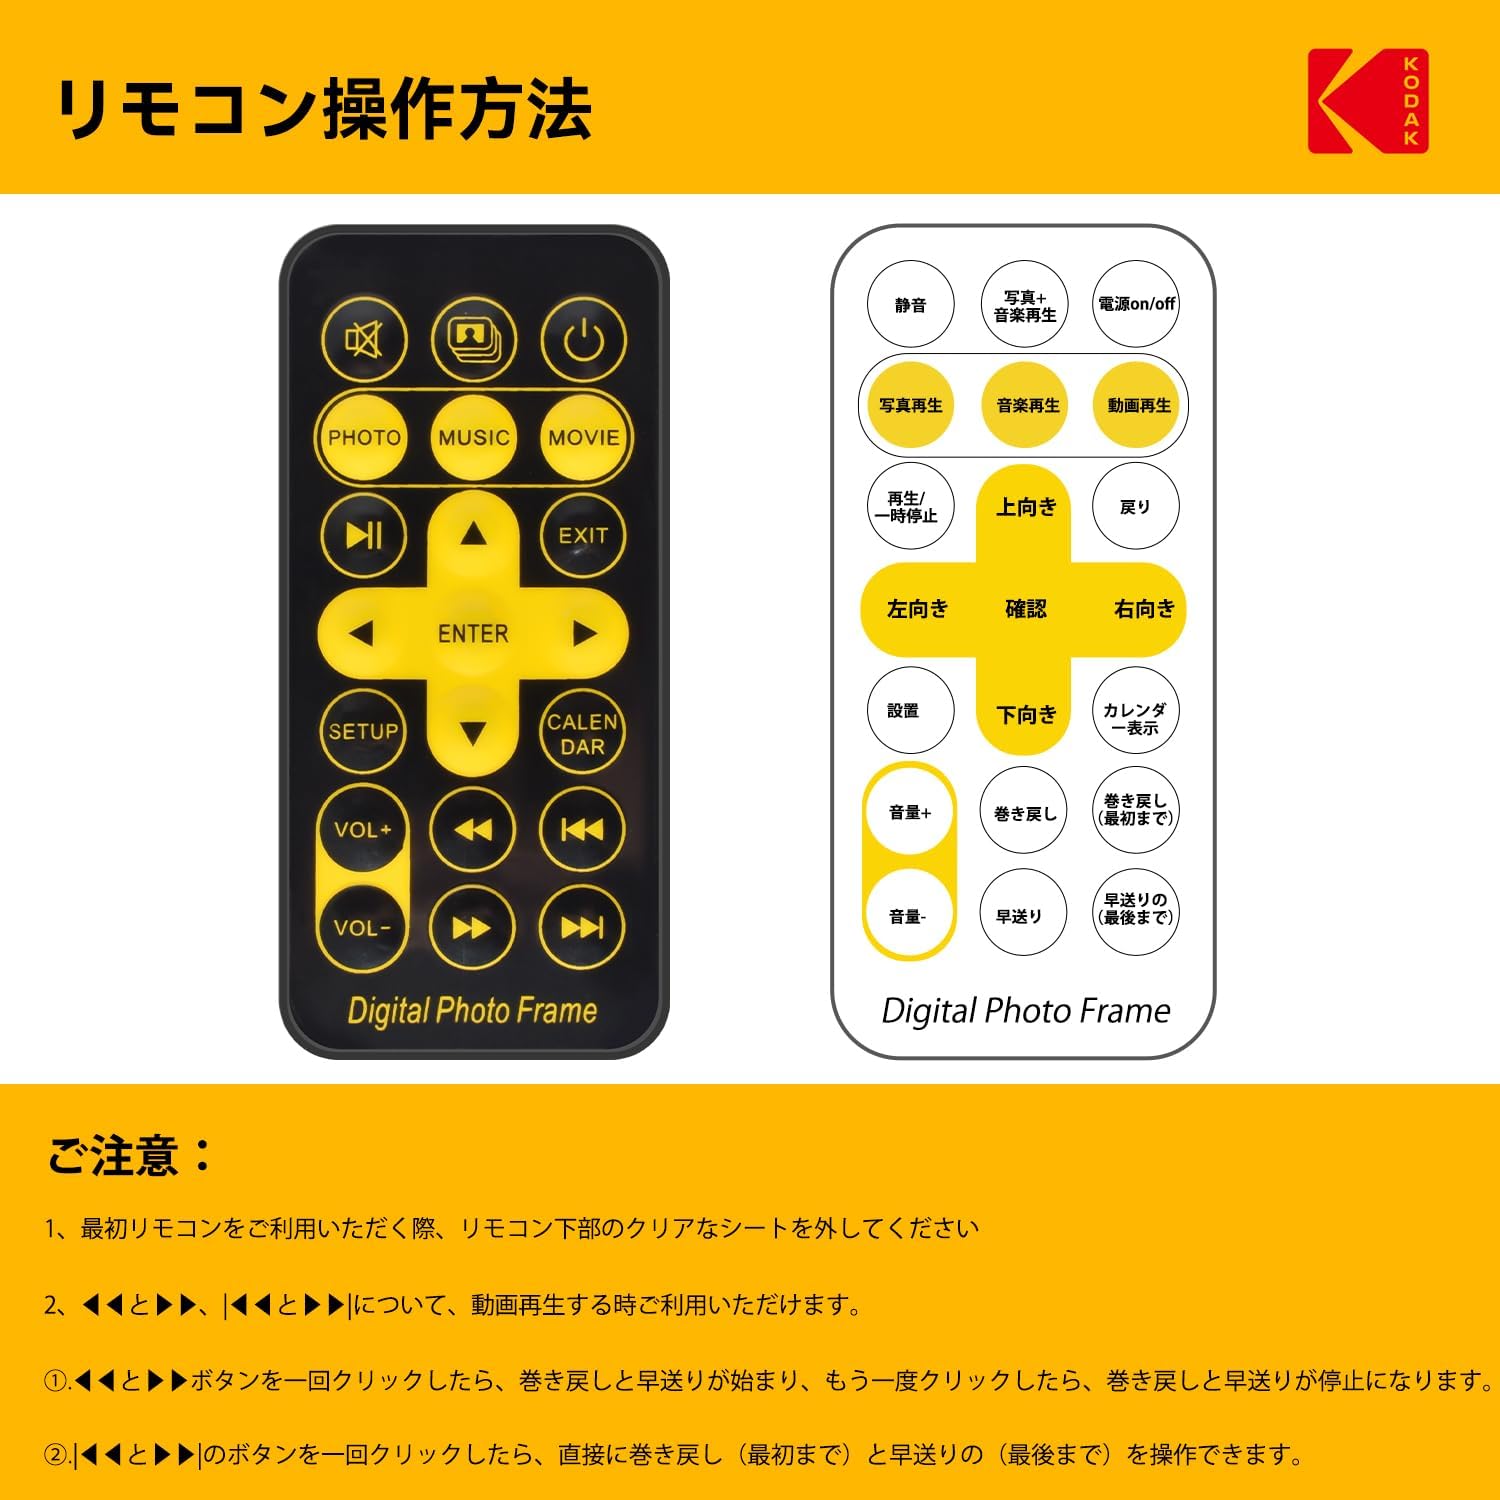
Imagen: Disposición del control remoto y funciones de los botones.
4.3 Navegación básica y reproducción
- Encendido/apagado: Press the power button on the frame or remote control.
- Select Media Source: Use the remote's 'PHOTO', 'MUSIC', or 'MOVIE' buttons to switch between media types, or navigate through the main menu using the arrow keys and 'ENTER'.
- Reproducción de fotos: Select 'PHOTO' to start a slideshow of images from the inserted storage media. Use arrow keys to navigate photos, 'PLAY/PAUSE' to pause/resume.
- Reproducción de vídeo: Select 'MOVIE' to play video files. Use playback controls (play, pause, fast forward, rewind) on the remote.
- Reproducción de música: Select 'MUSIC' to play audio files. Adjust volume using 'VOL+' and 'VOL-'.
- Combined Playback: The frame can play photos with background music simultaneously.

Image: Photo slideshow in progress.
4.4 Settings and Functions
- Menú de configuración: Press the 'SETUP' button on the remote to access system settings, including language, time, date, and display preferences.
- Calendario: Press the 'CALENDAR' button to display the calendar.
- Función de temporizador: Configure the frame to automatically power on or off at specific times to conserve energy.
- Playback Interval: Adjust the duration each photo is displayed during a slideshow using the settings menu.

Image: Playback interval settings.
5. Mantenimiento
5.1 Limpieza
- Always unplug the power adapter before cleaning.
- Utilice un paño suave, seco y sin pelusa para limpiar suavemente la pantalla y el marco.
- No utilice limpiadores líquidos, aerosoles o materiales abrasivos, ya que pueden dañar la pantalla o el acabado.
5.2 Almacenamiento
When not in use for extended periods, store the digital photo frame in a cool, dry place away from direct sunlight and extreme temperatures.
6. Solución de problemas
Si tiene problemas con su marco de fotos digital, consulte los siguientes problemas y soluciones comunes:
| Problema | Posible causa | Solución |
|---|---|---|
| El marco no se enciende. | Adaptador de corriente no conectado o defectuoso. | Ensure the power adapter is securely connected to the frame and a working electrical outlet. |
| Cannot read SD card or USB memory. | Incorrect format, unsupported file type, or faulty media. | Ensure the storage media is formatted to FAT32. Check that files are compatible (e.g., JPEG for photos). Try a different SD card or USB stick. |
| Images appear distorted or corrupted. | Unsupported image resolution or file corrupción. | Verify image file integrity on a computer. Ensure image resolution is within the frame's capabilities (1024x600 is native). |
| El control remoto no responde. | Problema u obstrucción de la batería. | Ensure the plastic insulation tab has been removed from the battery. Replace the battery if necessary. Ensure no obstructions between the remote and the frame's IR receiver. |
7. Especificaciones
- Marca: KODAK
- Número de modelo: KD-RDPF-708
- Tamaño de pantalla: 7 pulgadas
- Resolución: 1024x600 píxeles
- Relación de aspecto: 16:9
- Almacenamiento compatible: Tarjeta SD/MMC, memoria USB (hasta 32 GB, formato FAT32 recomendado)
- Conectividad: Infrarrojos (para control remoto)
- Dimensiones del producto: Aproximadamente 16 x 21 x 2.51 cm
- Peso del producto: Aproximadamente 660 g
- Funciones: Photo, Video, Music Playback, Calendar, Clock, Alarm, Timer
8. Garantía y soporte
KODAK provides quality assurance for this product. If you receive a product different from your order, experience initial defects (such as damage or missing parts), or encounter quality issues under normal use, please contact customer support.
To contact support, navigate to your Amazon account's 'Account Service' → 'Order History' → locate your order → 'Seller' → 'Ask a question'. Our team aims to provide a prompt response within 24 hours.


