1. Introducción
Thank you for choosing the ATsafepro 1/2" Digital Torque Adapter. This device converts a standard ratchet wrench into a precise digital torque wrench, providing accurate torque measurement for various applications. Please read this manual thoroughly before use to ensure proper operation and to maximize the product's lifespan.
2. Contenido del paquete
- 1x ATsafepro 1/2" Digital Torque Adapter (Measuring range: 10-200 Nm)
- 1x 3/8" Adapter
- 1x 1/4" Adapter
- 1x Hex Key (for battery cover)
- 1x Hard Storage Case (Oil-proof and shock-proof)
- 2 pilas AAA

Image: ATsafepro 1/2" Digital Torque Adapter and included accessories.
3. Características del producto
- Alta precisión: Achieves ±2% measurement accuracy for both clockwise and counter-clockwise torque.
- Smart Torque Warning System: Provides visual (LED) and auditory (buzzer) alerts at 80%, 90%, and 100% of the target torque to prevent overtightening.
- Múltiples modos de medición: Supports Track Mode (real-time display) and Peak Hold Mode (records maximum torque).
- Preset Torque Values: Allows setting up to 9 different torque presets (P1-P9) for various bolt specifications.
- Almacenamiento de datos: Stores up to 500 past measurement records for quality control and traceability.
- Conversión de unidades: Supports 5 types of units: Nm, ft-lb, in-lb, kg-cm, kg-m.
- Construcción duradera: Main body made of carbon steel for improved impact and wear resistance.
- Ahorro de energía: Automatic power-off after 2 minutes of inactivity.
- Función de luz de fondo: Ensures clear display visibility in low-light conditions.

Imagen: Más alláview of the digital torque adapter's display and controls.
4. Información de seguridad
Always wear appropriate personal protective equipment (PPE) such as safety glasses and gloves when using this tool. Ensure the adapter is securely attached to the ratchet wrench and the fastener before applying torque. Do not exceed the maximum torque capacity of the device. Keep the device away from water, extreme temperatures, and corrosive substances. Store in a dry, safe place when not in use.
5. Configuración
5.1 Instalación de la batería
- Locate the battery compartment on the back of the digital torque adapter.
- Use the provided hex key to open the battery cover.
- Inserte 2 pilas AAA, asegurándose de la polaridad correcta (+/-).
- Replace the battery cover and secure it with the hex key.
5.2 Attaching to a Ratchet Wrench
- Select the appropriate adapter (3/8" or 1/4") if needed, and attach it to the 1/2" drive of the digital torque adapter.
- Insert the square drive of the digital torque adapter (or attached adapter) into the drive of your standard ratchet wrench. Ensure a secure connection.

Image: Digital Torque Adapter connected to a ratchet wrench with various adapters.
6. Instrucciones de funcionamiento
6.1 Encendido y apagado
- To power on, press the 'C' button. The display will light up.
- The device will automatically power off after 2 minutes of inactivity to conserve battery.
6.2 selección de unidad
- Press the 'U' button to cycle through the available torque units: Nm, ft-lb, in-lb, kg-cm, kg-m. Select your desired unit.
Selección de 6.3 modos
Press the 'P/T' button to switch between measurement modes:
- Modo de seguimiento (T): Displays the real-time torque value as it is applied.
- Modo de retención de pico (P): Records and displays the maximum torque value reached during the application.
6.4 Ajuste de valores de par (modo preestablecido)
- Press the 'Up' or 'Down' arrow buttons to display the 9 preset torque values (P1-P9).
- Use the 'Up' or 'Down' buttons to select the desired preset group. After confirming the group, press the 'M' button to activate it.
- Adjust the data using the 'Up' or 'Down' buttons. Press and hold for 2 seconds to enter rapid adjustment mode.
- Once the adjustment is complete, press the 'C' button to confirm.
6.5 Smart Torque Warning System
- 80% Target Torque: Intermittent buzzer sound (pipipi) and green/yellow LED flashes.
- 90% Target Torque: Intermittent buzzer sound (pipipi) and green/yellow LED flashes.
- 100% Target Torque (Reached/Exceeded): Continuous buzzer sound (peee) and red LED lights up, indicating the target torque has been reached or exceeded. This helps prevent overtightening and potential damage.
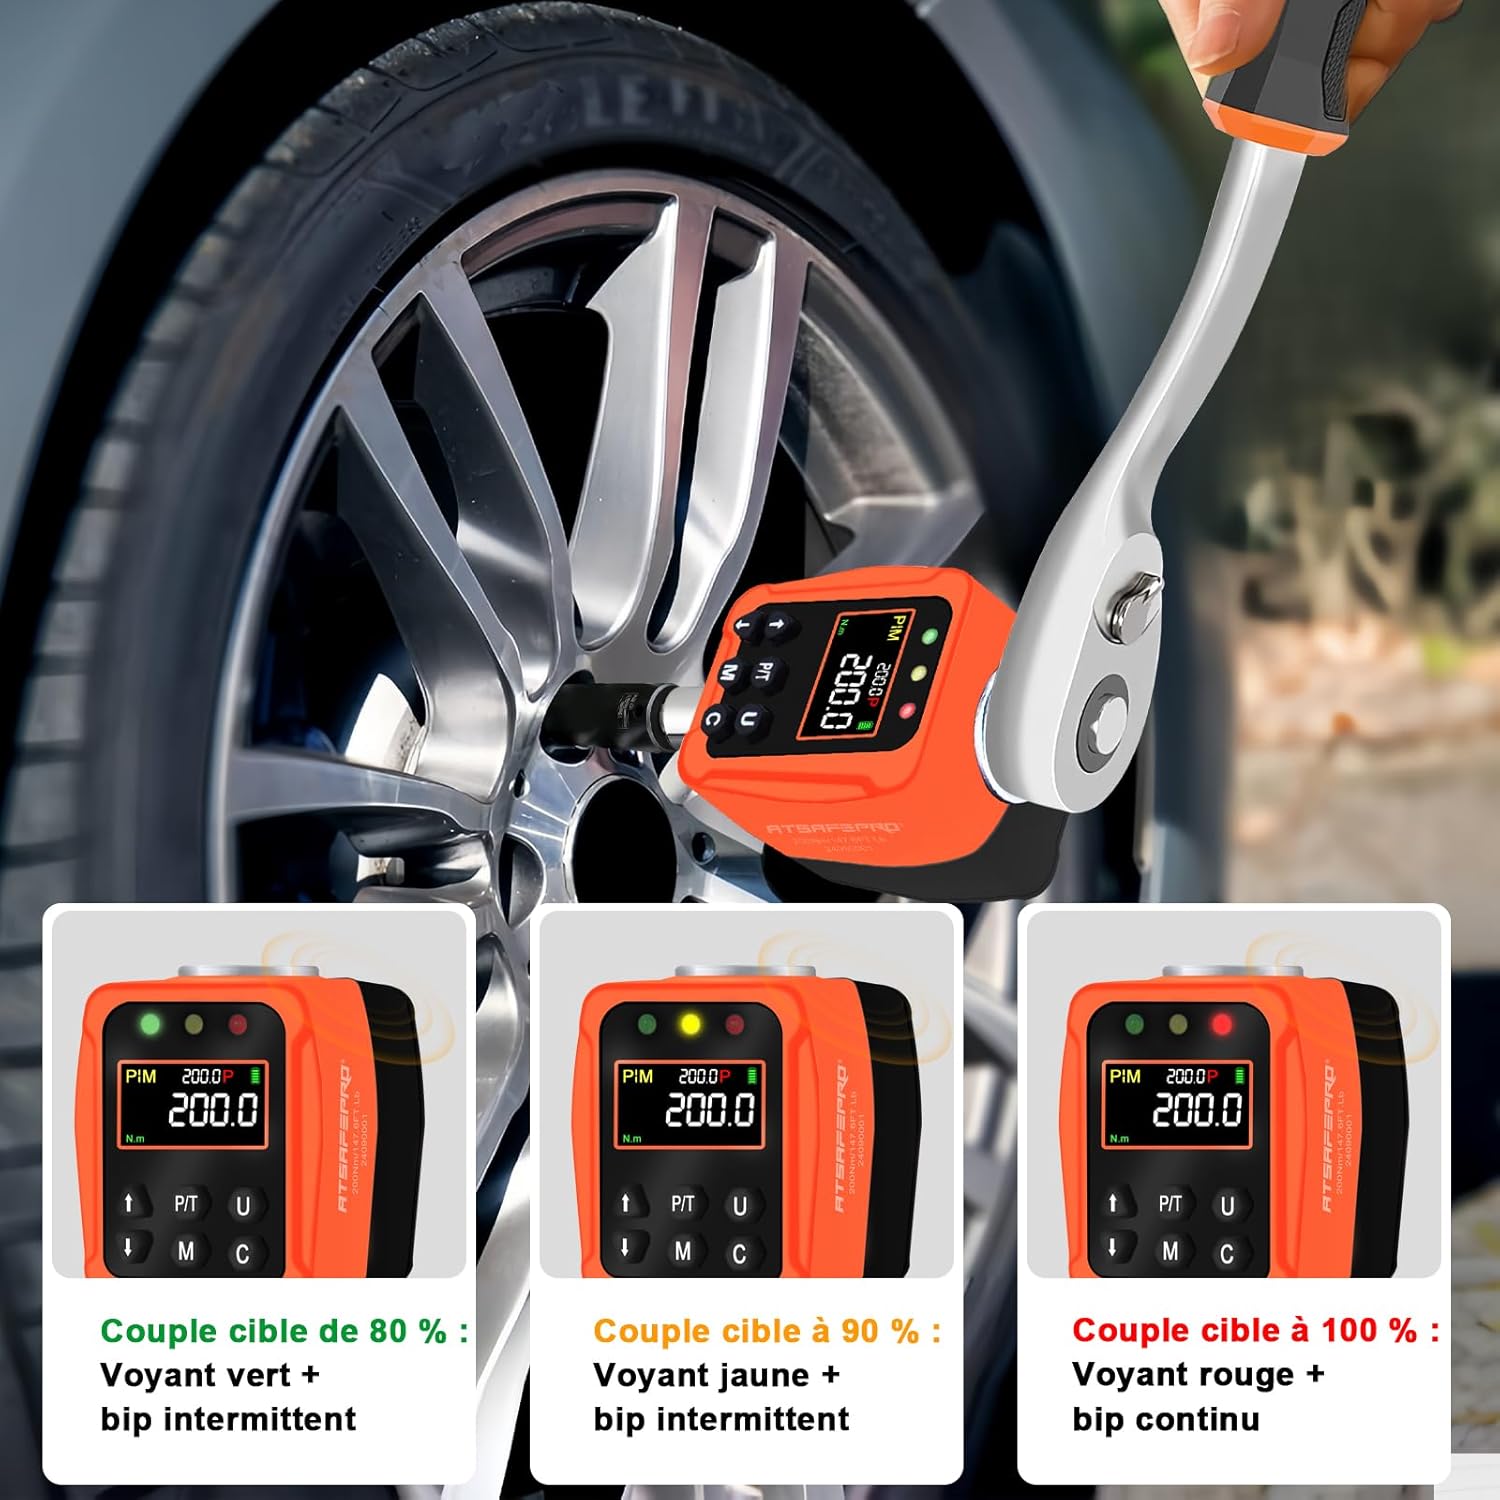
Image: Visual representation of the smart torque warning system.

Image: Display modes and unit options on the digital torque adapter.
6.6 Retrieving Saved Data
- Long-press the 'M' button to activate torque data retrieval.
- Use the 'Up' or 'Down' buttons to browse through the saved data.
6.7 Deleting Saved Data
- Long-press the 'M' button to activate torque data retrieval.
- Press the 'U' button to enter the deletion screen. 'ALL' (delete all data) and 'ONE' (delete individual data) will be displayed alternately.
- After confirming the deletion type, press the 'M' button again to execute the deletion. If 'SUCC' is displayed, the deletion was successful.
6.8 Vídeos oficiales del producto
Video: Demonstrates the usage of a digital torque meter, including setting torque values and data management. This video is provided by the seller.
Vídeo: Un overview of the digital torque meter's features and functions. This video is provided by the seller.
Video: Detailed instructions on how to use a digital torque wrench. This video is provided by the seller.
7. Mantenimiento
- Limpieza: Limpie el dispositivo con un paño suave y seco. No utilice limpiadores abrasivos ni disolventes.
- Almacenamiento: Store the digital torque adapter in its hard storage case in a dry, cool place, away from direct sunlight and moisture. Remove batteries if storing for extended periods to prevent leakage.
- Calibración: For professional use, periodic calibration is recommended to maintain accuracy. Refer to a qualified service center for calibration.
8. Solución de problemas
| Problema | Posible causa | Solución |
|---|---|---|
| El dispositivo no enciende | Baterías bajas o agotadas; Instalación incorrecta de la batería | Reemplace las baterías; Verifique la polaridad de las baterías |
| Lecturas inexactas | Device needs calibration; Improper use | Contact service center for calibration; Review Instrucciones de funcionamiento |
| El zumbador/LED no funciona | Settings issue; Device malfunction | Check settings for warning thresholds; Contact customer support |
9. Especificaciones
| Característica | Detalle |
|---|---|
| Marca | ATsafepro |
| Número de modelo | ATJ10200N-JP |
| Tamaño de la unidad | 1/2 de pulgada (12.7 mm) |
| Rango de torque | 10-200 Newton Meters (Nm) |
| Exactitud | ±2% (Clockwise/Counter-clockwise) |
| Unidades | Nm, ft-lb, in-lb, kg-cm, kg-m |
| Almacenamiento de datos | 500 registros |
| Fuente de poder | 2 pilas alcalinas AAA (incluidas) |
| Apagado automático | 2 minutos de inactividad |
| Peso del producto | 450 gramos |
| Dimensiones del paquete | 12.1 x 9.2 x 7.1 cm |
| Aplicaciones | Automotive repair, bicycle maintenance, machinery, DIY, etc. |

Image: Diverse applications of the ATsafepro Digital Torque Adapter.
10. Garantía y soporte
ATsafepro products are designed for durability and performance. For warranty information, technical support, or service inquiries, please refer to the contact information provided with your purchase or visit the official ATsafepro webSitio. Conserve su recibo de compra como comprobante para reclamaciones de garantía.


