Introducción
This manual provides detailed instructions for the setup, operation, and maintenance of your Phenyx Pro PWH-4200 Professional Wireless Microphone. Please read this manual thoroughly before using the product to ensure proper function and longevity.
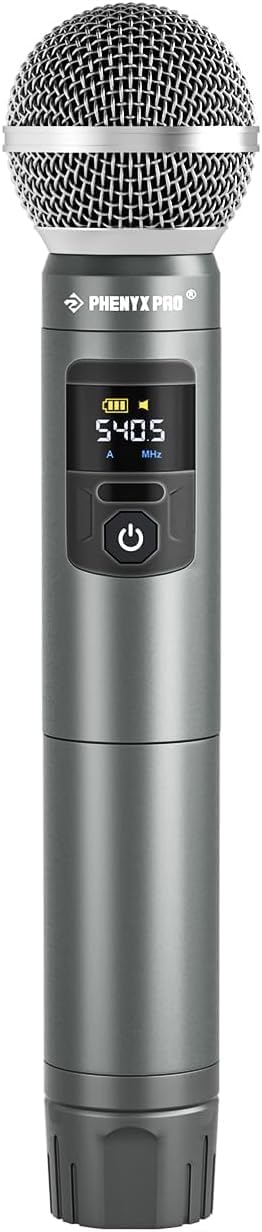
Image: The Phenyx Pro PWH-4200 Professional Wireless Microphone, a sleek gray handheld unit with a metal grille and an LCD display showing frequency and battery status.
Información importante de seguridad
- No exponga el micrófono a temperaturas extremas, humedad o luz solar directa.
- Evite dejar caer o someter el micrófono a impactos fuertes.
- No intente desmontar ni modificar el micrófono. Esto anulará la garantía.
- Mantenga el micrófono alejado del agua y otros líquidos.
- Use only specified batteries (not included) and dispose of them properly.
Contenido del paquete
The Phenyx Pro PWH-4200 package includes:
- 1 x Phenyx Pro PWH-4200 Handheld Wireless Microphone
Nota: Las baterías NO están incluidas y deben comprarse por separado.
Guía de configuración
1. Instalación de la batería
- Unscrew the bottom part of the microphone handle to access the battery compartment.
- Inserte dos pilas AA (no incluidas), asegurándose de la polaridad correcta (+/-).
- Securely screw the bottom part back onto the microphone handle.

Image: Diagram of the UHF Handheld Transmitter, highlighting the physical battery indicator, ON/MUTE/OFF button, and frequency/volume adjustment controls. The display shows frequency and battery level.
2. Compatibility and System Pairing
The PWH-4200 microphone is designed for use with New Version Phenyx Pro wireless microphone systems, specifically models PTU-52, PTU-5200, and PTU-4200. Ensure your receiver is one of these compatible models.
To synchronize the microphone with your receiver, follow these steps:

Image: Step-by-step visual guide on how to switch channels and synchronize the Phenyx Pro PWH-4200 microphone. It shows pressing the power button, then the SET button, and finally locking the setting.
- Paso 1: Encender
Press the power button on the microphone for 2 seconds to turn it on. - Step 2: Switch Channel
Presione el COLOCAR button for 3 seconds to switch the channel until the preset Channel A is switched to Channel B, or as needed for your system. - Step 3: Channel Confirmation
Observe the display to confirm the channel has switched (e.g., from Channel A to Channel B). - Step 4: Lock Setting
Turn off the transmitter (microphone). Then, long press the COLOCAR and power buttons together for 3 seconds to lock your setting. - Step 5: Confirm Synchronization
Toque el COLOCAR button to confirm the synchronization with your receiver.
Instrucciones de funcionamiento
1. Función de encendido/apagado y silencio
- To turn on the microphone, press and hold the power button for approximately 2 seconds. The display will illuminate.
- To turn off the microphone, press and hold the power button for approximately 2 seconds until the display turns off.
- To mute the microphone during operation, briefly press the power button. The display may indicate "MUTE" or a similar status. Press again to unmute.
2. Selección de frecuencia
The PWH-4200 offers 30 selectable frequencies within the 500MHz band to help avoid interference. To change the operating frequency:
- With the microphone powered on, briefly tap the COLOCAR button (located under the battery cover or near the display, refer to image). Each tap will cycle through available frequencies.
- Ensure the selected frequency matches the frequency on your compatible Phenyx Pro receiver for proper operation.
3. Ajuste del volumen
The microphone may feature a volume adjustment button (labeled VOL) for remote volume changes. Refer to your receiver's manual for overall system volume control.
4. Rendimiento óptimo
- The microphone features a cardioid dynamic cartridge, designed to pick up sound primarily from the front, reducing background noise.
- Maintain a clear line of sight between the microphone and the receiver for optimal wireless transmission. The operating range is up to 200 feet in open space.
- Evite colocar el receptor cerca de objetos metálicos grandes u otros dispositivos inalámbricos que puedan causar interferencias.

Image: Illustration demonstrating the cardioid polar pattern of the Phenyx Pro PWH-4200 microphone, showing its sensitivity to sound from the front and rejection of sound from the sides and rear. An inset shows the battery compartment.
Mantenimiento
1. Limpieza
- Limpie el cuerpo del micrófono con un paño suave y seco.
- No utilice limpiadores abrasivos, disolventes ni aerosoles químicos.
- For the microphone grille, use a soft brush to gently remove any debris.
2. Cuidado de la batería
- Replace batteries when the low battery indicator appears on the microphone's display.
- Remove batteries if the microphone will not be used for an extended period to prevent leakage.
- Deseche las baterías usadas de acuerdo con las normas locales.
3. Almacenamiento
- Guarde el micrófono en un lugar fresco y seco, alejado de la luz solar directa y de temperaturas extremas.
- If possible, store in its original packaging or a protective case to prevent damage.
Solución de problemas
| Problema | Posible causa | Solución |
|---|---|---|
| No hay sonido del micrófono |
|
|
| Interferencia o ruido estático |
|
|
| Rango de operación corto |
|
|
Presupuesto
| Nombre del modelo | PWH-4200 |
| Marca | Phenyx Pro |
| Factor de forma del micrófono | Portátil |
| Patrón polar | Unidireccional (cardioide) |
| Tecnología de conectividad | UHF inalámbrico |
| Banda de frecuencia | 500MHz band (30 selectable frequencies) |
| Rango de operación | Up to 200ft line of sight (in open space) |
| Fuente de poder | Funciona con pilas (2 pilas AA, no incluidas) |
| Dispositivos compatibles | Phenyx Pro PTU-52, PTU-5200, PTU-4200 wireless microphone systems |
| Componentes incluidos | 1 x Handle Microphone |
| Peso del artículo | 14.1 onzas (aprox. 400 g) |
| Dimensiones del paquete | 10.62 x 2.36 x 2.36 pulgadas (aprox. 27 x 6 x 6 cm) |
| Material | Construcción de metal |
Garantía y soporte
For detailed warranty information, please refer to the warranty card included with your product or visit the official Phenyx Pro website. For technical support or customer service inquiries, please contact Phenyx Pro directly or the retailer from whom you purchased the product.
Puede encontrar más información y datos de contacto en el Tienda Phenyx Pro en Amazon.


