1. Introducción
The ATOMSTACK Swift 7W Laser Engraver is a high-precision laser cutting and engraving machine designed for various materials. It features advanced spot compression technology, enabling detailed engraving and efficient cutting. This manual provides essential information for safe operation, assembly, usage, and maintenance of your device.
2. Normas de seguridad
- Protección ocular: Always wear the provided safety glasses during operation. The magnetic filter cover blocks 97% of intense light, but direct exposure to the laser beam can cause severe eye damage.
- Ventilación: Opere la máquina en un área bien ventilada para disipar el humo y los vapores producidos durante el grabado y el corte.
- Compatibilidad de materiales: Grabe o corte únicamente materiales especificados como seguros para el procesamiento láser. Evite materiales altamente reflectantes, inflamables o desconocidos.
- Supervisión: Do not leave the machine running unattended. Monitor the engraving/cutting process closely.
- Parada de emergencia: Familiarícese con el procedimiento de parada de emergencia.
- Detección de llama: The device includes a flame detector and gyroscope for enhanced safety, triggering an alarm in case of unexpected events.
3. Contenido del paquete
Verifique que todos los componentes estén presentes en su paquete:
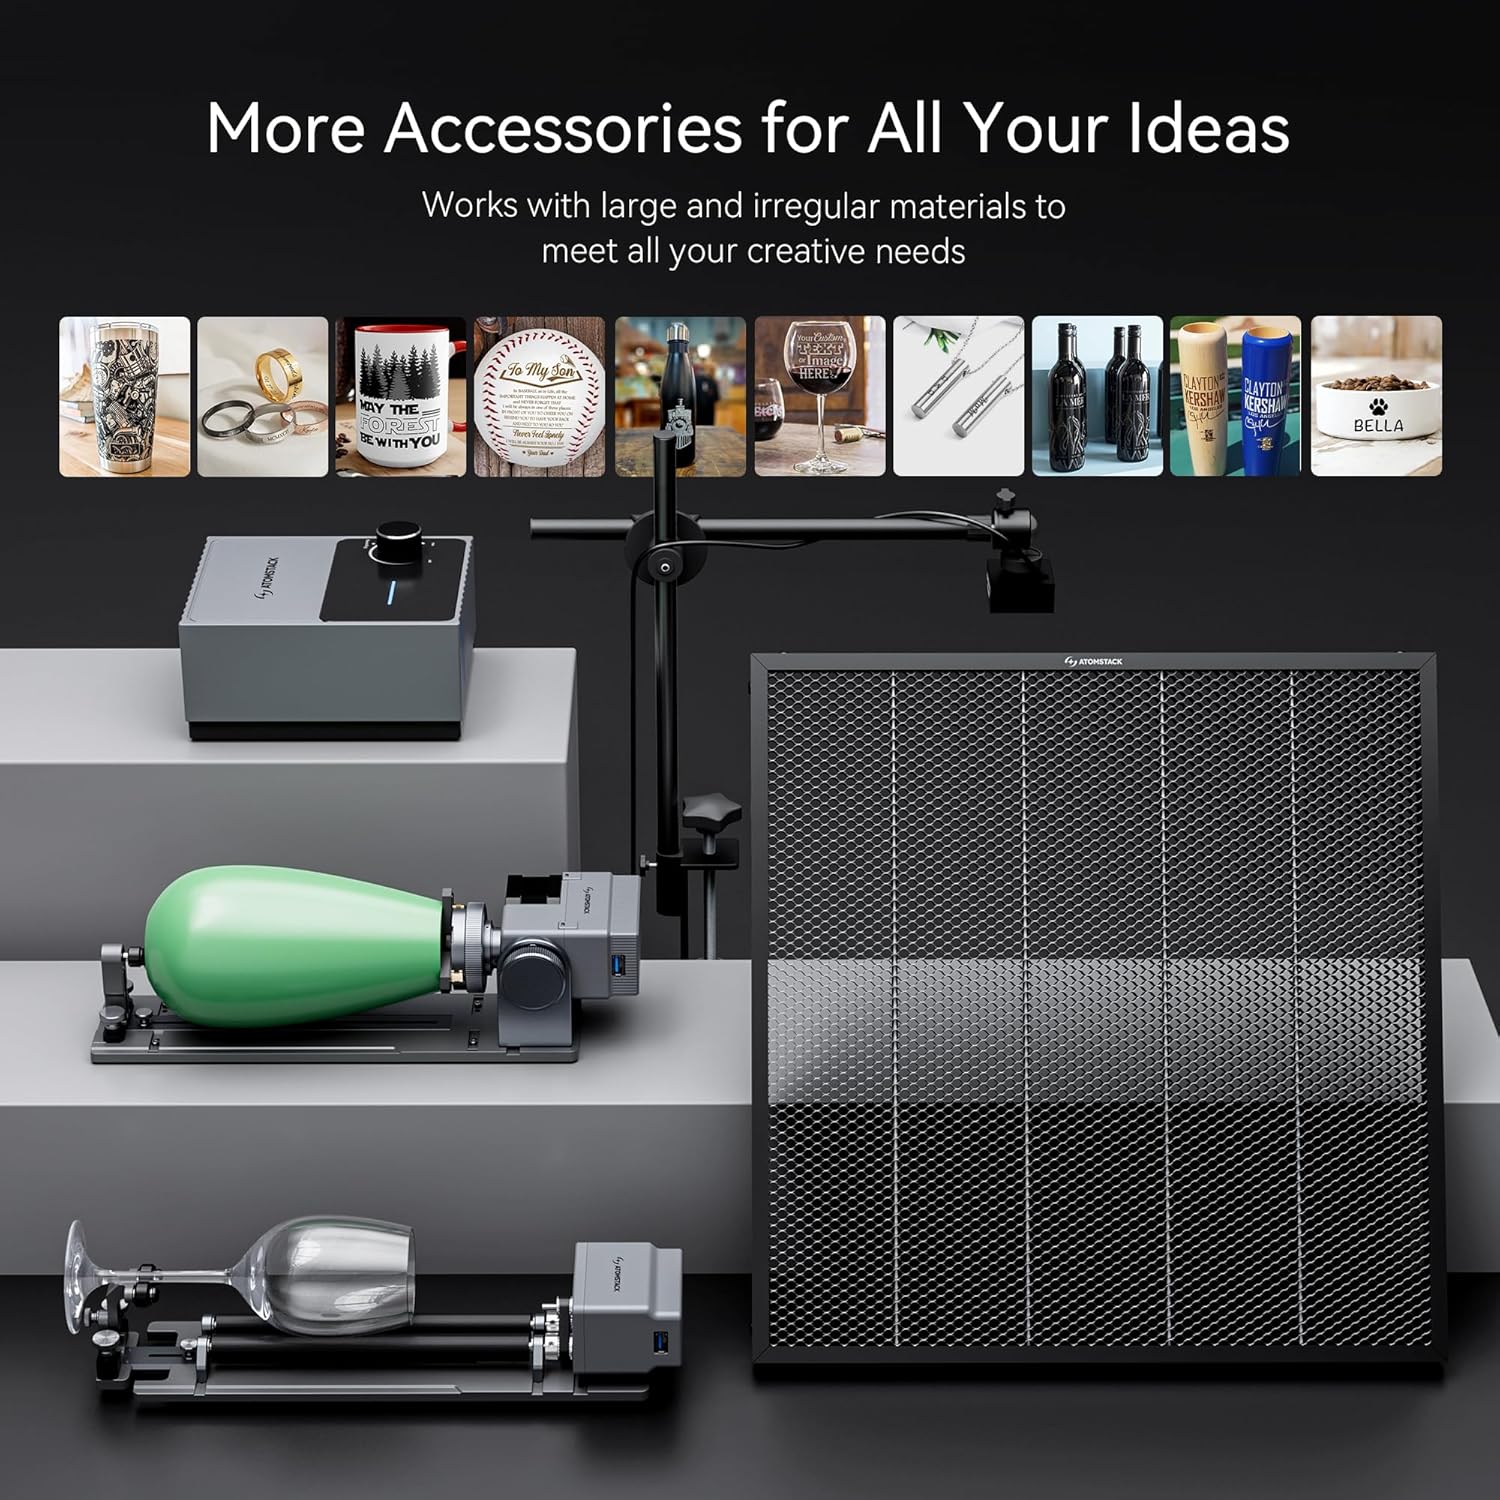
Imagen: Detallada view of all components included in the ATOMSTACK Swift 7W Laser Engraver package, laid out on a table.
- Conjunto del eje X delantero (con cable)
- Conjunto del eje X trasero
- Montaje del eje X
- Conjunto del eje Y izquierdo (con motor)
- Conjunto del eje Y derecho
- Eje óptico
- Módulo láser
- Adaptador de corriente
- Cable USB
- Manual del producto
- Correa de distribución
- H2/H2.5/H3 L-shaped Allen wrench set
- Llave inglesa
- M5×8 Screws (x6)
4. Instrucciones de montaje
The ATOMSTACK Swift 7W Laser Engraver is designed for quick and easy assembly. Follow the steps below:
- Conectar conjuntos: Align and connect the five main frame assemblies as shown in the video. Ensure the X-axis assembly's belt faces downward and the Y-axis assembly with the motor is on the left side.
- Fijar con tornillos: Use the provided M5×8 screws to securely fasten all connected assemblies.
- Instalar el eje óptico: Insert the optical shaft onto the X-axis assembly.
- Apretar el acoplamiento y la polea de distribución: Push the X-axis toward the front X-axis assembly, ensuring it is fully inserted and aligned parallel. Then, tighten the coupling and the timing pulley.
- Instalar el módulo láser: Carefully install the laser module onto the X-axis assembly and tighten the thumb screw to secure it.
- Conectar cables: Connect the motor cable, limit switch cables, and the laser module cable to their respective ports.
- Adjust Eccentric Nut: Use an open-end wrench to adjust the eccentric nut until the X-axis can slide down smoothly when the machine is tilted at 45°. This ensures proper movement and stability.
Video: A step-by-step guide demonstrating the unboxing and installation process of the ATOMSTACK Swift Laser Engraver, including connecting components and securing them.

Image: Illustration of the modular design of the ATOMSTACK Swift 7W Laser Engraver, highlighting its quick assembly process.
5. Guía de funcionamiento
5.1. Método de enfoque
To ensure optimal engraving and cutting results, proper focusing is essential. Place your workpiece on the working area, then adjust the focus by turning the side knob on the laser module until the laser spot is at its smallest and sharpest point on the material surface. If the hand-tightened screw interferes with the optical shaft, pull out the black part, rotate it outward, and then release it.
5.2. Software y conectividad
The ATOMSTACK Swift 7W Laser Engraver supports multiple software options and connectivity methods:
- Software: Compatible with LightBurn, LaserGRBL, and ATOMSTACK's proprietary PC software (AtomStack Studio) and mobile app.
- Conectividad: Connect via Type-C USB cable, standard USB cable, or wirelessly via WiFi/hotspot.
- Sistemas compatibles: Windows, macOS, Android e iOS.
- File Formatos: JPG, JPEG, SVG, PNG, BMP, PDF, G-Code, DXF.
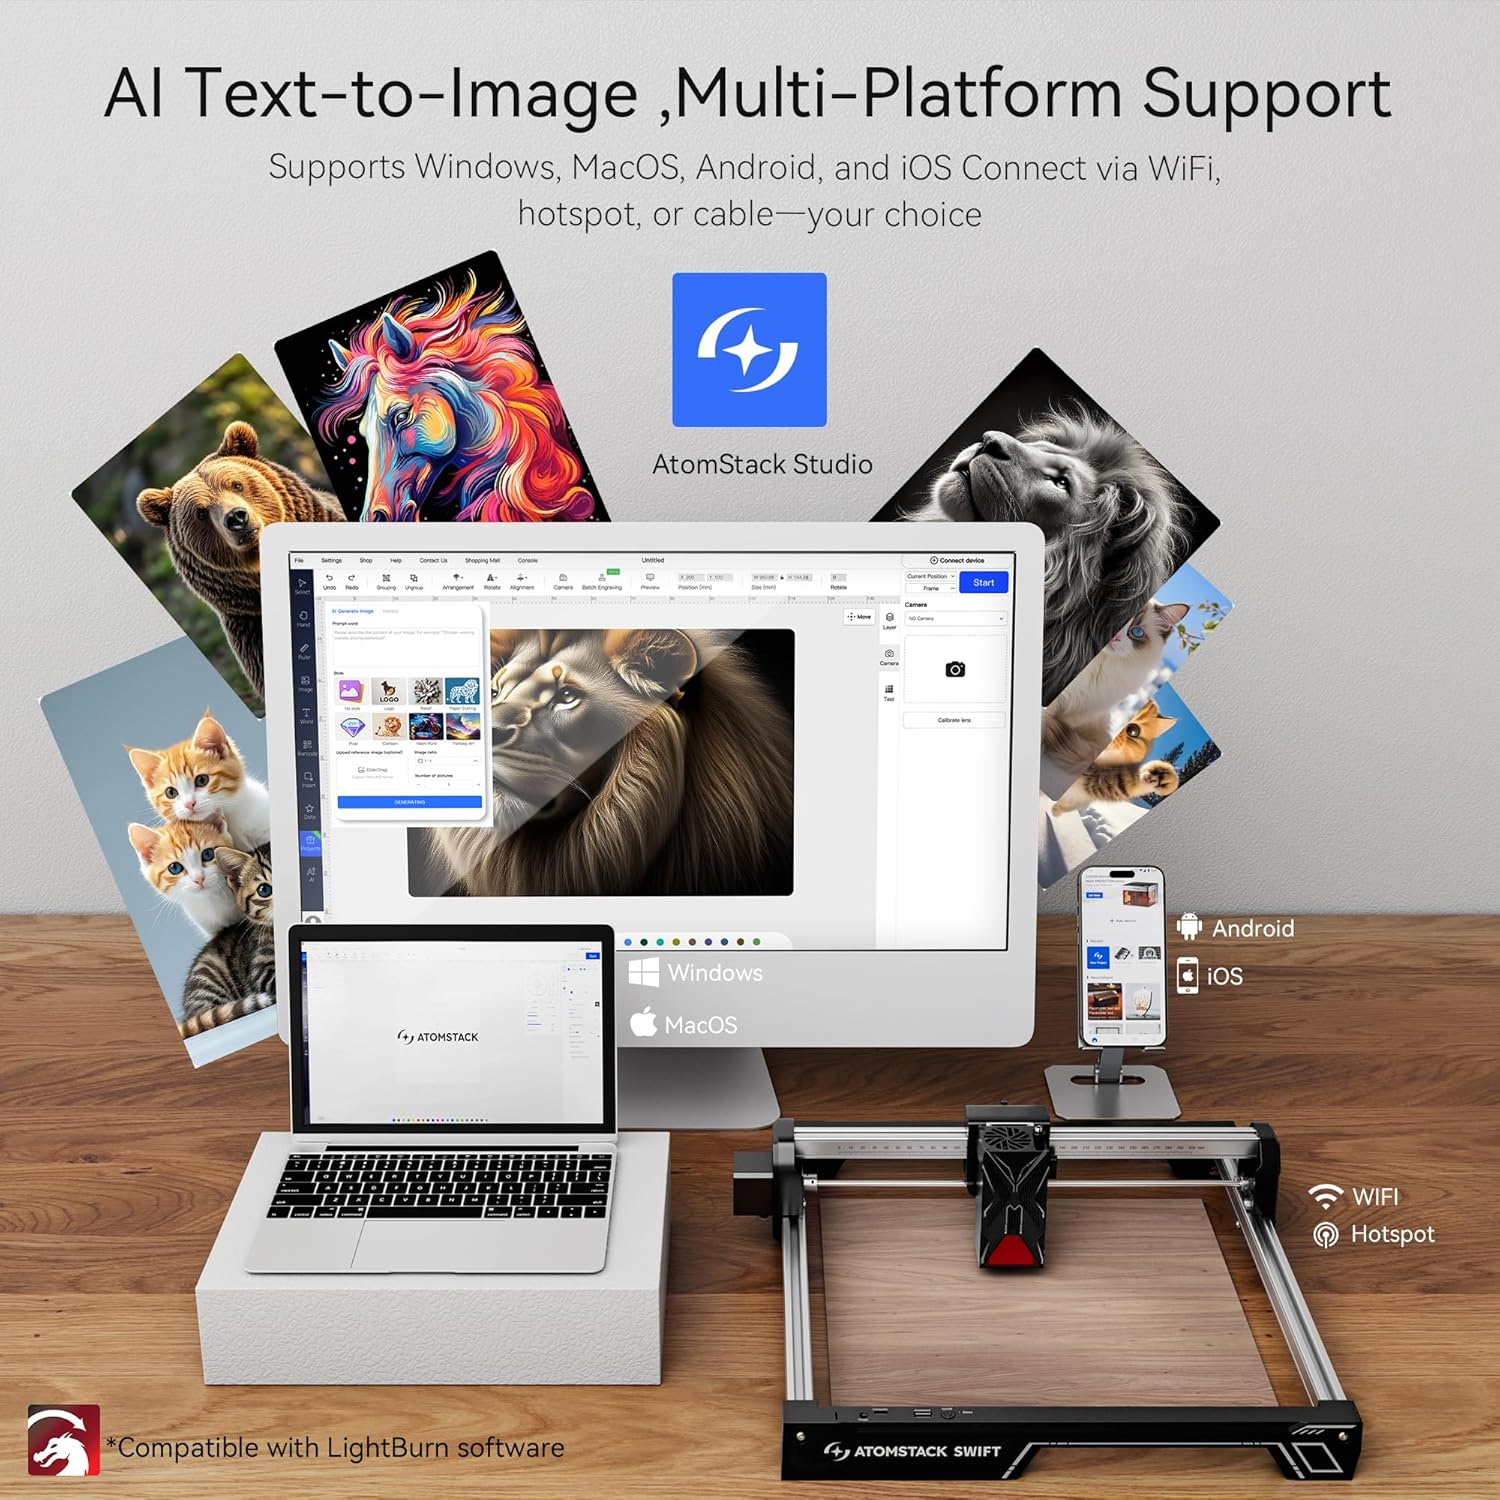
Image: Displays the ATOMSTACK Studio software interface on various devices (laptop, tablet, phone) and highlights the multiple connectivity options including WiFi and USB.
5.3. Capacidades de grabado y corte
The ATOMSTACK Swift 7W features a 7W laser power with a unique point compression technology, achieving a spot size of 0.06 x 0.08 mm for high precision. It combines high-energy cutting with precise engraving, reaching speeds of up to 400 mm/s (10000 mm/min). The engraving area is 300 x 300 mm, which can be expanded.

Image: Illustrates the precision engraving and powerful cutting capabilities of the ATOMSTACK Swift 7W, showing examples of cutting 4mm black acrylic and 8mm basswood plywood.
Video: Demonstrates the ATOMSTACK Swift Laser Engraver and Cutter in action, showcasing its ability to engrave and cut various materials with precision.
5.4. Expandability and Accessories
The engraving area can be expanded to accommodate larger projects. Various accessories are available to enhance functionality and meet diverse creative needs.

Image: Shows the large working area of the ATOMSTACK Swift 7W Laser Engraver, measuring 461.9mm x 459.1mm (18.1in x 18in).

Image: Highlights the safety features of the ATOMSTACK Swift 7W Laser Engraver, including a flame detector and gyroscope for secure operation.
6. Mantenimiento
- Limpieza: Regularly clean the laser lens and the working area to prevent debris buildup, which can affect performance and accuracy. Use a soft, lint-free cloth and appropriate cleaning solutions.
- Lubricación: Periodically lubricate the moving parts, such as the guide rails and lead screws, to ensure smooth operation.
- Inspección de cables: Check all cables for any signs of wear or damage. Replace damaged cables immediately to prevent electrical hazards.
7. Solución de problemas
- La máquina no se enciende: Ensure the power adapter is securely connected to both the machine and a working power outlet. Check the power button.
- El láser no dispara/salida débil: Verify the laser module is correctly installed and the thumb screw is tightened. Check the focus adjustment. Ensure the laser module cable is properly connected.
- Engraving/Cutting Inaccurate: Check the tightness of all screws and ensure the optical shaft is properly installed. Adjust the eccentric nut if the X-axis movement is not smooth. Ensure the workpiece is stable and not moving during operation.
- Problemas de conectividad del software: Confirm that the USB cable is properly connected or that the WiFi/hotspot connection is stable. Restart the software and the machine if necessary.
8. Especificaciones técnicas
| Característica | Especificación |
|---|---|
| Fabricante | Pila de átomos |
| Número de pieza | Rápido |
| Peso del artículo | 6.12 libras |
| Dimensiones del producto | 9.65 x 4.72 x 19.49 pulgadas |
| Número de modelo del artículo | Rápido |
| Tamaño | Swift 7W Black |
| Color | Swift 7w Black |
| Quétage | 7000 milivatios (7 W) |
| ¿Baterias incluidas? | No |
| ¿Se requieren pilas? | No |
| ASIN | B0FMKMK2ZB |
| Fecha de primera disponibilidad | 18 de agosto de 2025 |
9. Garantía y soporte
ATOMSTACK provides a 365-day warranty from the date of product receipt. Customer support is available 24/7. For any issues or inquiries, please contact the ATOMSTACK team directly via the Amazon platform for a solution within 24 hours.


