1. Introducción
This manual provides detailed instructions for the installation, operation, and maintenance of the OOYCYOO 60A MPPT Solar Charge Controller, Model EC60A. This device is designed to efficiently manage power flow from solar panels to various battery types, including 12V, 24V, 36V, and 48V systems.
Lea este manual detenidamente antes de la instalación y el funcionamiento para garantizar el correcto funcionamiento y la seguridad.
2. Características principales
- 60A MPPT Charging: Utilizes Maximum Power Point Tracking technology for efficient solar energy conversion.
- Multi-Stage Cargando: Cuenta con 4 stage battery charging algorithm (Bulk Charge, Boost Charge, Float Charge, Equalization) for optimal battery health.
- Amplio Voltagmi Soporte: Detecta y admite automáticamente sistemas de batería de 12 V, 24 V, 36 V y 48 V.
- Alta entrada fotovoltaica: Supports solar panel open circuit voltage up to 160VDC and input power up to 2800W (for 48V systems).
- Compatibilidad de la batería: Compatible with various battery types including AGM, Gel, Flooded, and Lithium (LFP), with pre-set and user-defined charging parameters.
- Alta eficiencia: Tracking efficiency not less than 98.1% and peak conversion efficiency up to 98%.
- Protección Avanzada: Includes PV over current/power, PV short circuit, PV reverse polarity, night reverse charging, battery reverse polarity, over voltage, over discharge, overheating, lithium battery low temperature, load short circuit, load overload, and TVS high voltage transitorios.
- Pantalla LCD: Integrated blacklight LCD for monitoring system status, including KWH charge amount.
- Refrigeración eficiente: Die-cast aluminum construction with built-in cooling fan for effective heat dissipation.
3. Instrucciones de seguridad
Tenga en cuenta las siguientes precauciones de seguridad durante la instalación y el funcionamiento:
- Asegúrese de que todas las conexiones sean correctas y seguras antes de aplicar energía.
- Conecte siempre primero la batería, luego el panel solar y, por último, la carga. Desconecte en orden inverso.
- No desmonte ni intente reparar el controlador usted mismo. Contacte con personal cualificado para obtener servicio técnico.
- Instale el controlador en un área bien ventilada, lejos de materiales inflamables y de la luz solar directa.
- Utilice equipo de protección personal (EPP) adecuado cuando trabaje con sistemas eléctricos.
- Asegúrese de que el volumen del sistematage no excede el volumen máximo de entrada del controladortage (160 V CC).
4. Producto terminadoview
The OOYCYOO 60A MPPT Solar Charge Controller features a robust design with an intuitive LCD display and clearly labeled terminals for easy connection.

Figura 4.1: Frente view of the OOYCYOO 60A MPPT Solar Charge Controller, showing the LCD display, control buttons, and terminal connections.

Figura 4.2: detallada view of the controller highlighting the LCD display, control buttons (SET, A, B, C, D), 5-second reset function, and clearly marked Solar Panel, Battery, and Load terminals.
4.1. Componentes e interfaz
- Pantalla LCD: Shows real-time system parameters such as PV input voltage, batería voltage, load output, and charging status.
- Control Buttons (A, B, C, D, SET): Used for navigating menus, adjusting settings, and confirming selections.
- Terminales del panel solar: Connect positive and negative leads from the solar array.
- Terminales de la batería: Connect positive and negative leads to the battery bank.
- Terminales de carga: Connect positive and negative leads to DC loads.
5. Instalación y configuración
5.1. Montaje del controlador
Mount the controller vertically on a wall or a stable surface in a dry, well-ventilated indoor location. Ensure adequate clearance around the unit for proper airflow and heat dissipation. Avoid direct sunlight, high temperatures, and humid environments.
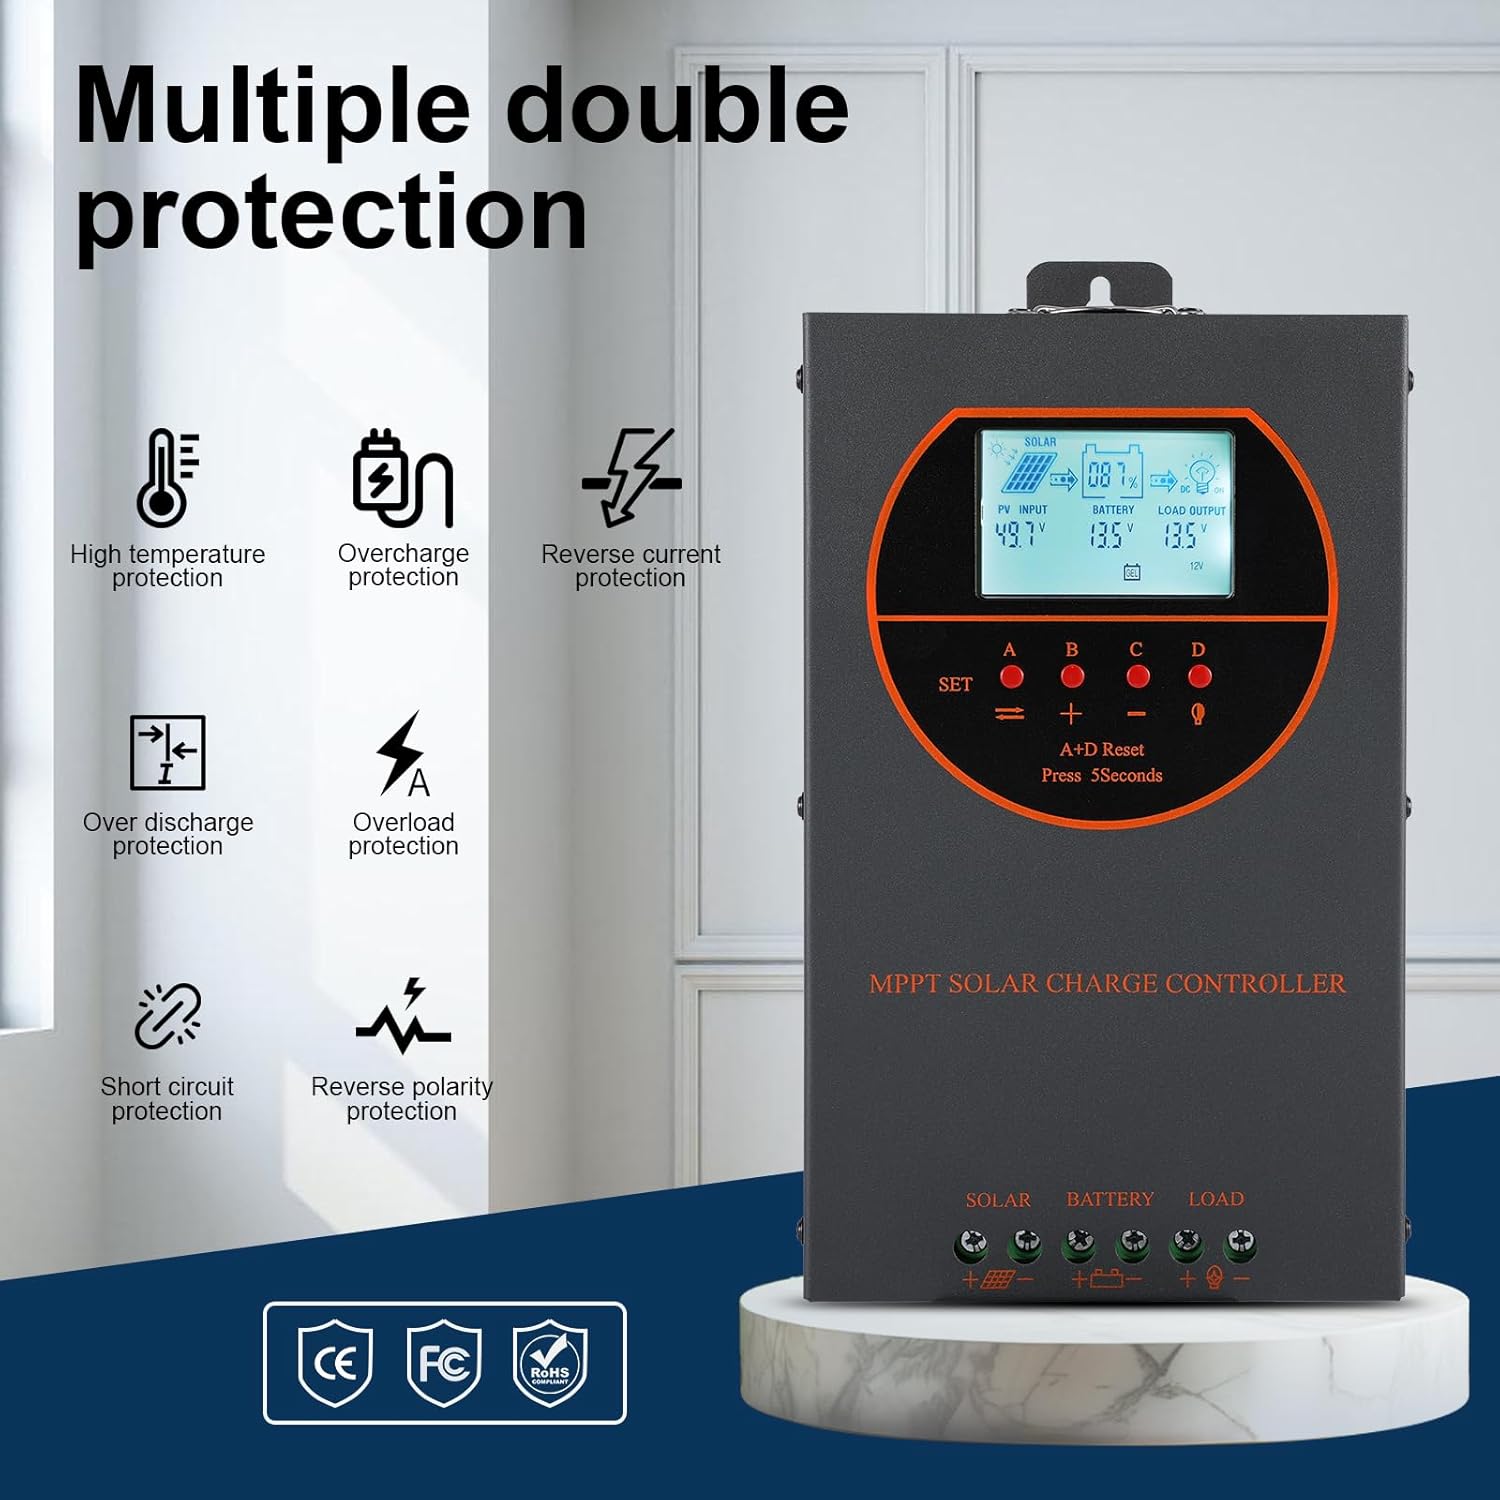
Figure 5.1: Dimensions of the OOYCYOO 60A MPPT Solar Charge Controller, showing approximate measurements of 14cm (5.5in) width, 5.5cm (2.2in) depth, and 23cm (9.1in) length.
5.2. Secuencia de cableado
Siga esta secuencia de cableado cuidadosamente para evitar dañar el controlador u otros componentes:
- Conecte la batería: Conecte los terminales positivo y negativo de la batería a los terminales correspondientes del controlador. Asegúrese de que la polaridad sea correcta. El controlador detectará automáticamente el volumen de la batería.tagy (12V/24V/36V/48V).
- Conecte el panel solar: Connect the positive and negative leads from the solar panel array to the corresponding PV input terminals on the controller. Ensure correct polarity.
- Conecte la carga de CC (opcional): Connect the positive and negative leads of your DC load to the corresponding load terminals on the controller.
Importante: Siempre conecte primero la batería y desconecte primero el panel solar al desmontar el sistema.

Figure 5.2: Illustrative wiring diagram showing connections from solar panels to the controller, then to the battery, and finally to DC and AC loads via an inverter. This diagram also shows the possibility of connecting two 60A controllers in parallel for increased capacity.
5.3. Volumen del sistematage and Power Configuration
The controller automatically identifies the battery system voltage. Ensure your solar panel array's open circuit voltage (Voc) and maximum input power are within the specified limits for your battery system:
| Sistema de batería | máx. Volumen de circuito abierto fotovoltaicotage (voc) | Máxima potencia de entrada fotovoltaica |
|---|---|---|
| 12 V | ≤72 V | 720 W |
| 24 V | ≤108 V | 1440 W |
| 36 V | ≤144 V | 2100 W |
| 48 V | ≤160 V | 2800 W |

Figure 5.3: Diagram illustrating the connection of multiple PV modules in series to the controller, with a table detailing recommended system parameters for 12V, 24V, and 48V systems, including battery float voltage, bajo voltage protección, recuperación voltage, and maximum input power.
6. Operación
6.1. Pantalla LCD e indicadores
The LCD display provides real-time information about the solar charging system. Key indicators include:
- Entrada fotovoltaica: Muestra el volumen actualtagy energía de los paneles solares.
- Batería: Muestra el volumen actual de la batería.tage y estado de carga.
- Salida de carga: Indica el estado de la salida de carga de CC.
- kWh: Displays the total accumulated charge in kilowatt-hours.
6.2. Selección del tipo de batería
The controller is compatible with various battery types. You can select the appropriate battery type through the controller's settings menu to ensure optimal charging. Supported types include:
- GEL
- Asamblea General Anual
- USER (user-defined parameters)
- SEL (Sellado)
- FLD (Inundado)
- LI (Litio)
- LiFePO4

Figure 6.1: Diagram illustrating the controller's strong adaptability to various battery types (GEL, AGM, USER, SEL, FLD, LI, LiFePO4) and a graph showing the 4-stage charging process: Bulk Charge, Constant Charging (Boost), and Float Charge.
6.3. Charging Algorithm
El controlador emplea un tiempo de respuesta de 4 s.tage charging algorithm to maximize battery life and performance:
- Carga a granel: Delivers maximum current to rapidly charge the battery to approximately 80% capacity.
- Carga de impulso: Carga la batería a un volumen más alto.tage to ensure full charge and equalization.
- Carga flotante: Mantiene la batería a un volumen seguro.tage para evitar la autodescarga y la sobrecarga.
- Igualdad: Sobrecarga periódicamente las baterías inundadas para equilibrar el volumen de la celda.tages and prevent sulfation. (Applicable to flooded batteries only, if enabled).
7. Mantenimiento
El mantenimiento regular garantiza la longevidad y el rendimiento óptimo de su controlador de carga solar:
- Comprobar conexiones: Inspeccione periódicamente todas las conexiones del cableado para comprobar su estanqueidad y ausencia de corrosión.
- Controlador limpio: Keep the controller clean and free from dust. Use a dry cloth to wipe the exterior. Ensure ventilation openings are not obstructed.
- Rendimiento del monitor: Regularly check the LCD display for normal operating parameters. Note any unusual readings.
- Inspección de la batería: Inspect batteries for any signs of damage, leakage, or corrosion. Clean battery terminals as needed.
8. Solución de problemas
This section addresses common issues you might encounter with the OOYCYOO 60A MPPT Solar Charge Controller.
8.1. Problemas comunes y soluciones
| Problema | Posible causa | Solución |
|---|---|---|
| No hay pantalla/El controlador no se enciende | Batería no conectada o con bajo volumentage; polaridad inversa. | Verifique las conexiones de la batería y el vol.tage. Asegúrese de que la polaridad sea correcta. Cargue la batería si el vol.tage es demasiado bajo. |
| Sin carga solar | Solar panel not connected; reverse polarity; low sunlight; PV over-voltage / actual. | Check solar panel connections and polarity. Ensure sufficient sunlight. Verify PV voltage and current are within limits. |
| La carga no funciona | Load not connected; load short circuit; overload; battery low voltage. | Check load connections. Inspect for short circuits or overloads. Ensure battery has sufficient charge. |
| Sobrecalentamiento del controlador | Mala ventilación; entrada de carga/fotovoltaica excesiva. | Ensure adequate airflow around the controller. Reduce load or PV input if consistently overheating. |
8.2 Funciones de protección
The controller includes multiple protection features to safeguard the system:
- PV Sobrecorriente/Potencia
- PV cortocircuito
- Polaridad inversa PV
- Carga inversa nocturna
- Polaridad invertida de la batería
- Batería sobre vol.tage
- Sobredescarga de la batería
- Battery Overheating, Controller Overheating
- Baja temperatura de la batería de litio
- Cortocircuito de carga
- Sobrecarga de carga
- TVS de alto volumentage Transitorios

Figure 8.3: Visual representation of the multiple protection features integrated into the controller, including low voltage, overheat, short circuit, reverse protection, overload, and overcurrent protection.

Figura 8.4: Interna view of the controller, highlighting key components such as copper coil transformers and capacitors, which contribute to its robust performance and protection features.
9. Especificaciones técnicas
| Parámetro | Especificación |
|---|---|
| Corriente de carga nominal | 60A |
| Volumen nominal del sistematage | Identificación automática de 12 V/24 V/36 V/48 V CC |
| Volumen de la bateríatage Rango | 9 V ~ 55 V |
| máx. Volumen de circuito abierto fotovoltaicotage | 160 V CC |
| Potencia máxima de entrada fotovoltaica (sistema de 12 V) | 720 W |
| Potencia máxima de entrada fotovoltaica (sistema de 24 V) | 1440 W |
| Potencia máxima de entrada fotovoltaica (sistema de 36 V) | 2100 W |
| Potencia máxima de entrada fotovoltaica (sistema de 48 V) | 2800 W |
| Terminal de poder | 6-12 AWG |
| Dimensiones (L*An*Al) | 11 x 6 x 2.5 pulgadas (aprox. 27.9 x 15.2 x 6.3 cm) |
| Peso | 4.07 libras (aprox. 1.8 kg) |
| Eficiencia de seguimiento | ≥98.1% |
| Eficiencia máxima de conversión | Hasta el 98% |
| Enfriamiento | Die-cast aluminum housing, built-in cooling fan |
| Tipos de batería compatibles | AGM, Gel, Flooded, Lithium (LFP), Sealed, User-defined |
| Material | Aluminio |
| Número de modelo del artículo | EC60A |
| Código Postal | 750864834470 |
10. Soporte y contacto
For technical support, warranty claims, or further assistance, please contact OOYCYOO customer service through the retailer where the product was purchased or visit the official OOYCYOO store on Amazon:

