Guía del usuario del control de persianas inteligentes Pulse PRO Automate RTI

AUTOMATIZAR PULSE PRO SOBREVIEW
Mejore su experiencia con Automate integrando fácilmente las persianas motorizadas Automate en los sistemas de control RTI. Automate Pulse PRO ofrece una potente integración con control discreto de persianas y comunicación bidireccional, que proporciona actualizaciones en tiempo real sobre la posición de las persianas y el nivel de batería. Con conectividad Ethernet (CAT 5) e inalámbrica de 2.4 GHz, Pulse PRO garantiza una integración fluida con la domótica gracias a un puerto RJ45 de fácil acceso ubicado en la parte posterior del concentrador. Cada concentrador admite hasta 30 persianas, lo que lo convierte en una solución versátil para cualquier sistema de domótica.
EMPEZANDO:
In order to integrate your motorized window treatments with RTI Control System, you will need to have:
- Downloaded the free Automate Pulse PRO via the Apple App Store (available under iPhone /iPad apps) or the Google Play Store.
- Purchased one or more Automate Pulse PRO depending on size of the space and additional repeaters if is required.
- Integrated your motorized window treatments onto Automate Shades App.
INSTRUCTIONS INCLUDED:
- Set up instructions for both the Automate Shades App & Automate Pulse PRO.
- RTI Driver Installation Specification.
- RTI Control System Driver Operating Guide.
- Integration Diagram.
- Integration FAQ’s.
REVISIÓN HISTÓRICA:
- Initial release of the driver.
INFORMACIÓN GENERAL:
- The Automate Pulse PRO Operating Guide for information on setup of the system. This driver is for control and feedback only. Setup of the Automate Pulse PRO Hub must be completed prior to setting up driver. Contact Rollease Acmeda for information on how to complete setup using the Hub and App. This driver is for the Automate Pulse PRO Hub only and control motors (i.e. shades) via TCP Communication.
AJUSTES DE CONEXIÓN: The Network TCP is the only method for communicating with the Pulse PRO Hub. Enter the IP Address of the Hub in the TCP Address field.
MOTOR COUNT (i.e. Shade Count): Enter the number of motors (Shades) that this Pulse PRO is controlling using the App to have the same capability on RTI Control System Driver.
MOTOR NAME (i.e. Shade Naming): Enter a unique name for each motor (i.e. shade). When the driver is running on the processor, the Motor or Shade name is updated automatically accordingly named on the Automate Shades App.
MOTOR ADDRESS (i.e. Shade Address): Enter the motor address that corresponds to the motor (i.e. shade) to be controlled. This address is acquired during the Automate App setup on the system.
DRIVER COMMAND: The control commands are available for movement of motors (i.e. shades) up and down as well as adjusting the shade to a discrete level by entering a value as a percentage.
DRIVER VARIABLES: Feedback variables are available for initialization state, connection state, and motor (i.e. shade) specific.
DRIVER INSTALATION:
- Desempacar el equipo:
• In this case, were used XP3 Processor and a KX3 Touch Panel to exemplify the communication between the RTI Control System and Automate Pulse PRO.
• XP3 – Use provided power supply to power up processor. Also connect to network (make sure to use ethernet connection and not RS-232). If you have a POE connection, then the XP-3 can be powered that way as well.
• KX3 – Use provided power supply (has a RJ-45 end) to power the KX3 through the Control Port on the back of the unit. Connect this to the network as well. If you have a POE connection, then the KX3 can be powered that way as well. - Descomprime el file Contiene el controlador y sample file. Copiar el controlador file (Rollease Pulse.rtidriver) to Integration Designer’s Control Driver Library (Documents\Integration Designer\Control Drivers). We will open the sample file in Integration Designer APEX
- Load Integration Designer APEX onto your computer and launch software.
- Open provided Integration Designer APEX file (Rollease Pulse Sample File.apex) del File menú.

- Use the Automate Shades App to get the Hub IP address. On Manage Hub screen, you have the full Hub information. Enter “Hub IP Address” as one variable on the connection settings on Integration Designer Software.

- En este exampSe usaron solo dos motores/cortinas. El número de motores determinará cuántos motores se mostrarán disponibles en la lista inferior. Añada un nombre de motor único para cada motor de la lista e ingrese la dirección del motor para cada cortina, según la información disponible en la aplicación Automate Shades en la pantalla del dispositivo.

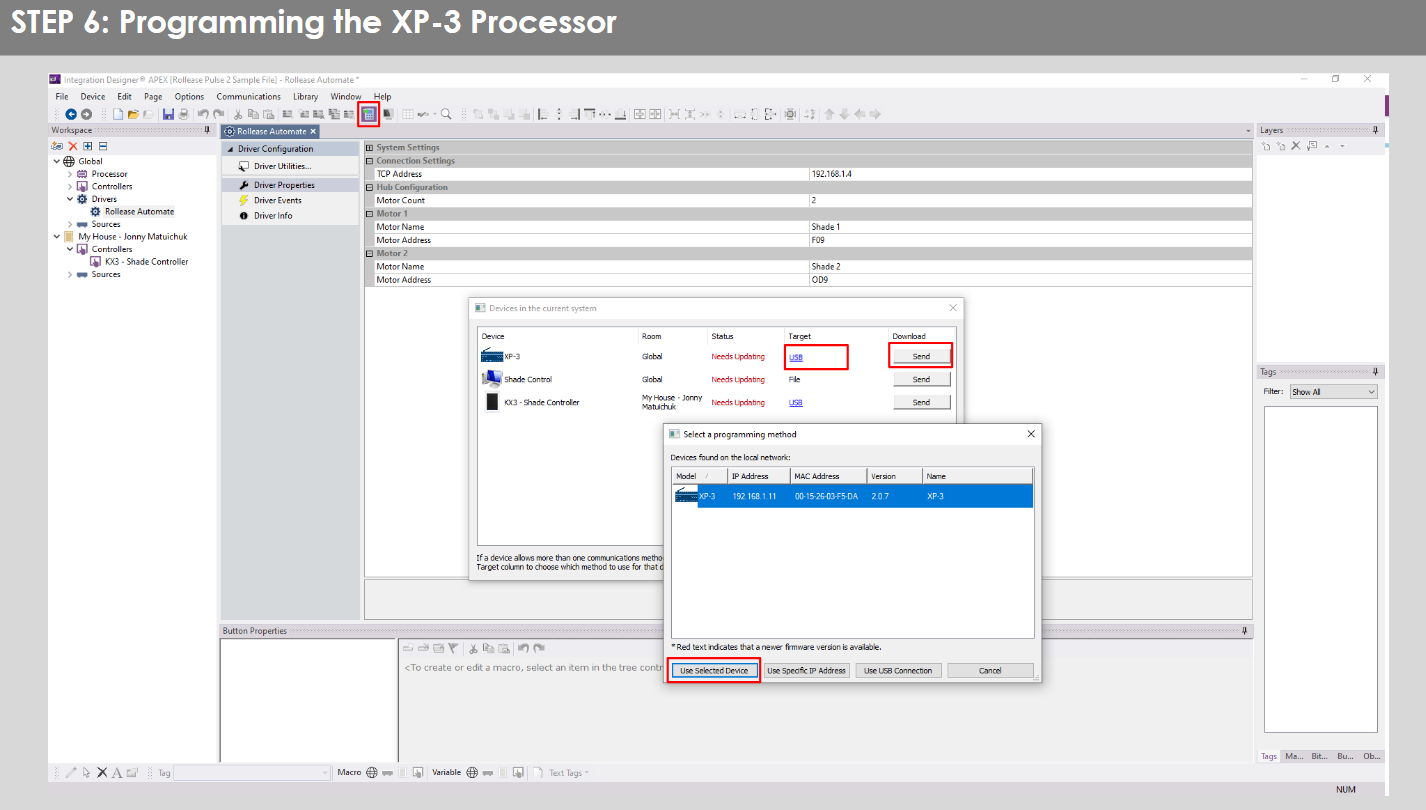
- Click on the “Download” icon from the top toolbar. This will open a screen with all devices available on Integration Designer. After that, click on the “USB” link that corresponds to your processor (in this case for the XP-3) in the Target column. When clicking that, a new window will open that shows all processors in your system. Select that one it corresponds to your processor and click on “Use Select Device”. Then after the window closes click the “Send” button in the Download column.
- Repeat the same process for KX3 Touch Pad.

- There is also a Virtual Panel control provided in the file que creará un controlador para su computadora.


- To launch the Virtual Panel, click the “Send” button like you did with the previous devices. Since this is a virtual device you will be directed to save the Virtual Panel to a location on your computer.

- Once you save the Virtual Panel it will launch.

Errores comunes:
- Ingresar una dirección IP incorrecta en la línea de configuración “Dirección IP”.
If you’re failing to communicate with the devices, double check this!
CONEXIÓN DEL SISTEMA DE CONTROL RTI:

PREGUNTAS FRECUENTES:
Q. No Pulse PRO detected.
A. Make sure that your Automate Pulse PRO is connected to the correct network and get an IP Address available and still communicating with the network using the Automate Shades App.
P. Los límites de sombra no están establecidos correctamente.
A. Calibrate shade limits with your Rollease Acmeda remote before setting the appropriate open and close time within RTI Control System.
P. Shade no se mueve en absoluto.
A. Make sure the selected Pulse PRO Hub is the correct Pulse PRO Hub for the shade to be controlled. Confirm the correct bindings are set in the RIT Control System connections tab between the Pulse PRO Hub and Shade drivers.
Q. We get unexpected responses from the RTI system, or “?” symbols
A. Asegúrese de que todas las conexiones que utilizan el puerto Ethernet o Wi-Fi funcionen correctamente. Se sabe que la conexión perdida produce resultados no deseados o inesperados.
RECURSOS DE APOYO:
Para obtener más ayuda, comuníquese con su distribuidor, visite nuestro websitio en www.rolleasacmeda.com
Documentos / Recursos
 |
AUTOMATE Pulse PRO Automatiza el control de persianas inteligentes RTI [pdf] Guía del usuario RTI, Pulse PRO Automate Control de persianas inteligentes RTI, Automate Control de persianas inteligentes RTI, Control de persianas inteligentes, Control de persianas |